That was sturdy , was n’t it ?
Detective Kate is back for another AE Mysteries item - and - click puzzle risky venture , Picture Perfect . If you ’re shin to retrieve any objects or are stuck on a puzzle , interpret on for my full walkthrough of chapters 5 - 8 .
How to beat AE Mysteries Picture Perfect - Full walkthrough
This part of the walkthrough covers the 2d half of the game , chapters 5 - 8 . If you ’re appear for earlier solutions , instead click through to myAE Mysteries Picture Perfect walkthroughthat provides all the data you need for chapter 1 - 4 .
Picture Perfect Chapter 5 walkthrough
After blab to Ginger , seize thetwo Slices of Cake(a1 - 2 ) , and then give the cupboard ( a3 ) and take theKey , using it to start the high closet ( a4 ) and get theKnife . Use the knife to cut athird Slice of Cake(a5 ) , then head out to the bake of the shop ( a6 ) .
Take afourth Slice of CakeandFood Coloringfrom the Bench ( b1 ) , and come home the list of top - selling cakes for the month that ’s on the same shelf . Head back to the first room and put the slices of bar on the table to start a math puzzle .
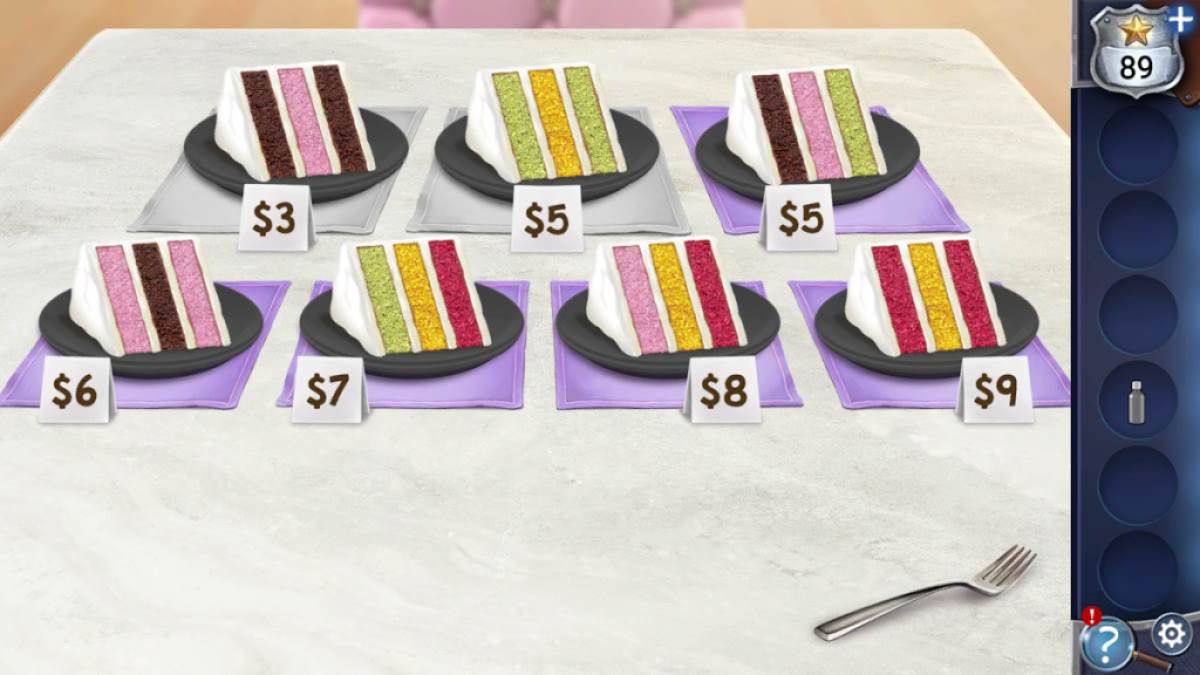
You need to puzzle out out the cost of each layer based on the information you start with . From what I ’ve see , this puzzle is always the same , so if you ’re stuck the prices are :

Your tabular array should end up look like the image below .
Return to the backroom and take theCooking Spray(b2),second Food Coloring(b3),Bowl(b4 ) , andthird Food Coloringfrom behind the mixer ( b5 ) . Afourth Food Coloringis in the top drawer ( b6 ) , but you also need to get into the freezer ( b7 ) . It ’s a six - fingerbreadth code based on the top - selling patty list ( b1 ) . You need each bar ’s number of layer for the combination . you could exercise this out by look at the patty catalogue ( a7 ) , wall display ( a8 ) , and glass case ( a9 ) . The compounding is352542 , which produce you theFrozen Gum Paste .
employ the bowl on the urine political machine ( b8 ) and place the wintry gum library paste into it . you could then take back the nowThawed Gum Paste . Go back to the first elbow room , practice the cookery spray on the stuck cabinet ( below a9 ) , and take theSquare Cake Platter . Give the platter to Ginger to bulge out a puzzle . You need to move the cake stratum by bed to the purple plate . If you ’re stuck , do the following ( using the scout image below ):
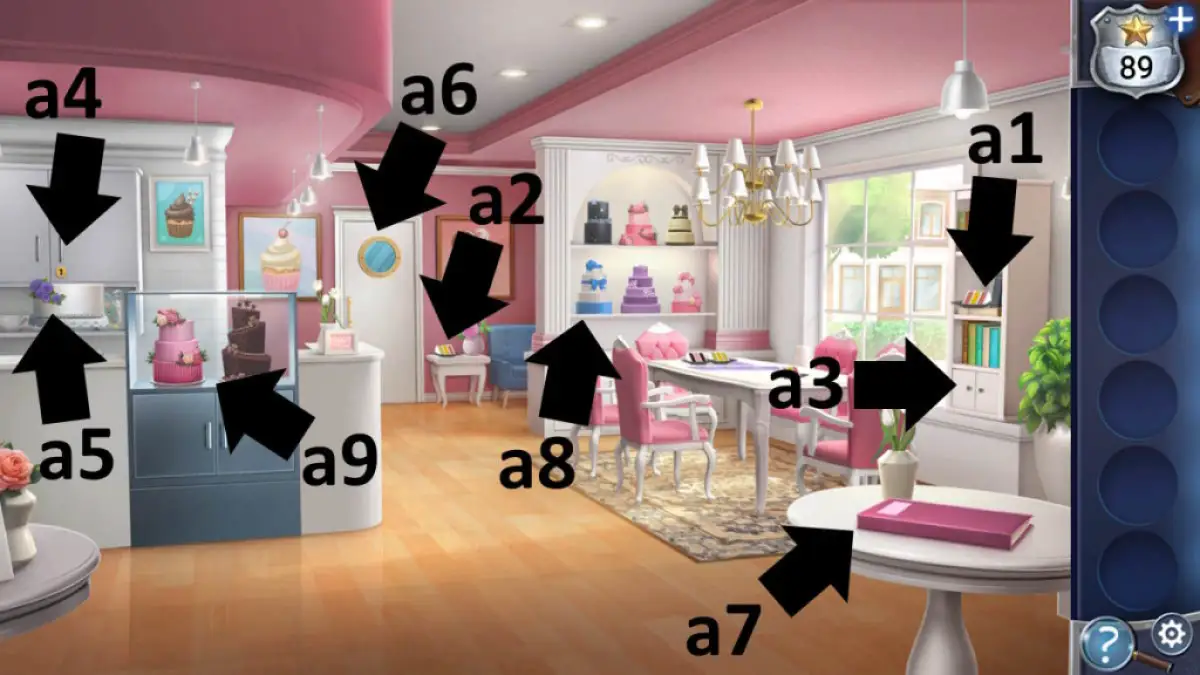
Image by Pro Game Guides
1 - 3,1 - 2 , 3 - 2 , 1 - 3 , 2 - 1 , 2 - 3 , 1 - 3 , 1 - 2 , 3 - 2 , 3 - 1 , 2 - 1 , 3 - 2 , 1 - 3 , 1 - 2 , 3 - 1 , 1 - 3 , 2 - 1 , 2 - 3 , 1 - 3 , 2 - 1 , 3 - 2 , 3 - 1 , 2 - 1 , 2 - 3 , 1 - 3 , 1 - 2 , 3 - 2 , 1 - 3 , 2 - 1 , 2 - 3 , 1 - 3
Once the cake is moved , give Ginger the four coloring bottles and the thawed chewing gum spread . With the flowers made , you now need to decorate the patty , so click it once more to start a placement puzzle . You require all the dyad to match , eye mask - style . See the image below if you get stuck .
When Ginger go out , click the now - open door at the back of the kitchen and head into the post . Grab theDrawer Handle(c1),Super Glue(c2 ) , andMakeup Remover(c3 ) , then click the dog food ( c4 ) to move it and look at the dog photo . Use the makeup remover on the photo to divulge one-half of the dog ’s name .
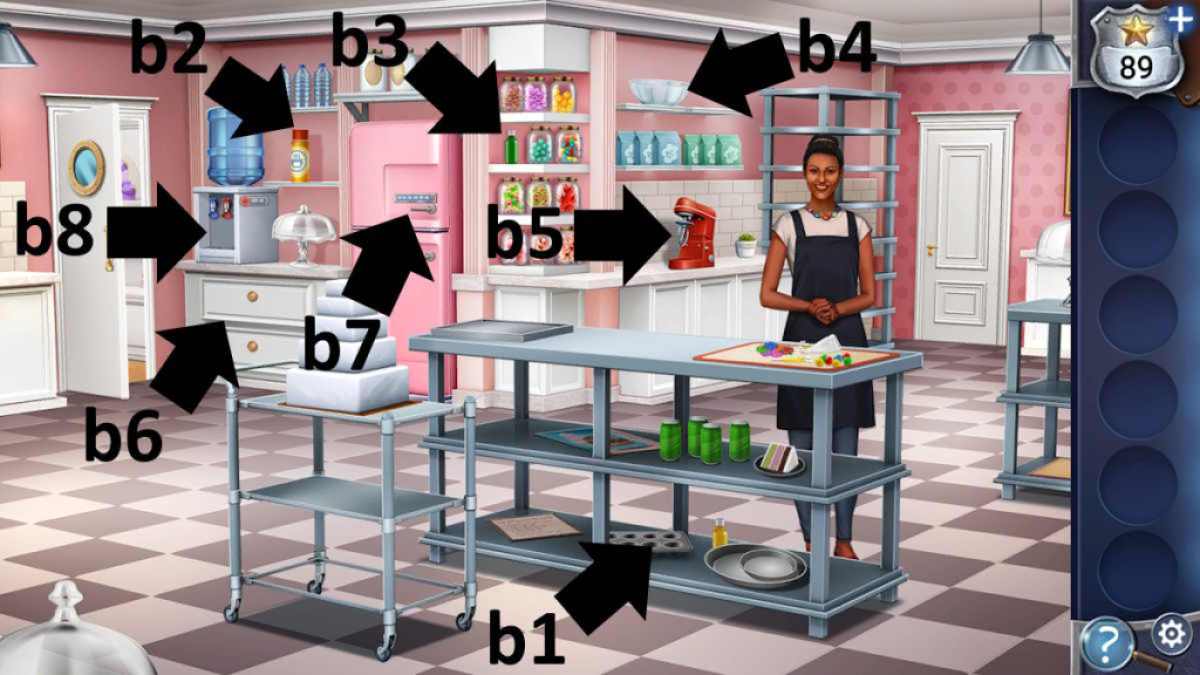
Image by Pro Game Guides
habituate the mucilage on the drawing card ( c5 ) then assault the handle and open it to get theCan Opener . Click the corkboard , then flick it again in finis - up to uncover the other half of the dog collar . you could now deduct that the dog collar readsBORUS .
Click the vase ( c6 ) to move it and clack on the cake folder underneath . mention the four countries the cake are from : Russia , USA , Italy , and Japan . Now click the mirror to see the clocks showing times around the world . jibe these to the bill of fare and you ’ll have a code,9283(remembering the times are reverse due to the mirror ) . apply this code to start the pink padlock ( c7 ) and use the can opener on the cad food inside to getDog Food .
Put the dog intellectual nourishment in the bowl ( c8 ) , which attract Borus and allows you to start the handbag on the sofa using its name . After checking out the evidence inside , take theSmall Key , unlock the back door , and you ’ll be heading off toward Chapter 6 .
Screenshot by Pro Game Guides
touch : Vanishing Act walkthrough ( Adventure Escape Mysteries )
Picture Perfect Chapter 6 walkthrough
Once you get in in Green Park , cluck the pigeon ( d1 ) to move it and seize thePark Token . Take asecond Park Tokenfrom near the bench ( d2 ) , then take the poster ( d3 ) and make a note of the locations it mentions in each line of the text ( flush garden , pond , pretzel stall , pagoda ) .
take care at the park map ( d4 ) and note the letters match the attractions . If you add together the bike assemblage pedestal to the starting signal and remnant of it , you getCKLFJC .
snap the bike rental machine ( d5 ) and enter the code . The machine will now work out , but you ask three park tokens . Click the ice cream handcart ( d6 ) for a conclusion - up . Click the purple wallet to tell the proprietor someone has left it behind , then buy anIce Cream Conefor one token . Use the cone on the bin ( d7 ) to draw the bee and then pick up thetwo Park Tokensby the bin . Put your three tokens into the machine ( d5 ) , then click the bike to move on .
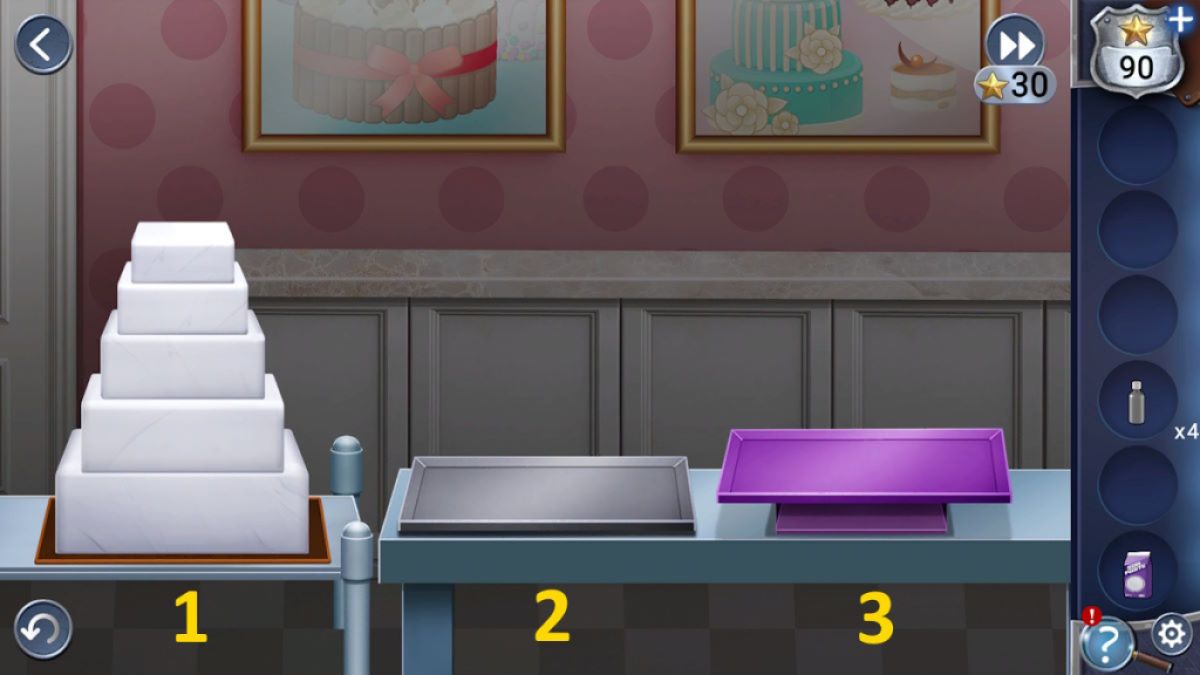
Image by Pro Game Guides
This begin a dexterity game in which you need to conjure 1 and 2 on the keyboard when circles appear . Hold down the number key to fill the meter . It ’s quite crafty , as sometimes you have to do both at once , but you could try as many sentence as you wish ( or skip it with clues ) . Also take down that when you cluck the bike again , you need to do this mental testing one more metre . However , you could decamp it for 0 cue . After that , you ’ll directly move to each location .
Once you arrive , pick up thePark Token(e1 ) and knock the other one ( e2 ) into the drainage . Click the sprinkler ballpark next ( e3 ) to start out a route puzzle . You need to direct the hot dog to the exit by turning the sprinklers on and off and run over the paw photographic print space . Sprinklers hold back their movement , as it will keep go in the direction you want until it hits an obstacle .
If you want the solution , it ’s : Up , Right , Down , Left , Up , Left , Down , Left , Up , Left , Up , Right , Up , Right , Down , Right , Up , Left , Up , Right . You ’ll then get theKite . Give the kite to the small fry ( e4 ) and he ’ll give you a 2nd Park Token .

Screenshot by Pro Game Guides
Now go to the pagoda ( e5 ) . cull up thetwo Park Tokens(f1 - 2 ) , move the corner ( f3 ) to find yourfifth Park Token , then talk to the argue couple . You realize it ’s their wallet back at the sparkler cream stand . advance some information on the duet by listening to their conversation and then channelise back to the ice emollient stand ( sink in the left side of the path , and then snap the bicycle ) . The resolution you need are :
Once you have the billfold , go back to the gazebo and give Annie the wallet . She ’ll give you theFishing Net . Use three park tokens to get someDuck Food(f4 ) , then use the watcher ( f5 ) to spot that one of the swans has a cay around its neck opening .
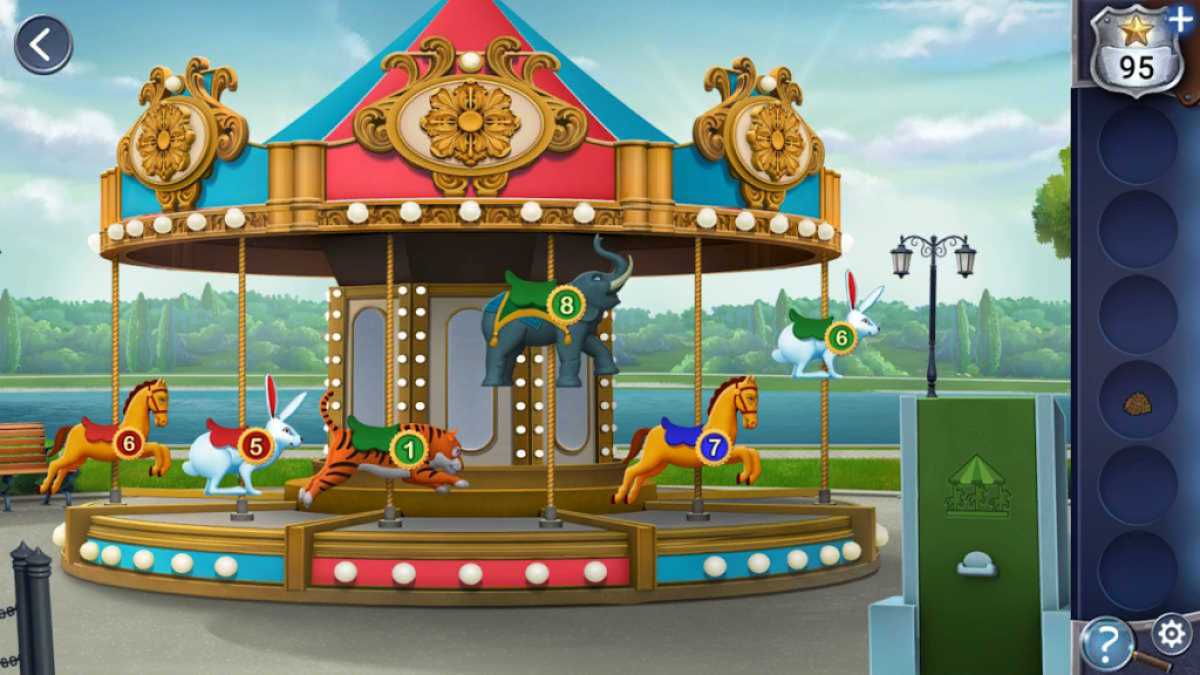
get through the gravy boat ( f6 ) and mark the positions of the animals . Head back to Rita and habituate the sportfishing net to get athird Park Tokenfrom the drain ( e2 ) . Now click the carousel ( e6 ) . When you get in , use your three commons token to birl it . You demand to note the number on the animals when they match the positions you saw on the boats . The answer is51876(you ignore the first beast as it is not on the boats ) .
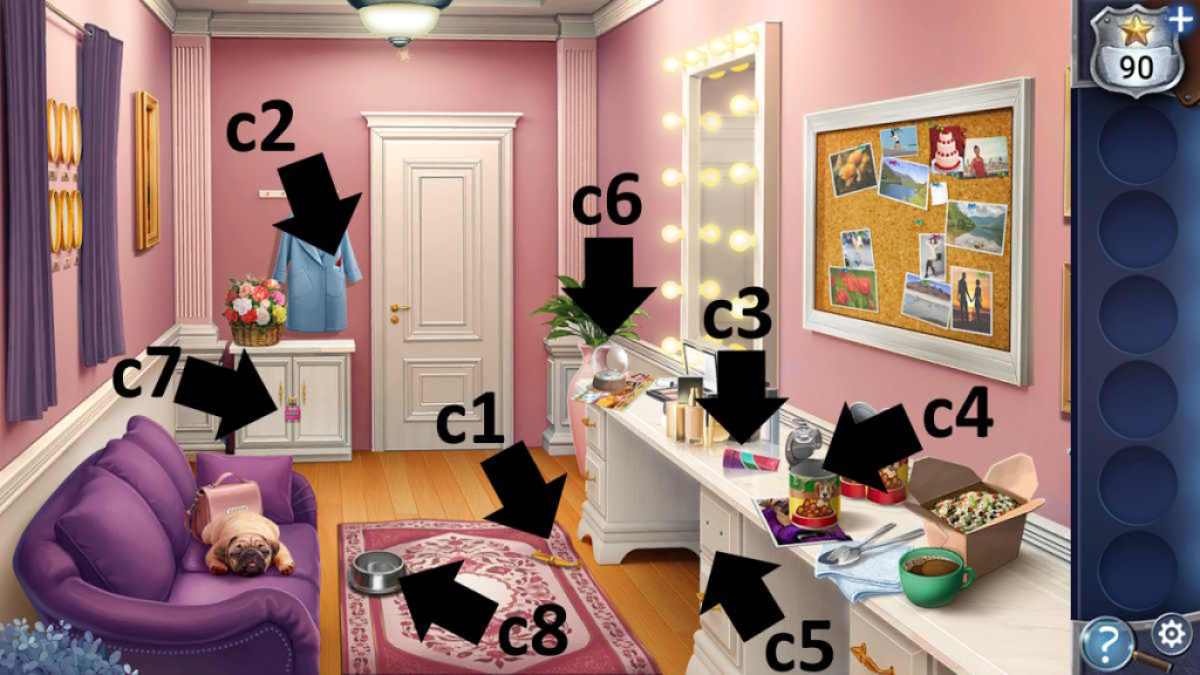
Image by Pro Game Guides
Go back to the pagoda and inscribe the computer code on the center reel of the padlock ( f7 ) . Click the boat , give the duck’s egg food to the swan , and get theSmall Key . Show the samara to Rita , then utilise it on the footlocker ( d8 ) to get Rita ’s Bag . Give Rita the bag , then complete the hugger-mugger photos stick . If you ’re struggle with this one , the root is above . Once done , you may move on to Chapter 7 .
Related : The Squire ’s Tale – Walkthrough Guide
Picture Perfect Chapter 7 walkthrough
Once you ’ve turned on the illumination ( g1 ) , take theTwine(g2 ) and theSmall Key(g3 ) , and then move the magazine ( g4 ) to bump aCircuit Chip .
Select the YouCrew reception desk ( next to g1 ) for a near - up , take theMagnet(h1 ) , and then apply the key to enter the top drawer ( h2 ) . flick it again to completely take the drawer , then place the string and attractor onto the desk after see at the ruler there ( h3 ) .
You ’ll get theMagnetic Fishing Pole , which you may practice to get aBlank Keycardfrom the desk draftsman ( h2 ) . apply it on the activation machine ( h4 ) to get theActivated Keycard . sink in the cupboard door ( h5 ) and take theCleaning Sprayand asecond Curcuit Chip .

Image by Pro Game Guides
Use the keycard to launch the lift instrument panel ( g5 ) and snap it again to start a math puzzle . You need to move the lift up and down to get it to this floor in precisely five moves . The resolution isUp 7 , Down 4 , Up 7 , Down 4 , and finally Up 7 . This lets Chelsea out of the lift , set aside you to go into the photography studio .
Take yourthird Circuit Chip(i1 ) and move the box ( i2 ) to regain aLight Bulb . practice the cleanup atomiser on the right lamp ( i3 ) , tally the light bulb to the left lamp ( i4 ) , then click the television camera ( i5 ) to take down the code on the jacket ( NFRNO ) . Type this into the computer ( i6 ) as the password . Click the picture to line up Dante was delete the dangerous photograph image . you may change his image on each one by clicking the portrayal button ( see below ) .
Put the correct Dante into each picture , noting the color of his top in each one and the date on the epitome . From left to rightfulness in the exposure order , you get :
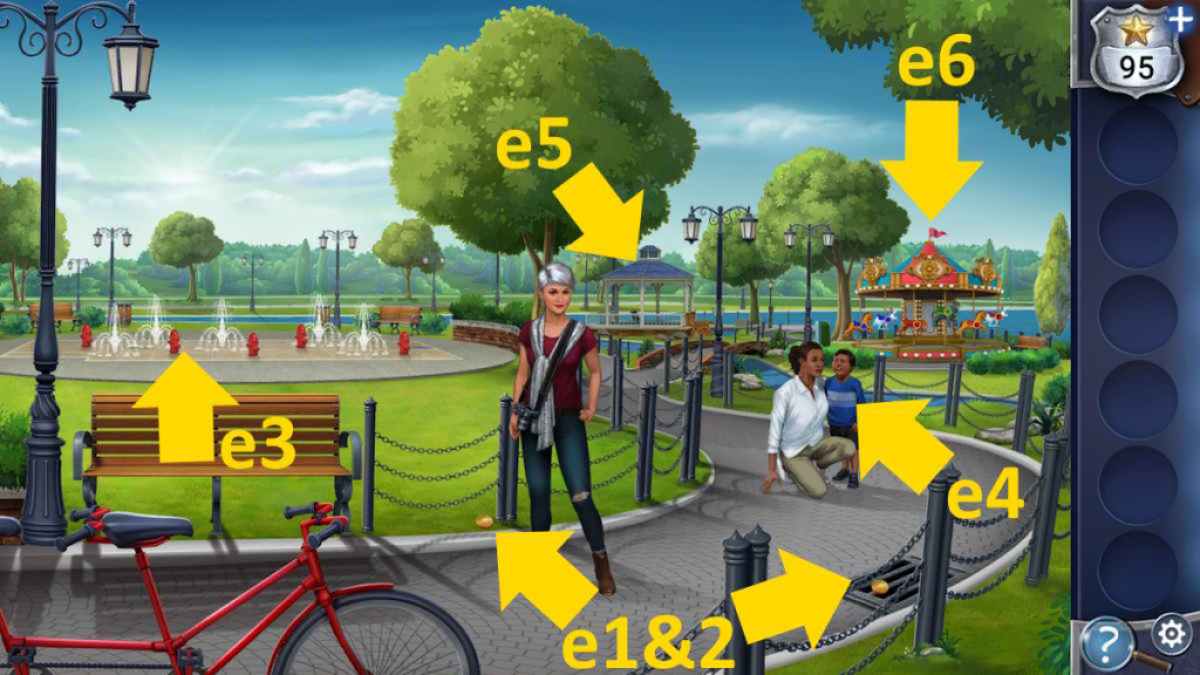
Image by Pro Game Guides
Go back to the receipt arena and flick the calendar ( h6 ) for a close - up . Note that the dates stand for to different columns , reach you the sequence ( from leave to right)purple , green , crimson , yellow-bellied , and white . Now take the threshold at the back of the office for a close - up of the whorl . Put in these colors ( bequeath to right ) and the lock will open . you’re able to now enter the function .
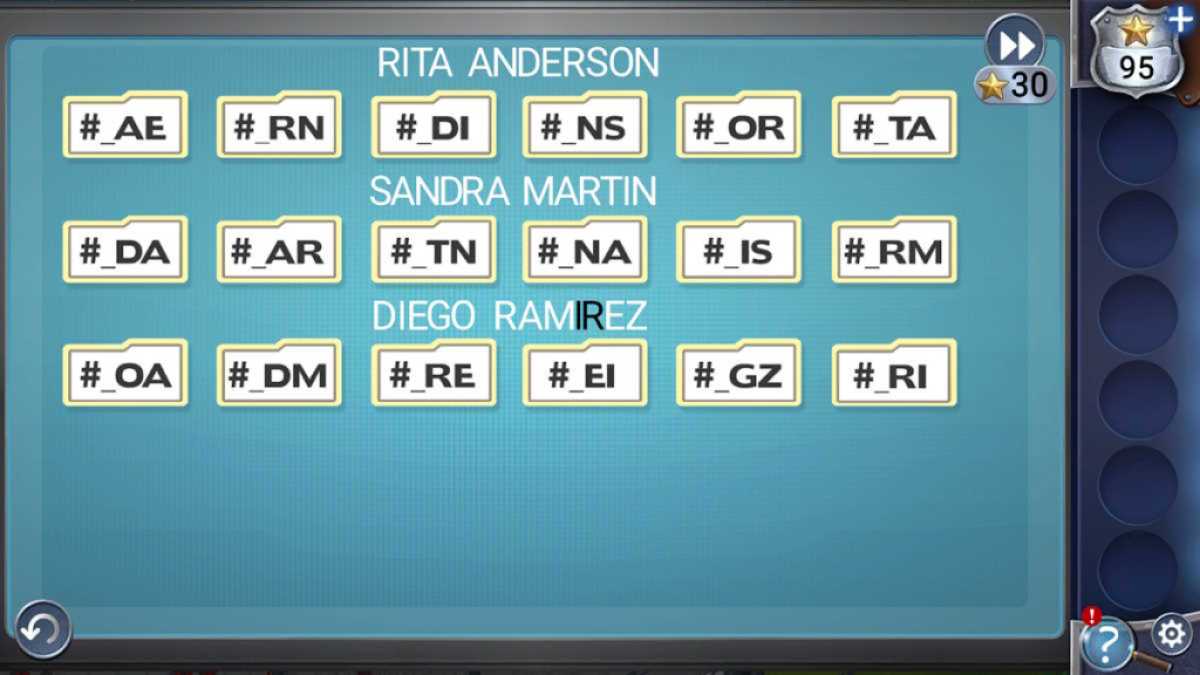
Take yourfourth Circuit Chip(j1 ) and open up the drawer ( j2 ) to get thePaper With Photo Images , moving the phone on the desk ( j3 ) to get asecond Paper With Photo Images . Move the vase ( j4 ) and take thePhoto of Dante , using it to beat the electronic computer ’s facial acknowledgement package ( j5 ) . hear to check Rita ’s location to find out that the servers are offline .
There ’s a camera on the desk ( j6 ) but it call for a passcode , which is where the papers with exposure images number in . Note the cameras pictured on each number tune and compare them to the bill poster on the wall . By suck up a line through each photo in a line , you ’ll get the shape of a number for the codification . The computer code is ( top to bottom)9526 . The genus Lens cap will pop off , commit you theKeyto the light-green room which is accessed via the photo studio apartment ( i7 ) .
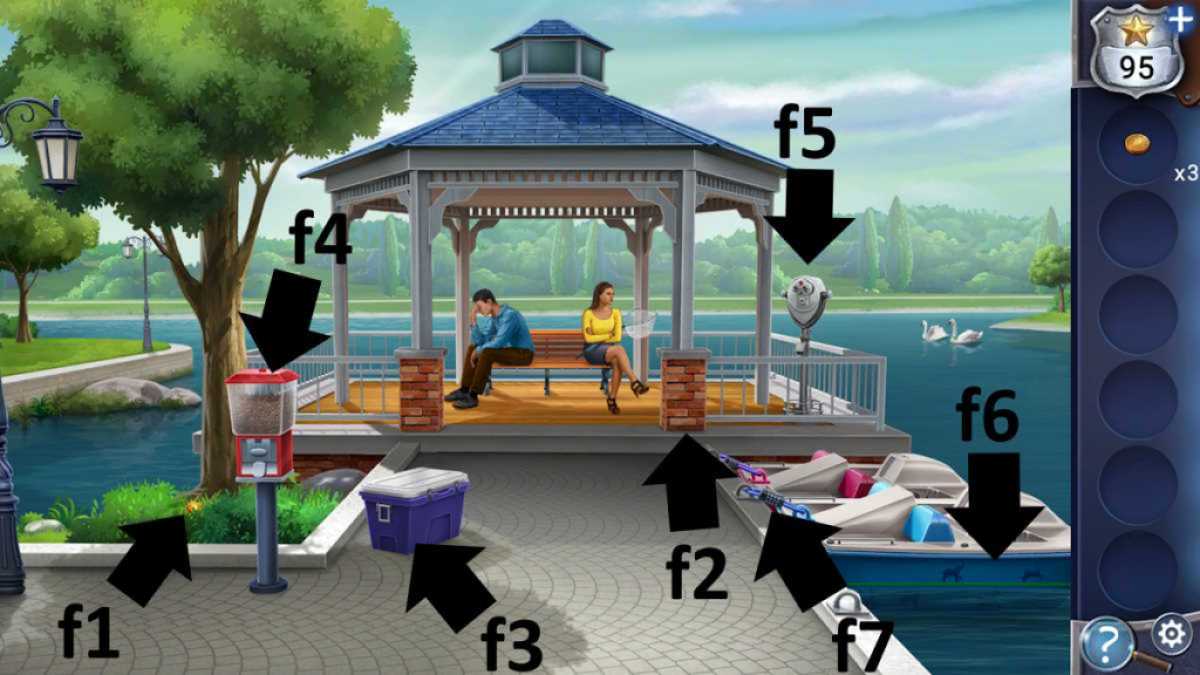
Image by Pro Game Guides
open up the green room door and adding the four electrical circuit chip begins a racing circuit puzzle . You need to slide the pieces into the correct spots , which is relatively dim-witted eyesight as you have two blank . I suggest get the unexpended top and bottom piece into spatial relation , then moving the firearm I have in the left over - mediate spot there before complete the rest period . Then , you just require to move that left - center composition two place to the right hand to discharge the puzzle ( see trope ) .
Once done , channelise back to the office and control the computer ( j5 ) for Rita ’s past locating to rule her out as a suspect . You ’ll also mark the company ’s profits were falling fast . Chelsea will give you theFiling Cabinet Key(j7 ) , leaving you facing a digital curl . You operate it like a fruit machine , moving each reel to get the images onto the right backgrounds , but you’re able to change both the columns ( hoi polloi ) and run-in ( office ) . See the answer below .
Once done , dawn the files in the attractor to get some young Revelation of Saint John the Divine about the case and to reason out Chapter 7 .
Screenshot by Pro Game Guides
Related : Clue The Murder of Mr Black – Full Walkthrough
Picture Perfect Chapter 8 walkthrough
Once you ’re in the auto with Murphy , click the phone ( k1 ) doubly tocall DJ Deeand find out she ’s work a wedding downtown . penetrate the digital display ( k2 ) a yoke of times to witness out that it ’s 9.05pm on 7/10/2020 .
Nowclick the sat nav(k3 ) and click each locus , comparing the selective information you have with each locating to see if it is a possible office for her disk jockey set . By a operation of evacuation , you ’ll be left with three name and address . Put the numbers2,6 , and 9(in any ordination ) into the sat nav . After checking the locations on your sound you ’ll spot her at the third event ( see image above ) , meaning you need to head to theParty Factory .
sink in the door ( l1 ) and get theLadder , and then click the stairs ( l2 ) to find out that they switch gloss between three patterns . Now get through the safe ( l3 ) to receive there are three lock to get through .
Screenshot by Pro Game Guides
The first needs you to know how many of each color appears in the stair lights . To work this out , you take to take screenshots of each stair color pattern , but if you want to shortcut this , the reply is Red ( 4 ) , Blue ( 6 ) , Green ( 7 ) , and Yellow ( 5 ) for4675 . This gets you aLightbulb .
Use the ladder on the missing bulb on the wall ( l4 ) , add the electric-light bulb , and the wall will illuminate up in yellow . The lights can be control with thepanel on the wall(l5 ) . The number and position of switches in the on emplacement affect the weak pattern , move over a different one for each compounding .
Thus , if only the number 1 switch is on , you have radiation pattern 1 , but if 1 , 2 , and 3 are all on , you have pattern 6 ( and so on ) . From this , you get arrows pointing in the following directions :
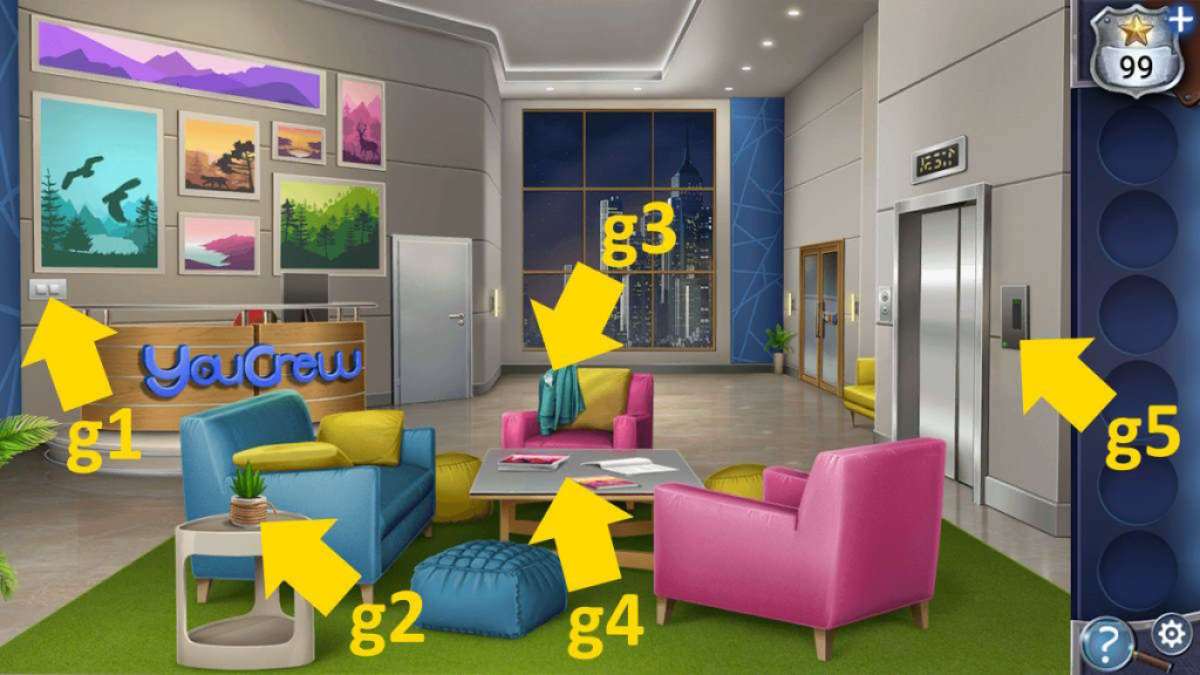
Image by Pro Game Guides
Go back to the safe and put this sequence into the guiding pad to enter the 2nd dependable and get theSunglasses .
Click the neon Let ’s Party sign for a ending - up and then click the magnify chicken feed on the sunglasses in your inventory to put them on . Move the glasses across the word party until you may see a four - fingerbreadth code through them . You ’ll get the code1427(see trope below ) , which allow you to start the final safe and get theSmall Key .
Use the key to get to the chicken feed display ( l6 ) and take theIce Heart . Put it into the flames ( l7 ) , then use the resultingKeyto unlock Murphy .
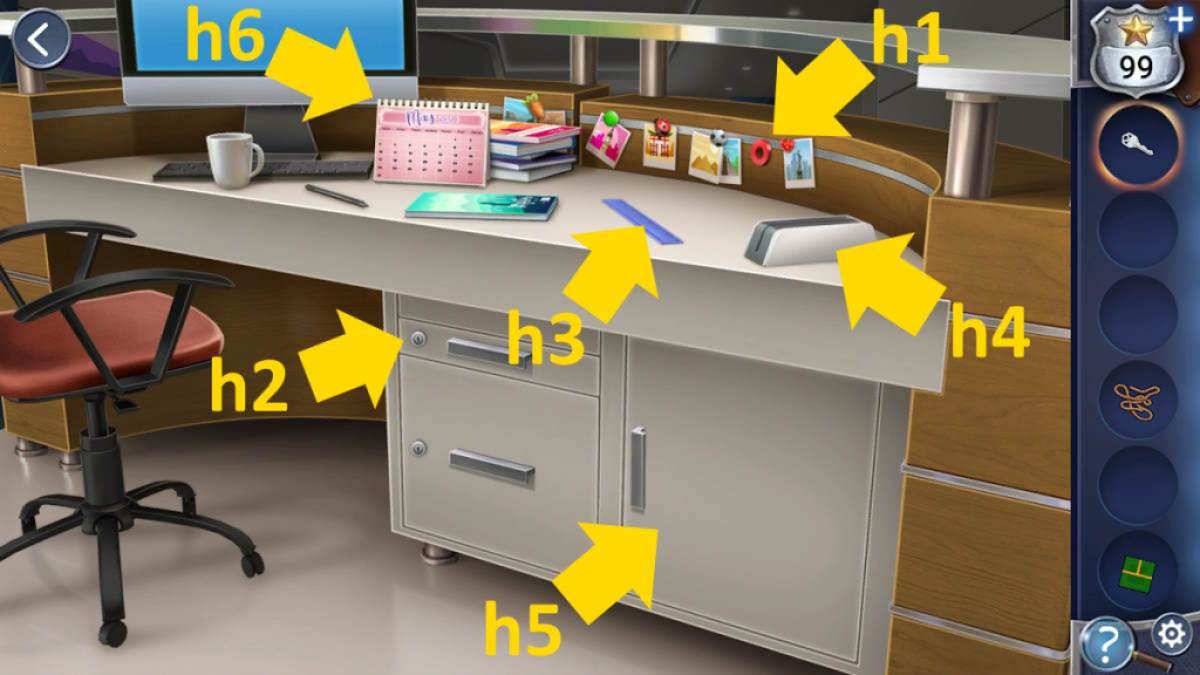
Image by Pro Game Guides
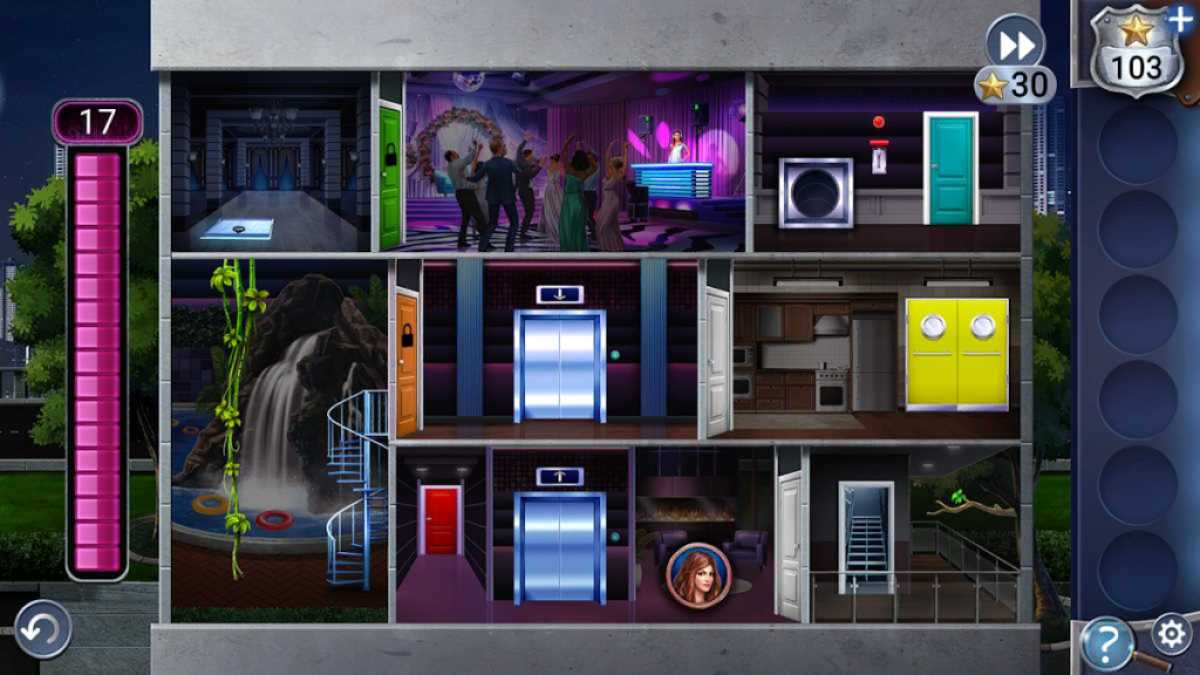
You now postulate to get to the party way via a movement puzzle and do it in only 17 move . Do the following :
Once inside the party , DJ Dee will release some balloon . Click them all to pop them , then turn off the euphony ( sink in m1 - 3 ) . Once the crowd clears snaffle theRemote Control(m4 ) and utilize it on the dry icing machine ( m5 ) and click the confetti blaster manual on the trading floor ( m6 ) to read it .
You need to penetrate each chargeman ( m7 - 8) to rule its example character , then follow the manual instructions to switch over them off , which need hold in buttons time for a define time ( see image ) . This can be annoying as you ask to get the prison term on the button right , but persevere . Once they ’re off , take theBronze Keyfrom the microscope stage ( m9 ) and click the cord ( m10 ) to start the curtain and reveal a threshold . Use the key to go through to the cap .
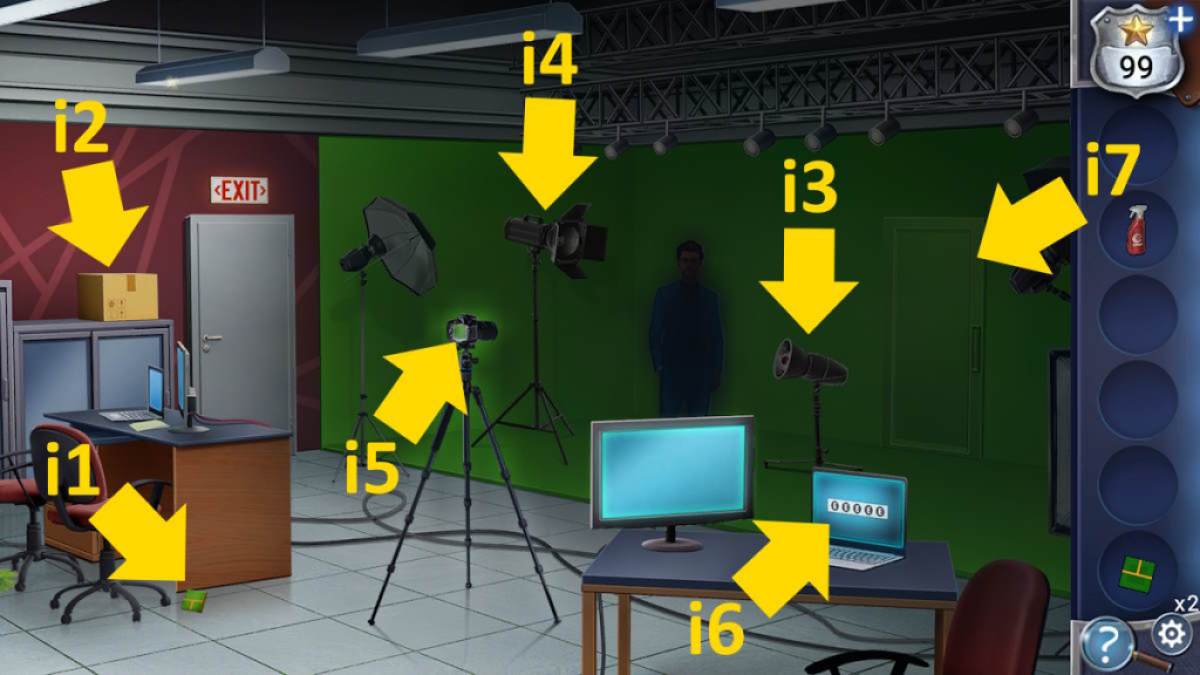
Image by Pro Game Guides
Take thePlant Clippers(n1 ) and trim the plants ( n2 ) to get theSmall Key . snaffle the twoLadder Rungs(n3 - 4 ) , use the cutters to rive the tarpaulin ( n5 ) , and expend the key to launch the box ( n6 ) and take two moreLadder rung . Also , note the angle of the symbolic representation on the interior of the box lid .
Click the steam valves ( n7 ) and become them so the slant rival the one inside the box seat exactly . There are two similar rendering of each in the boxwood , so be sure to get the ripe one ( it is unlike on dissimilar playthroughs ) . Once done , the steam will release off .
Click the shed door ( n8 ) to come up it require a code . If you look at all the graffiti , you ’ll retrieve they overlap each other . Using this , you could work out which graffiti is older , as it has been written over since . The row are TONRAK , ARCHON , JACE , FISE and LATVIAN . take the first of each , in years order , we get the codeAJFTL . Use this to spread the shed and take theWelding Kitand the fifthLadder Rung . sum them to the ladder , use the welding outfit , and head up .

Image by Pro Game Guides
Now comes the final chase ! Dee will always move provide or right first and then plow if she can , and she will keep going in her original direction to an exit . You have a shortsighted window to try and plot her route . The map seem randomized in each biz and even worse , there are three maps to complete , which you have to get all three in good order in a row or start up again . However , on the positive side , finally , the following map place will come upand this will solve it ( Dee ’s start positioning is in the mediate column ) .
And with that , you ’ll catch Dee on the rooftop . praise !
For more walkthroughs here at Pro Game Guides , watch outOn Thin Ice – Full Walkthrough & Solutions ( Chapters 1 - 4)andHaunted Hunt Walkthrough – Adventure Escape Mysteries !
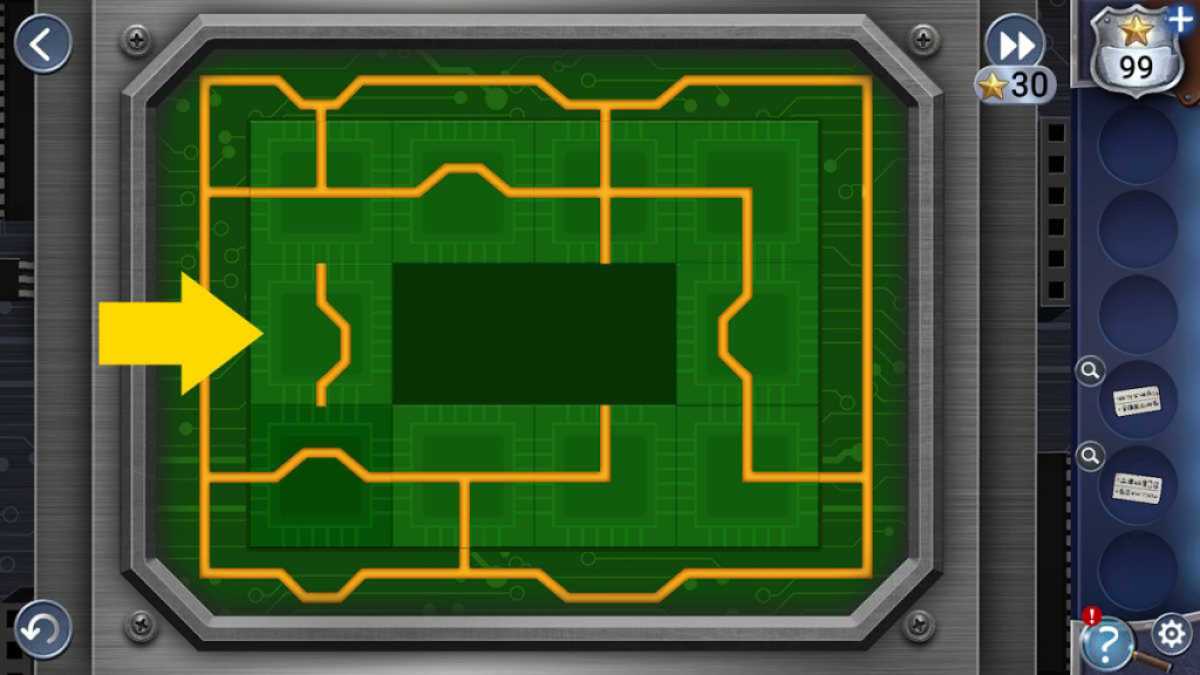
Image by Pro Game Guides

Screenshot by Pro Game Guides
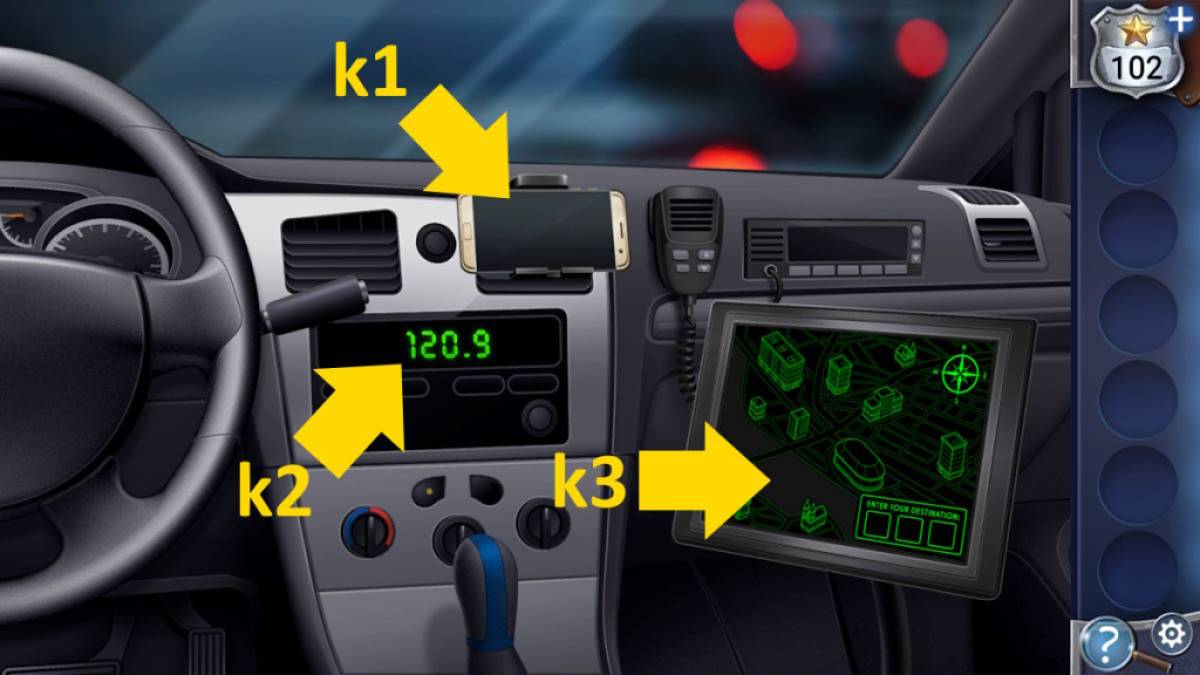
Image by Pro Game Guides

Screenshot by Pro Game Guides
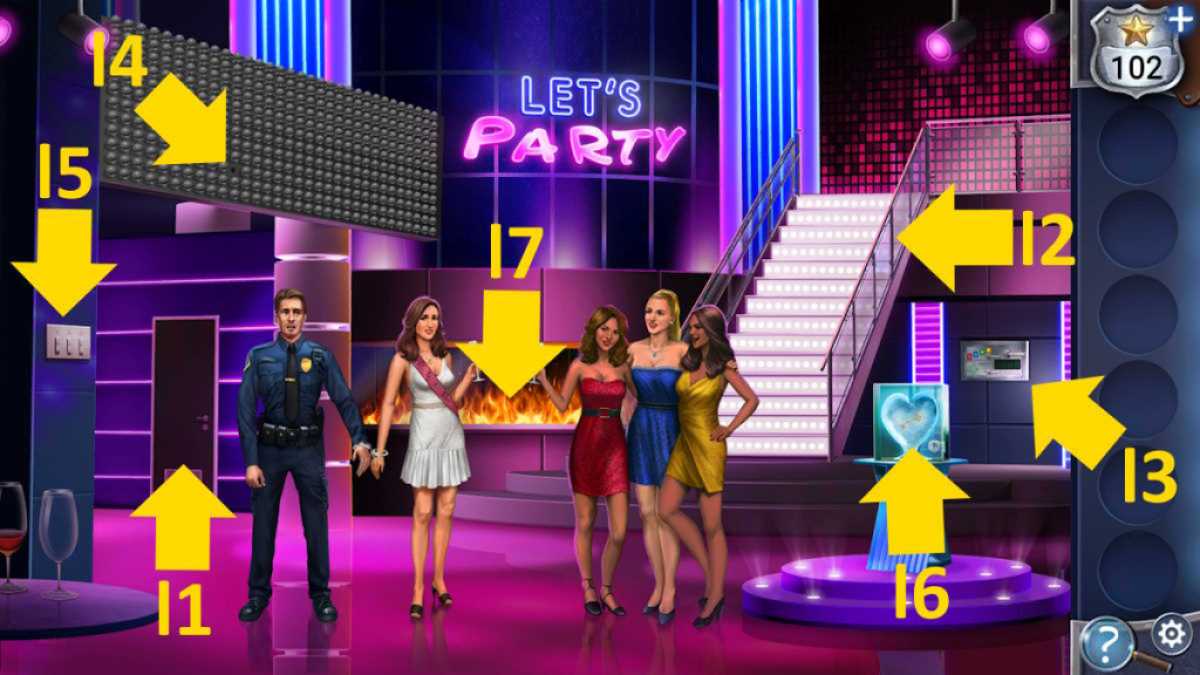
Image by Pro Game Guides
Screenshot by Pro Game Guides
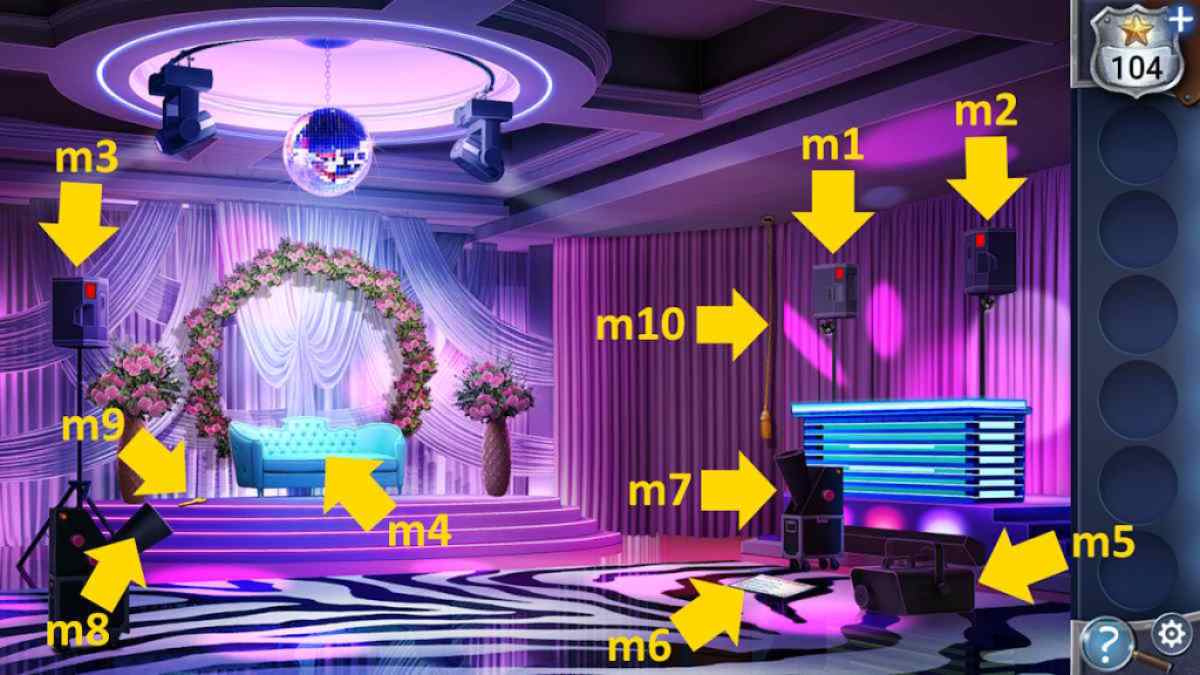
Image by Pro Game Guides
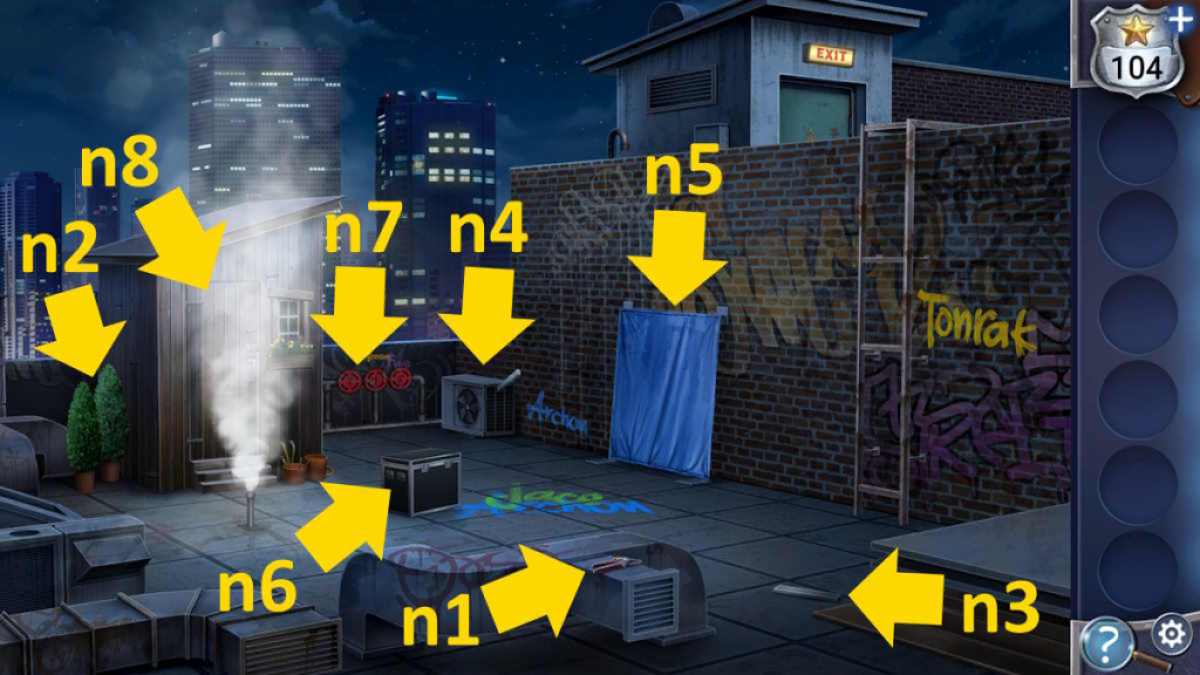
Image by Pro Game Guides

Screenshot by Pro Game Guides
