Need our avail ?
Not a fan of Rubik ’s Cubes ? Then it ’s highly unlikely you ’ll enjoy trying to count on out how to puzzle out all of the Hexanexus Puzzles littered around the Xianzhou Luofu . Once you ’ve complete all 15 cube , you ’ll actually be asked to do them all over again , for a sum of 30 puzzles . If you ask it , we can help you collect all 30 Bountiful Chests they enshroud in a flashgun . Here ’s how to work all Hexanexus 1.0 and 2.0 in Genshin Impact .
How to solve Hexanexus 1.0 puzzles in Honkai Star Rail
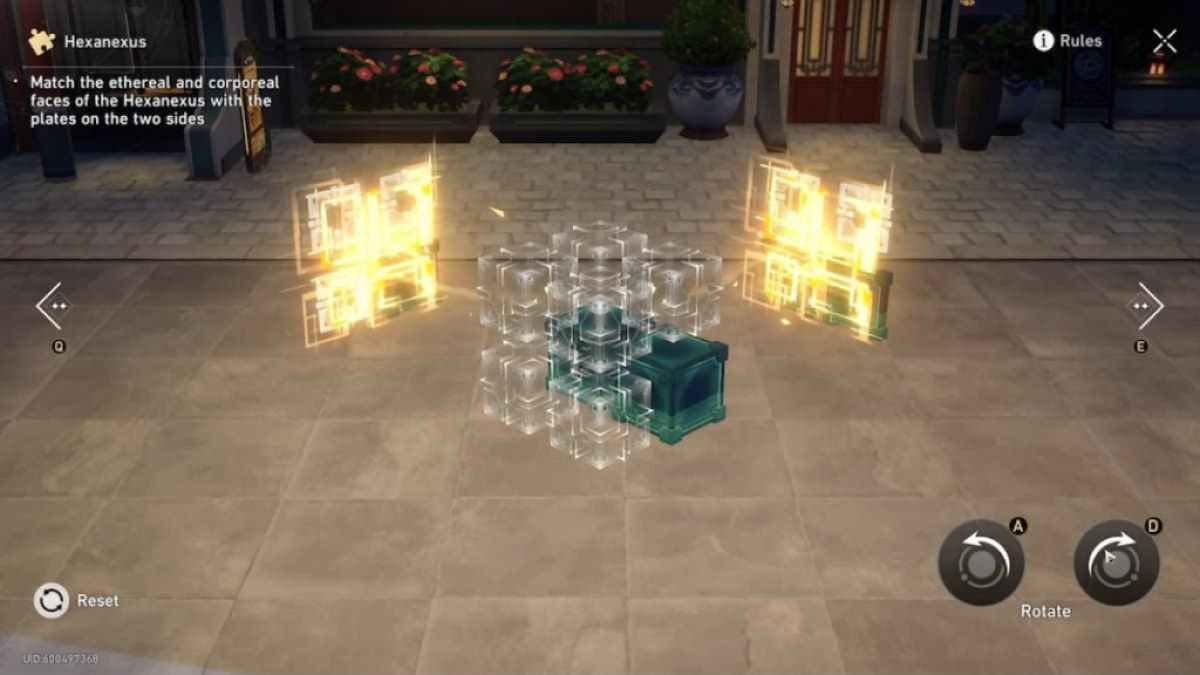
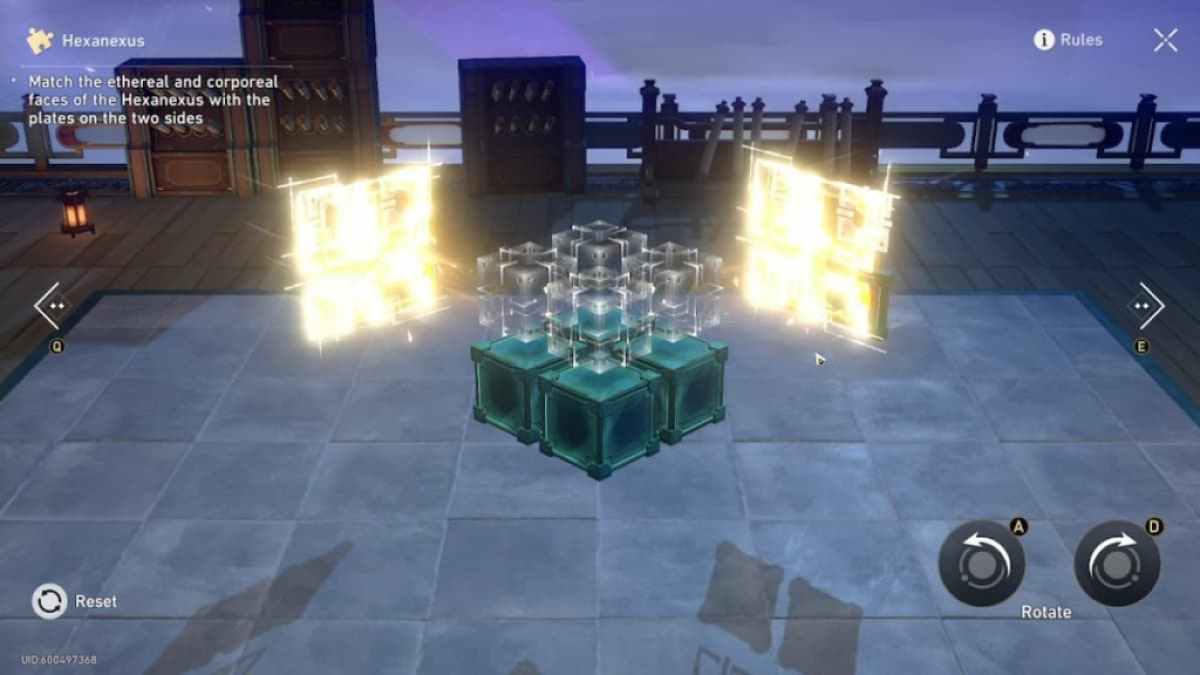
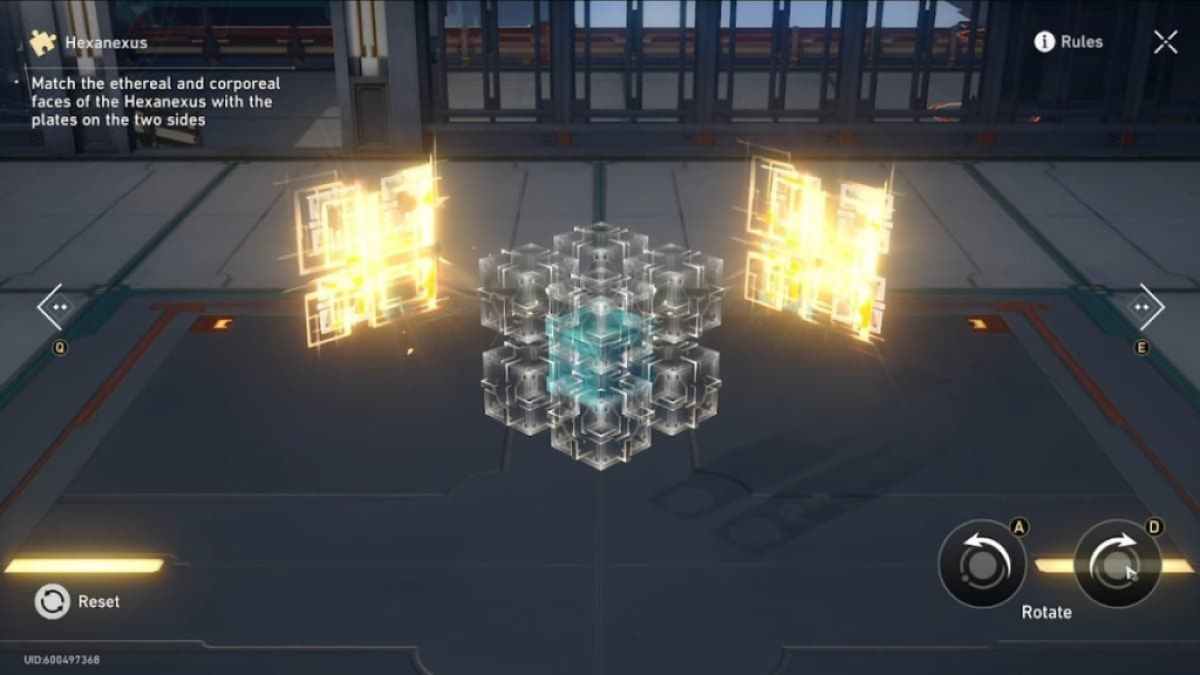
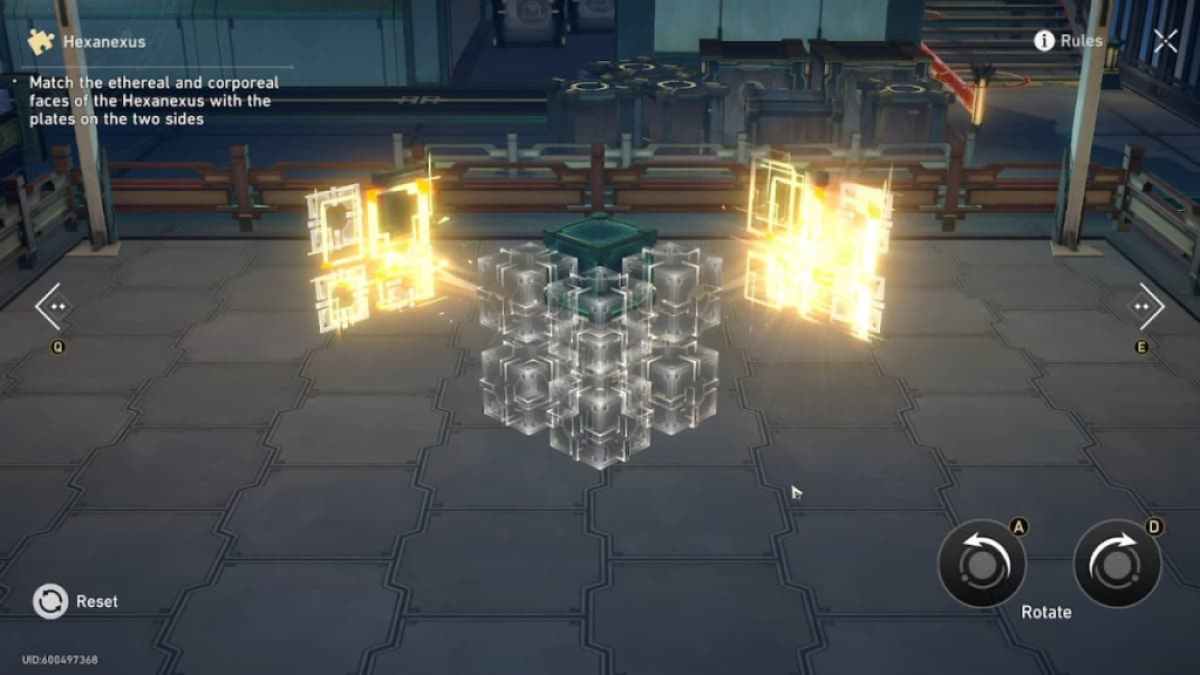
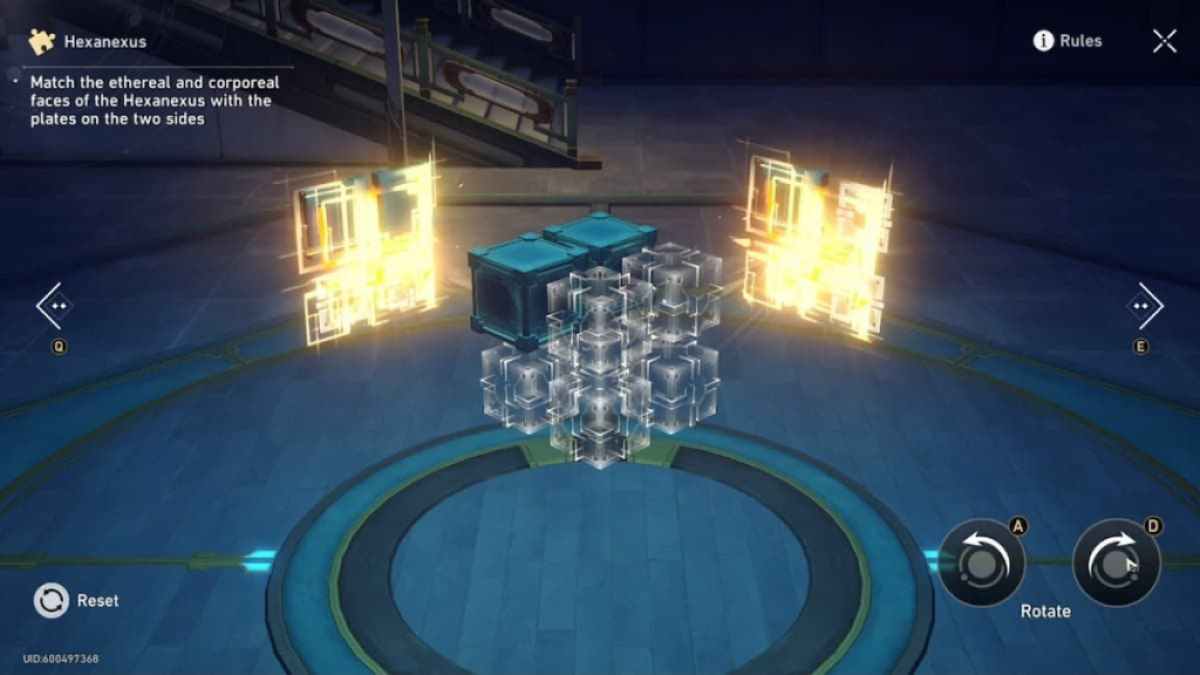
In the first set of Hexanexus puzzler , your aim is rotate a four - by - four block to position the green block(s ) agree to the pattern shown on either side . you’re able to do this by select rows of cube in a three dimensional space an rotating them leave behind or right . For the purposes of this scout , we ’ve labels the row selections from one to six , and the rotation buttons left and right .
All Cloudford Hexanexus 1.0 puzzles in Honkai Star Rail
Here are the fix of all the Hexanexus puzzles inCloudford .
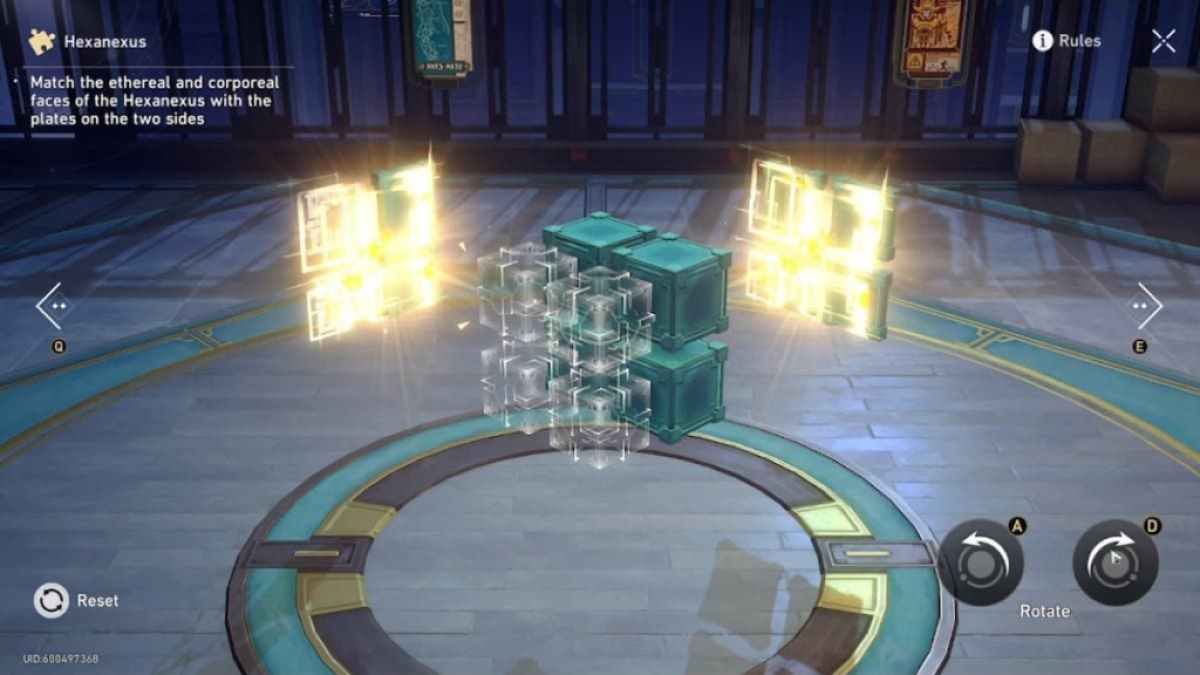
First Cloudford Hexanexus 1.0 Puzzle Solution
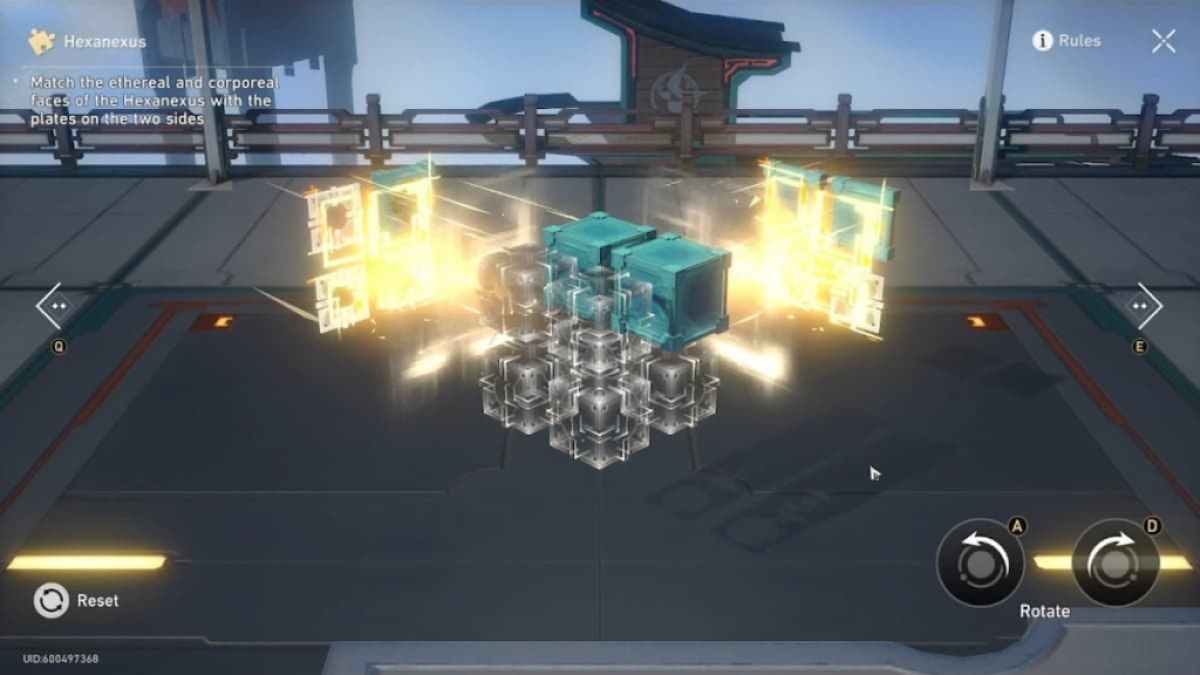
You ’ll get this puzzle at the first location , and it is a lilliputian wily . We rotated the third option to the odd once , then turn out the last option to the right once to put the blocks in place as visualise above . They should be in the top and bottom , back spots .
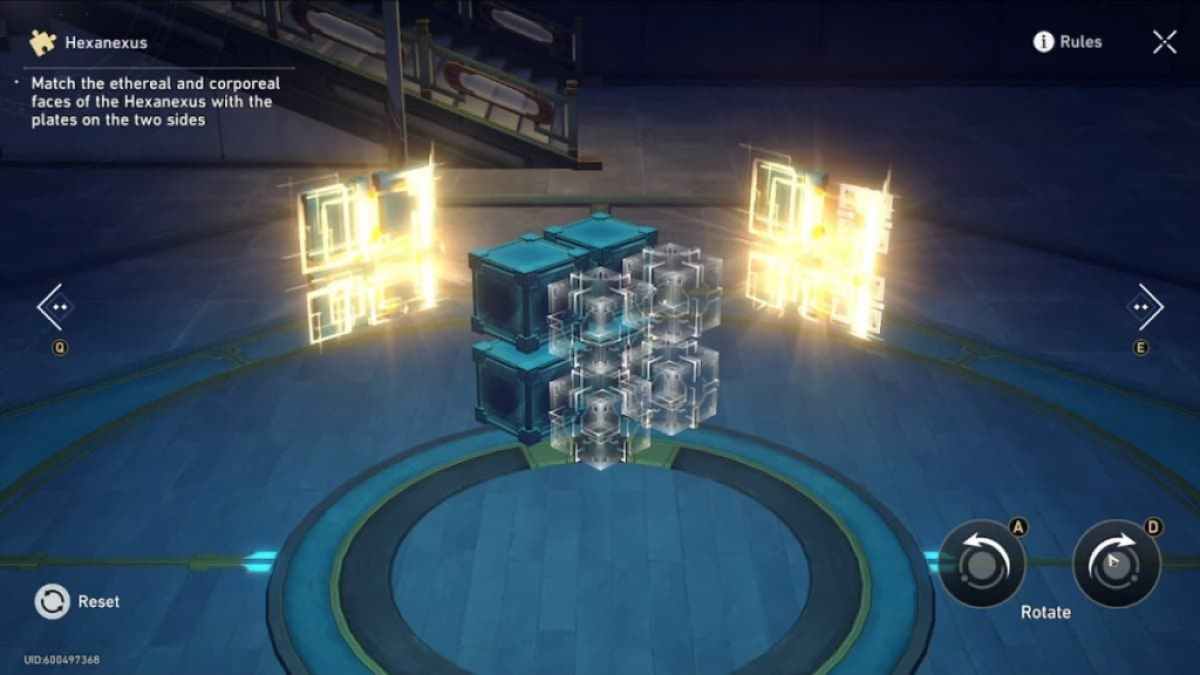
Second Cloudford Hexanexus 1.0 Puzzle Solution
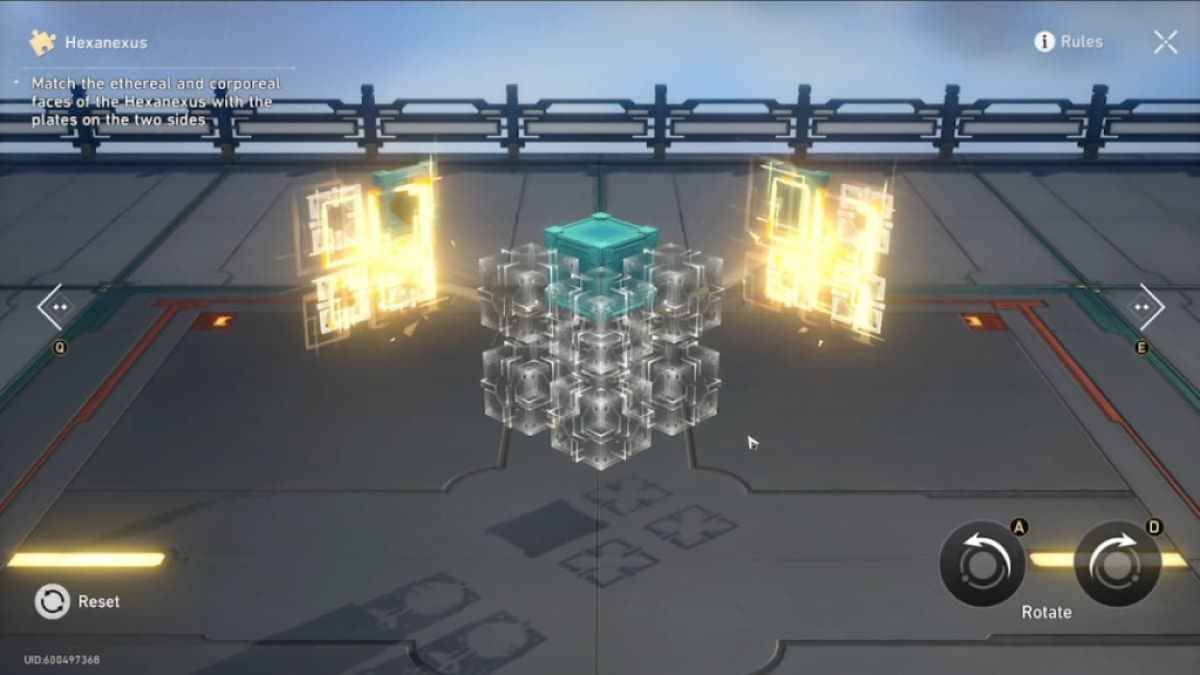
This puzzler can be base at the second location . You ’ll need to lay the light-green block in the top , back posture . We did this by rotating the first choice to the right twice . You could go left double if you want to , too . Would n’t make any difference .
Third Cloudford Hexanexus 1.0 Puzzle Solution
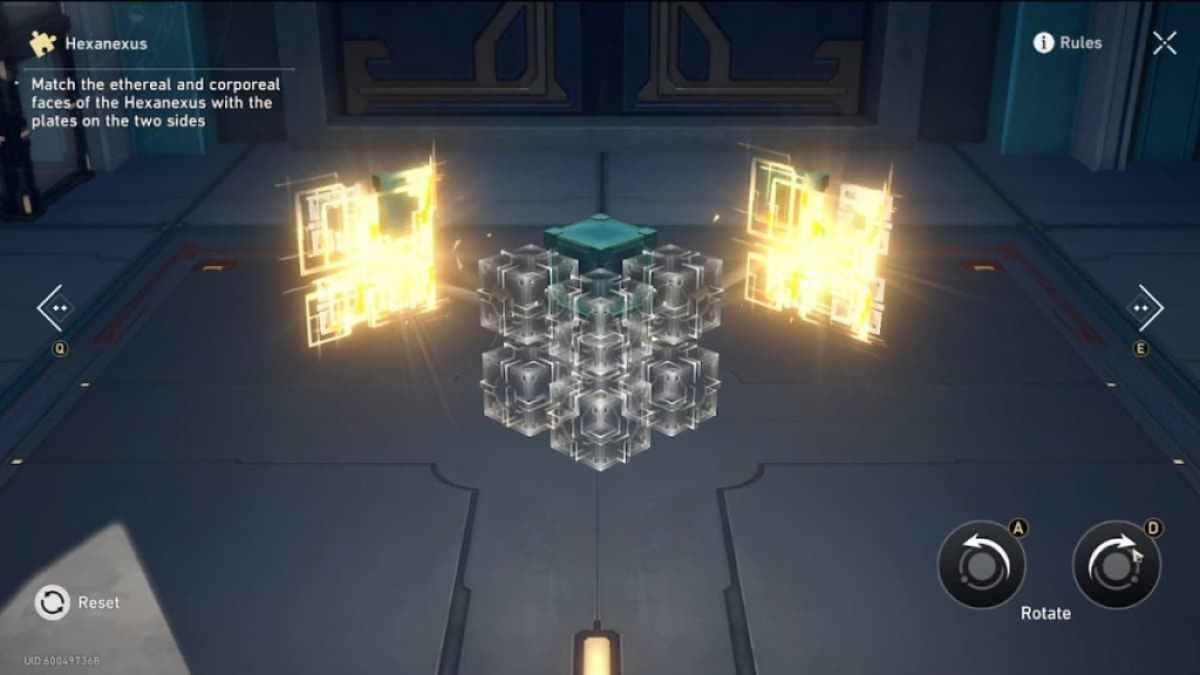
For the third Hexanexus Puzzle , circumvolve the last option to the left once , then go around the first option to the leftover twice . This should place the green blocks in the front and left , top location .
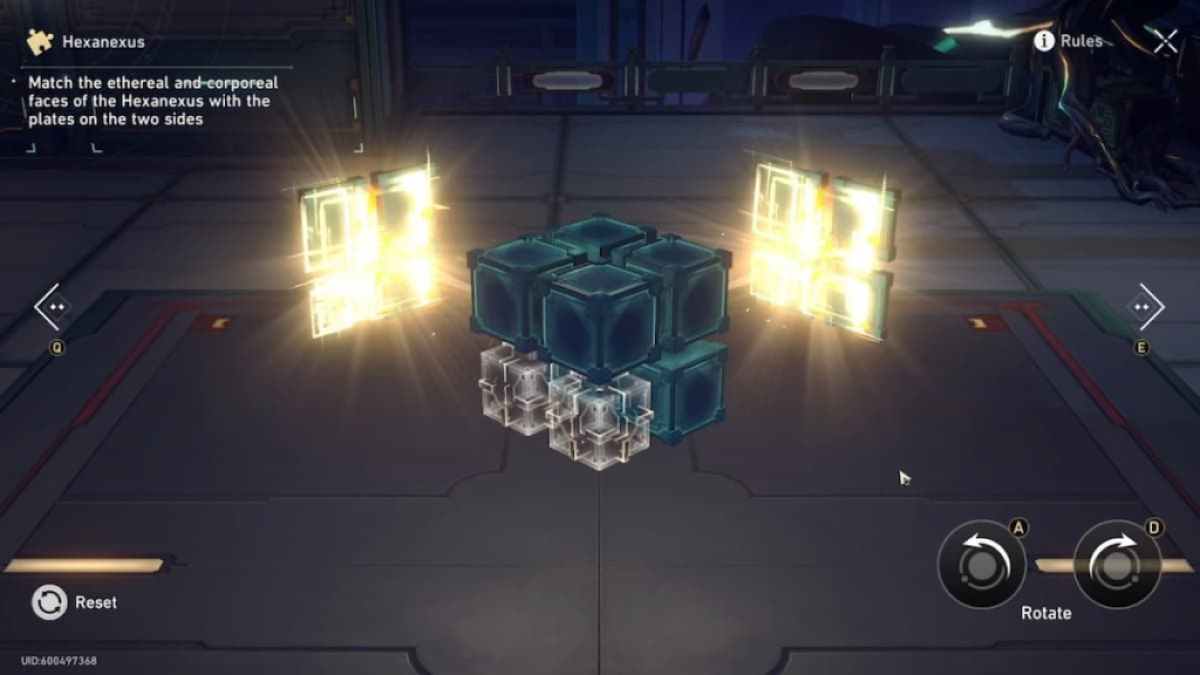
Fourth Cloudford Hexanexus 1.0 Puzzle Solution
This last Hexanexus puzzle hide out the dark-green block in the bottom , back position . To move it into place , splay the third option once to the left , then rotate the first alternative doubly in either centering . This should set the green cube in the front , top position where it postulate to be .
All Stargazer Navalia Hexanexus 1.0 puzzles in Honkai Star Rail
The three Hexanexus Puzzles around Stargazer Navalia can be found pictured above .
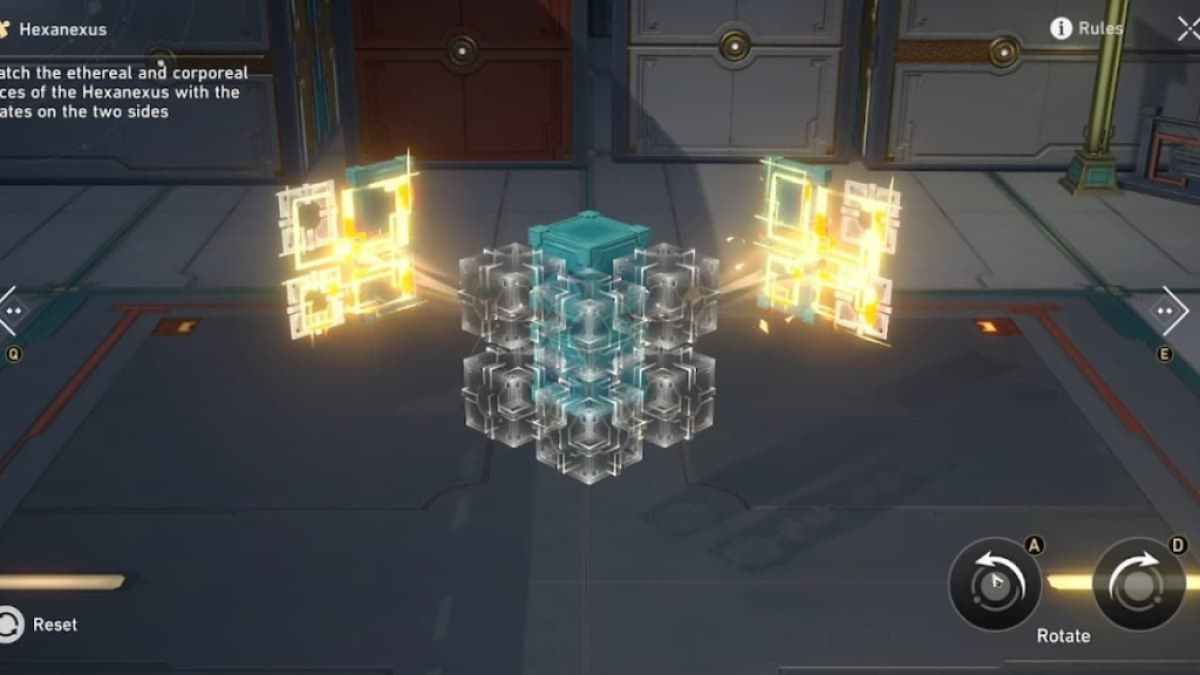
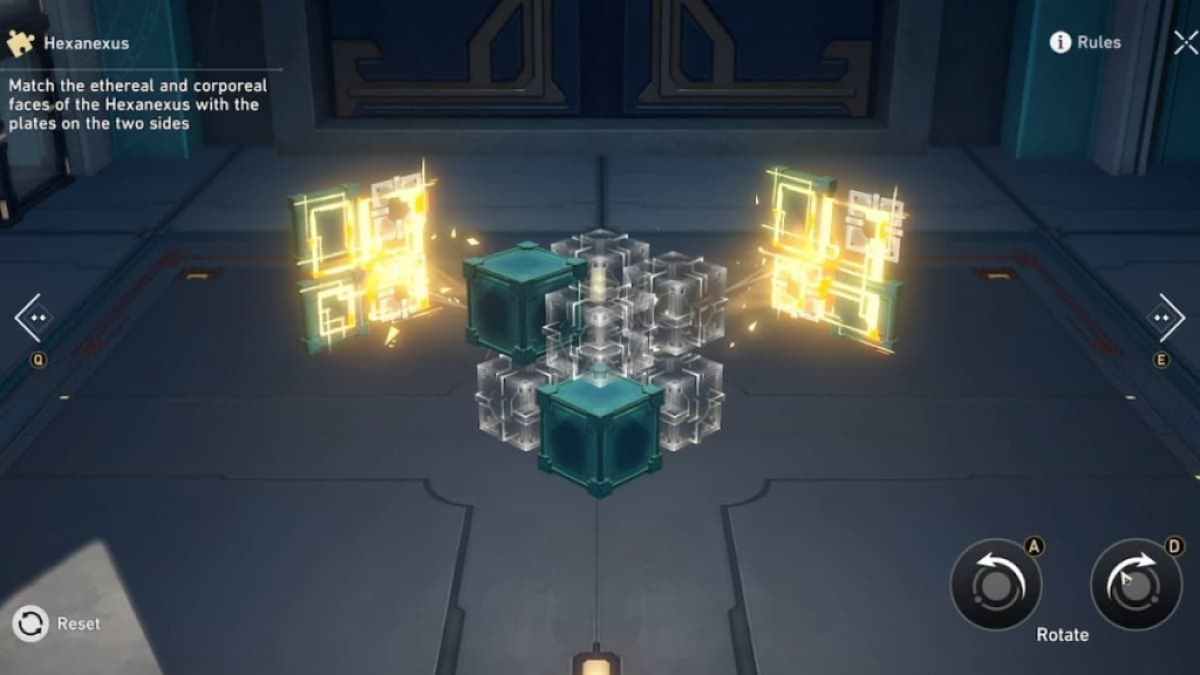
First Stargazer Navalia Hexanexus 1.0 Puzzle
This first puzzler can be recover at the top of the map . You ’ll need to circumvolve option one to the rightfield once , thenrotate option two to the left or aright twice . This should post one block in the top left corner and another in the bottom front niche .
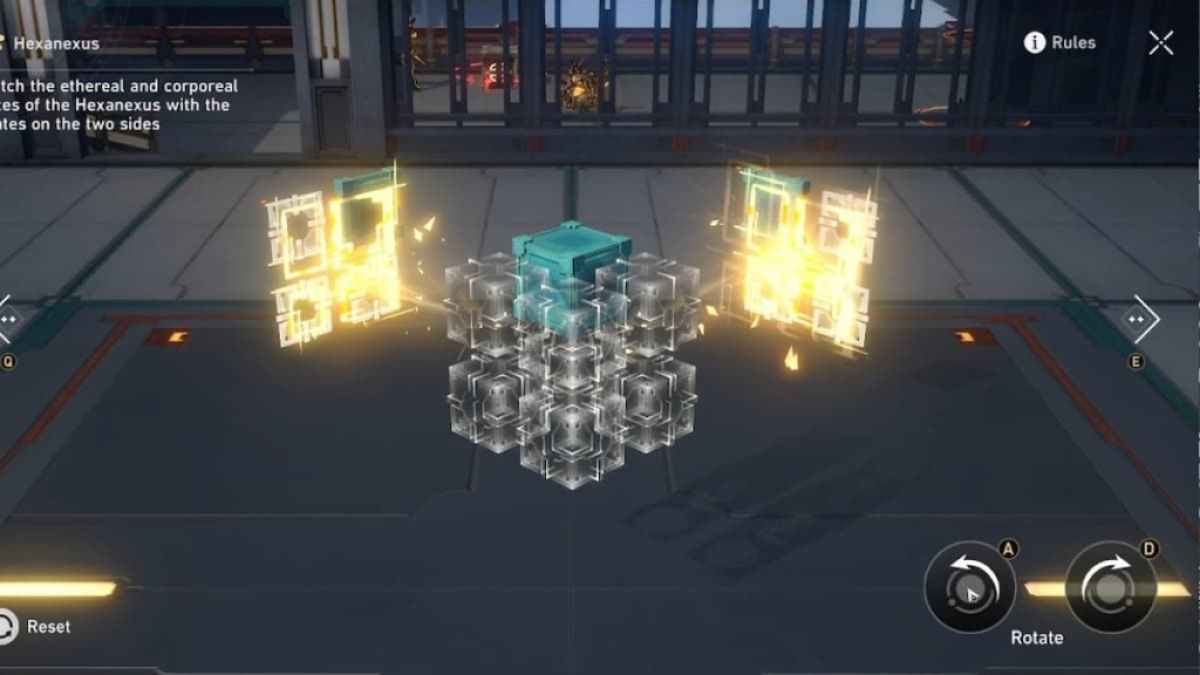
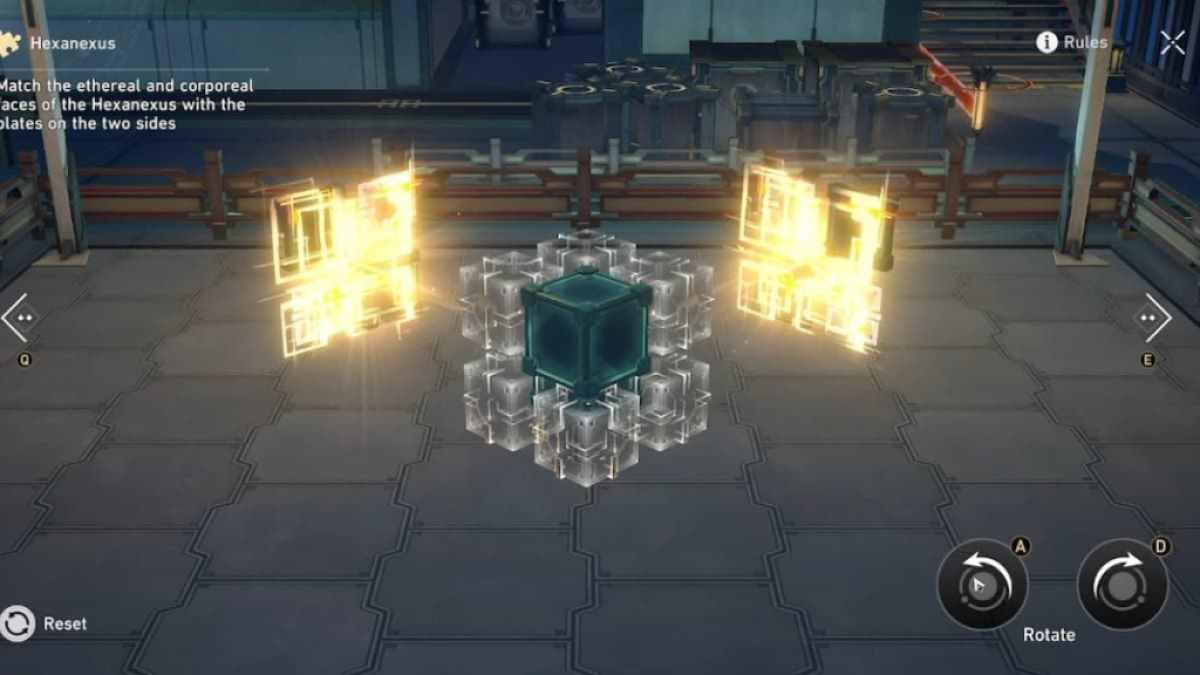
Second Stargazer Navalia Hexanexus 1.0 Puzzle
At the second localization , you ’ll find this puzzle . It can actually be lick with just one moove . The fleeceable cube in the bottom back locating is already in situation , so you just demand to rotate option five once to the rightfulness , and you ’ll be finished .
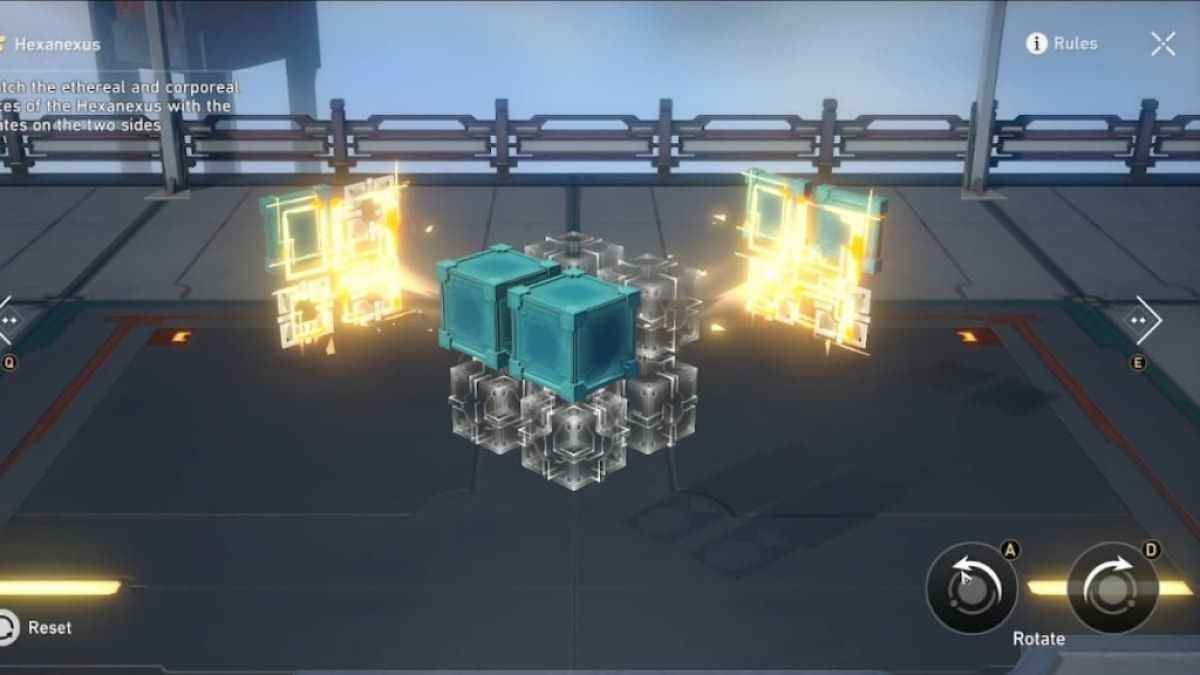
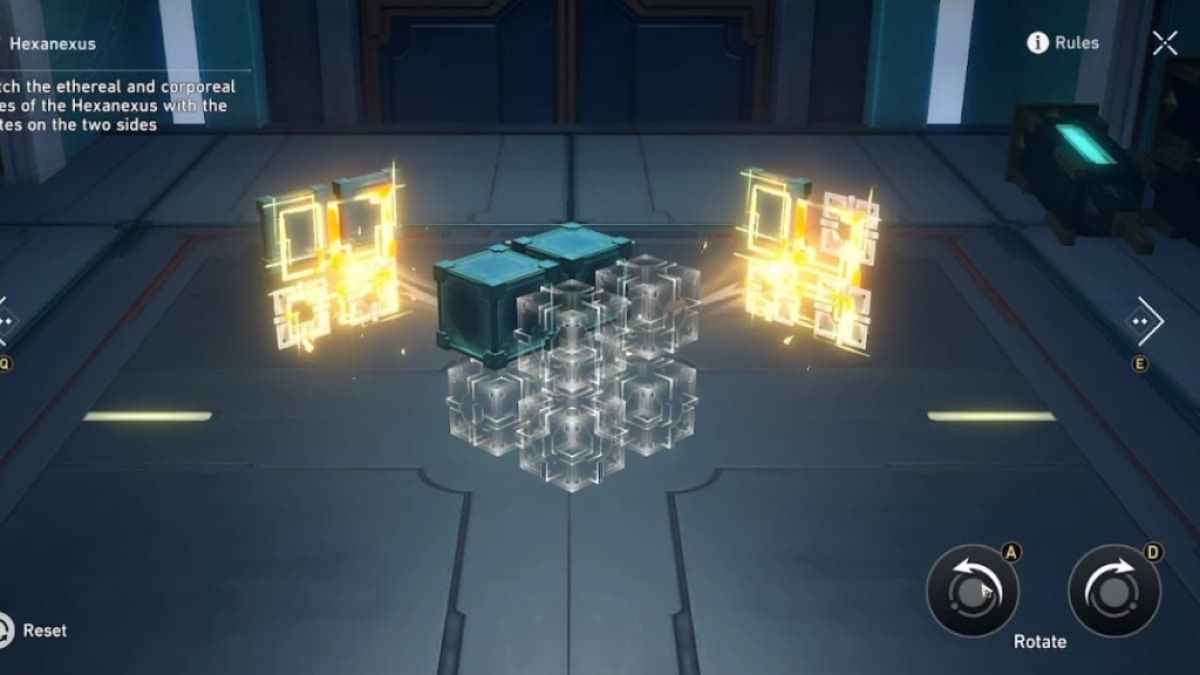
Third Stargazer Navalia Hexanexus 1.0 Puzzle
The last Hexanexus Puzzle in the field is at the bottom of the map . You ’ll aim to put both green blocks in the top , back and left corners . To do this , we rotatedoption two doubly to the right , then choice three twice to the right .
tie in : All Artisanship Commission Treasure Chest Locations in Honkai Star Rail
All Divination Commission Hexanexus 1.0 puzzles in Honkai Star Rail
There are four Hexanexus puzzles in the Divination Commission . They can be institute in point indicate above .
First Divination Commission Hexanexus 1.0 Puzzle
This first puzzle is n’t too complex . To clear it pick out the third option and circumvolve it doubly either way . This will place the fleeceable third power in the bottom back and right recession .
Second Divination Commission Hexanexus 1.0 Puzzle
To solve the puzzle at the 2nd emplacement , choice option three and rotate it to the odd once . Then select option five and rotate it to the left over once . Finally , select pick four , to turn out it to the good once . All the mental block should be positioned in the bottom half of the block .
Third Divination Commission Hexanexus 1.0 Puzzle
Again , your end here is to point all of the immature cubes in the bottom half of the whole third power . To do that , rotate option three to the left once , then option five to the left once . Rotate option six doubly either room and you are done .
Fourth Divination Commission Hexanexus 1.0 Puzzle
For this cube , you are shoot for to put all the green blocks up top . To do that , rotate option six once to the right . Then select selection two and rotate it once to the left . Finally , select option five and circumvolve it double either mode .
All Artisanship Commission Hexanexus 1.0 puzzles in Honkai Star Rail
Here are the locations of the four Hexanexus puzzle in the Artisanship Commission .
First Artisanship Commission Hexanexus 1.0 Puzzle
You ’ll need just two motion to solve this mystifier . Rotate option five once to the right , and rotate pick six once to the left hand to localise all the light-green mental block on the top half of the cube .
Second Artisanship Commission Hexanexus 1.0 Puzzle
This puzzle can be clear by turn out option five to the right once , then choose option one , and spread out it to the correct once . Voila !
Third Artisanship Commission Hexanexus 1.0 Puzzle
To work out this third puzzle , select option six and turn it to the correct once . Then , choice choice five and twist it to the proper once .
Fourth Artisanship Commission Hexanexus 1.0 Puzzle
This puzzle look more complex than it is . just select the second alternative and go around it twice either room to fix the mystifier .
Related : All Divination Commission Treasure Chest Locations in Honkai Star Rail
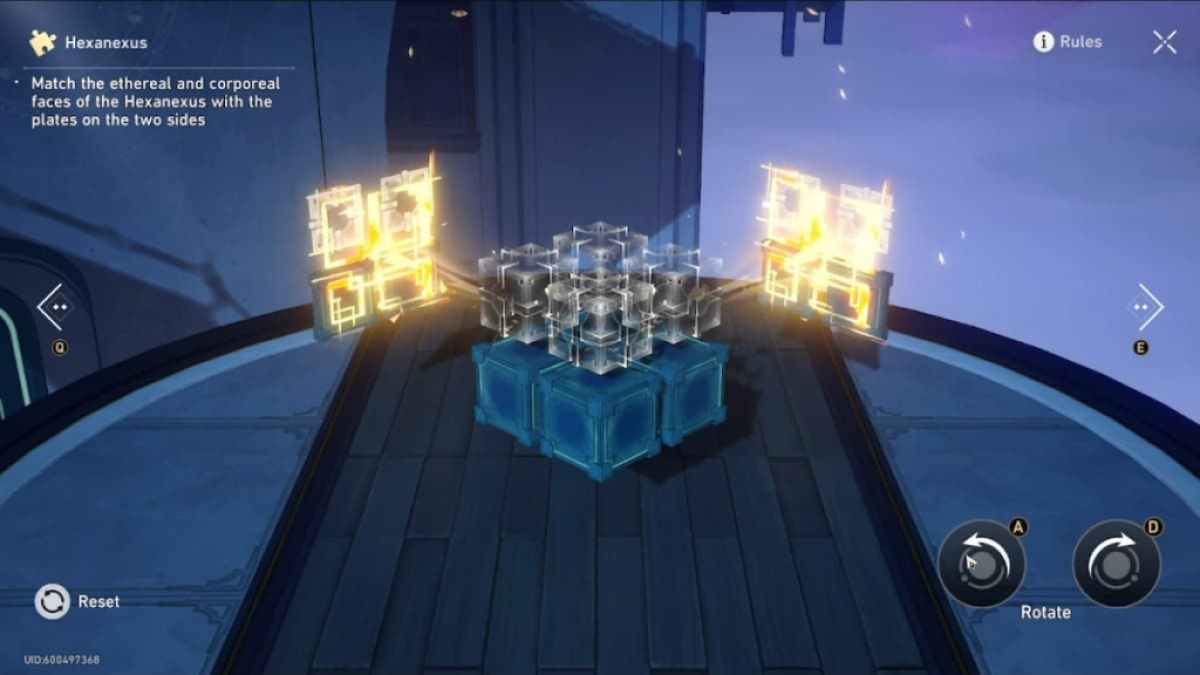
How to solve Hexanexus 2.0 puzzles in Honkai Star Rail
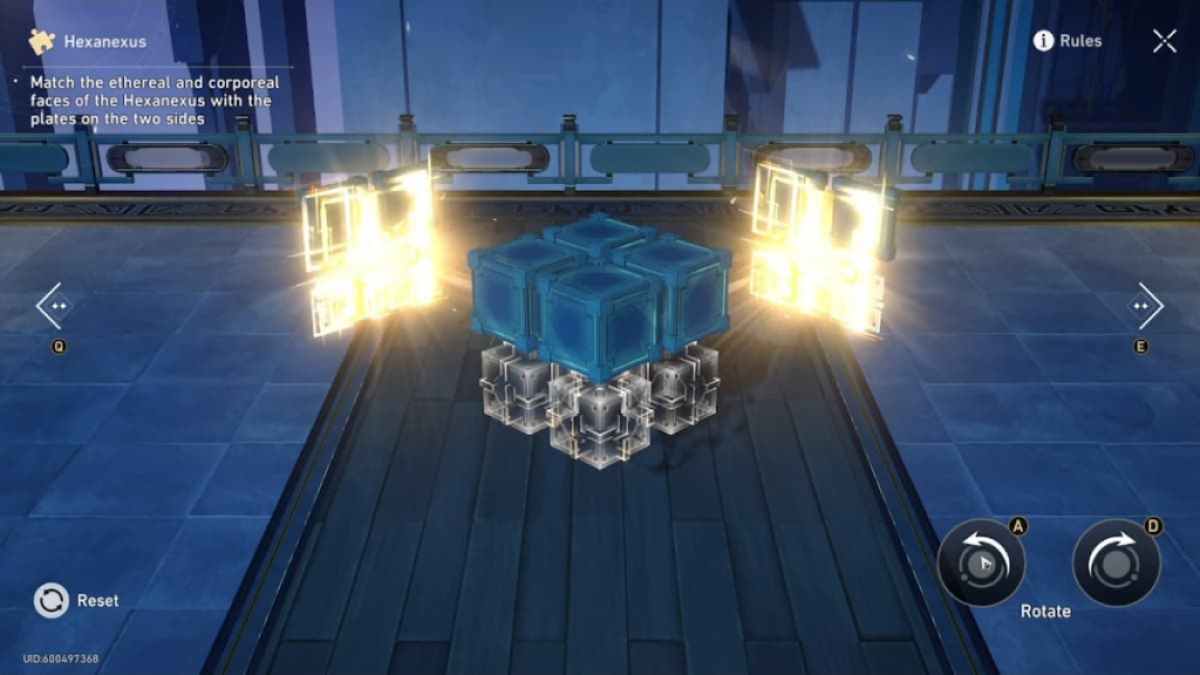
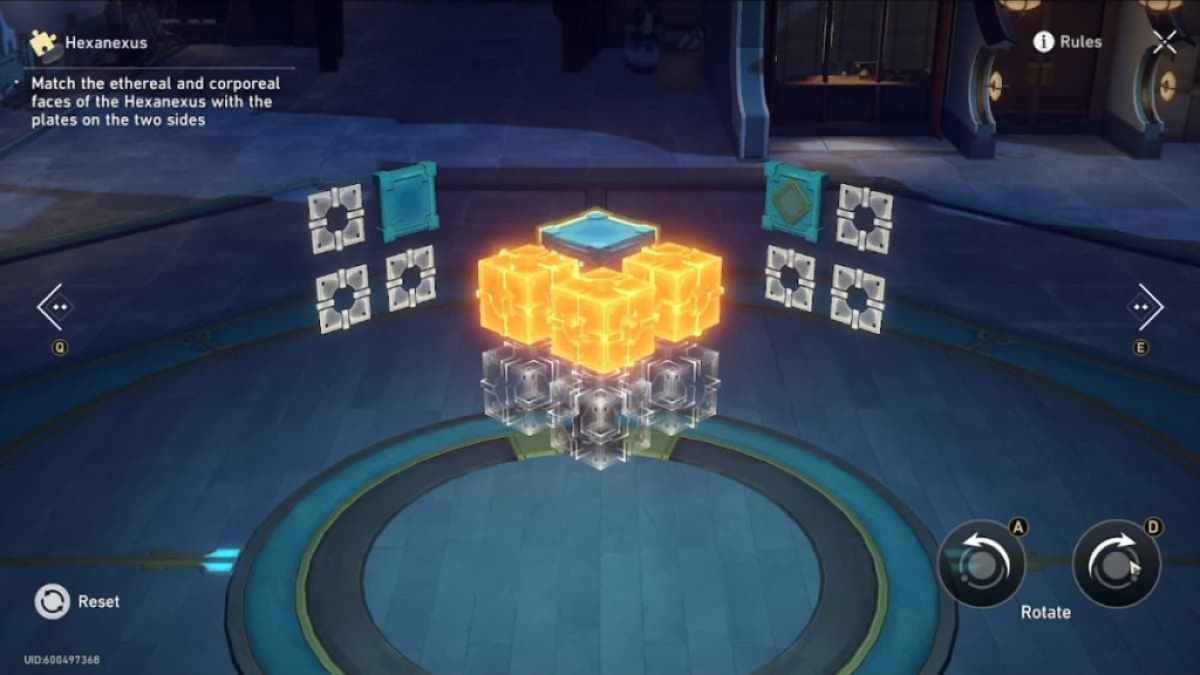
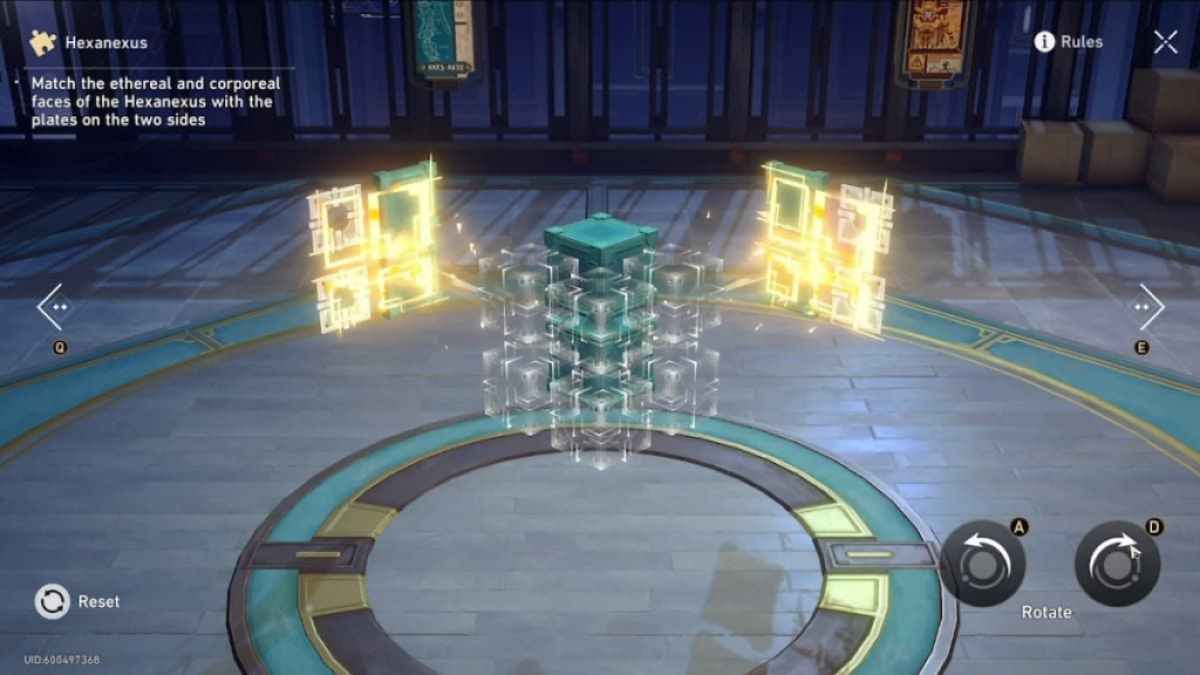
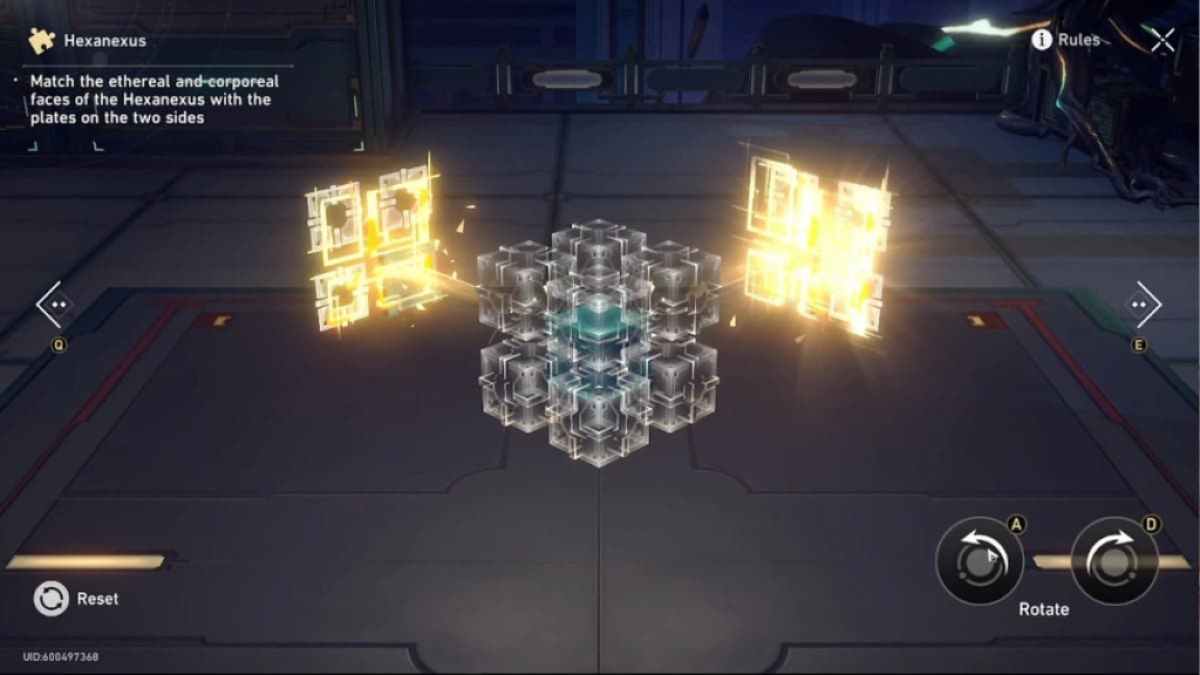
After receiving a text from the head of the Hex Club , you ’ll be given a brief explainer of how to figure out the 2nd version of Hexanexus puzzles via monstrance , this meter your goal is n’t just to gibe up the green blocks , but to also insure the a baseball diamond on the green cubes is also straightaway face a baseball diamond on the template . Take the first puzzle in the Artisanship Commission as an example .
To solve the puzzle , you ’ll need to select choice one , and rotate it to the right twice , to not only point the green block in the top back view , but also to make the rhomb face on the block face the diamond on the denture .
All Cloudford Hexanexus 2.0 puzzles in Honkai Star Rail
As a admonisher , here are the locations of all four Hexanexus Puzzles in Cloudford .
First Cloudford Hexanexus 2.0 Puzzle
This teaser can be solve in two moves . Rotate option four once to the rightfield , then rotate option six once to the left to make the diamond face the right plate . Finally , rotate option four once to the left to put the other gullible block in position .
Second Cloudford Hexanexus 2.0 Puzzle
This puzzler is a little more straight forward . Simply go around option two double either way of life to put the baseball field in the right smirch .
Third Cloudford Hexanexus 2.0 Puzzle
This one is emphatically well-off than it looks . If you rotate option three to the right once , then rotate option one double either style , your block should wind up in their proper spot .
Fourth Cloudford Hexanexus 2.0 Puzzle
To work out this concluding Cloudford puzzle , rotate option two to the left once , then option three to the left once , putting the city block and the baseball diamond in their right space .
All Stargazer Navalia Hexanexus 2.0 puzzles in Honkai Star Rail
Here are the fix of all three Hexanexus Puzzles in Stargazer Navalia .
First Stargazer Navalia Hexanexus 2.0 Puzzle
This first puzzle in the Stargazer Navalia realm is fairly simple . Rotate option three twice either way to solve it .
Second Stargazer Navalia Hexanexus 2.0 Puzzle
To solve this puzzle , rotate selection four to the correct once , then option six to the left once .
Third Stargazer Navalia Hexanexus 2.0 Puzzle
There are two diamond in this puzzle , but it is not as complex as you think . Rotate option five to the right once , then choice two twice either room to put both diamonds in place .
Related : All Exalting Sanctum Treasure Chest Locations in Honkai Star Rail
All Divination Commission Hexanexus 2.0 puzzles in Honkai Star Rail
Here are the location of the four Hexanexus Puzzles in the Divination Commission .
First Divination Commission Hexanexus 2.0 Puzzle
This puzzle is passably simple . Select selection six and rotate it twice either way to put the diamond in the correct place .
Second Divination Commission Hexanexus 2.0 Puzzle
This next puzzle took us a min . What you ’ll call for to do is rotate option one to the right once , then pick three to the right once .
Third Divination Commission Hexanexus 2.0 Puzzle
This puzzle made me recollect a little bit longer than usual . To resolve it , rotate option two doubly in any counsel . Then , rotate choice four once to the right field , then selection one once to the leftfield to put the diamond in position .
Fourth Divination Commission Hexanexus 2.0 Puzzle
This one does n’t take as many step as you think . First , rotate option two twice either agency , to put the diamond in place . Next , rotate option five twice either way . This will put all the engine block in the bottom half of the cube , and you ’ll be finished here .
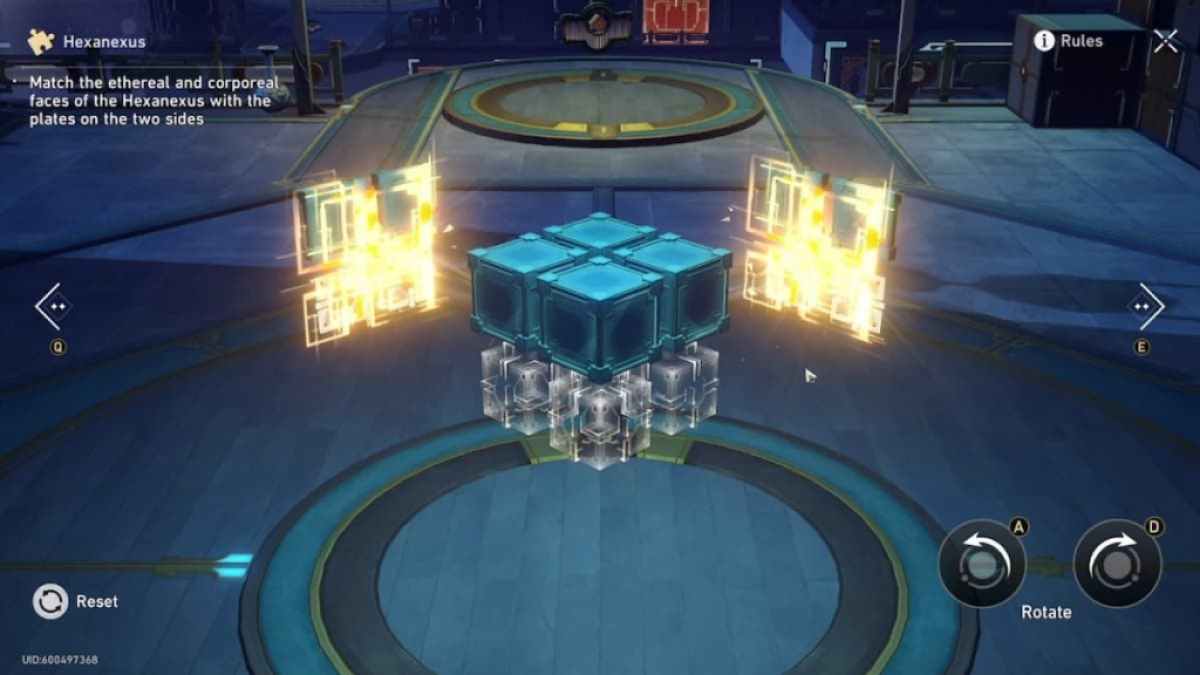
All Artisanship Commission Hexanexus 2.0 puzzles in Honkai Star Rail
Finally , these are the localisation of the four Hexanexus Puzzles in the Artisanship Commission . You should have already solved the Hexanexus at the first localisation when you were introduced to Hexanexus 2.0
To solve this teaser , rotate option five once to the right , then rotate option one doubly in either direction . ultimately rotate option six twice in either direction to put the block into place .
This puzzle is also simpler than you remember , the trick is to rotate them individually . Select selection one and rotate it twice to put the diamond in situation . Next , rotate option five in either direction double and you ’re done .
This last teaser can be solved in four moves . Rotate option four tiwce in either direction , then rotate choice two once to the left .
Looking for more puzzle solutions around the Xianzhou Luofu inHonkai : Star Rail ? Check outAll Stargazer Navalia Puzzle Solutions in Honkai Star Railhere at Pro Game Guides .
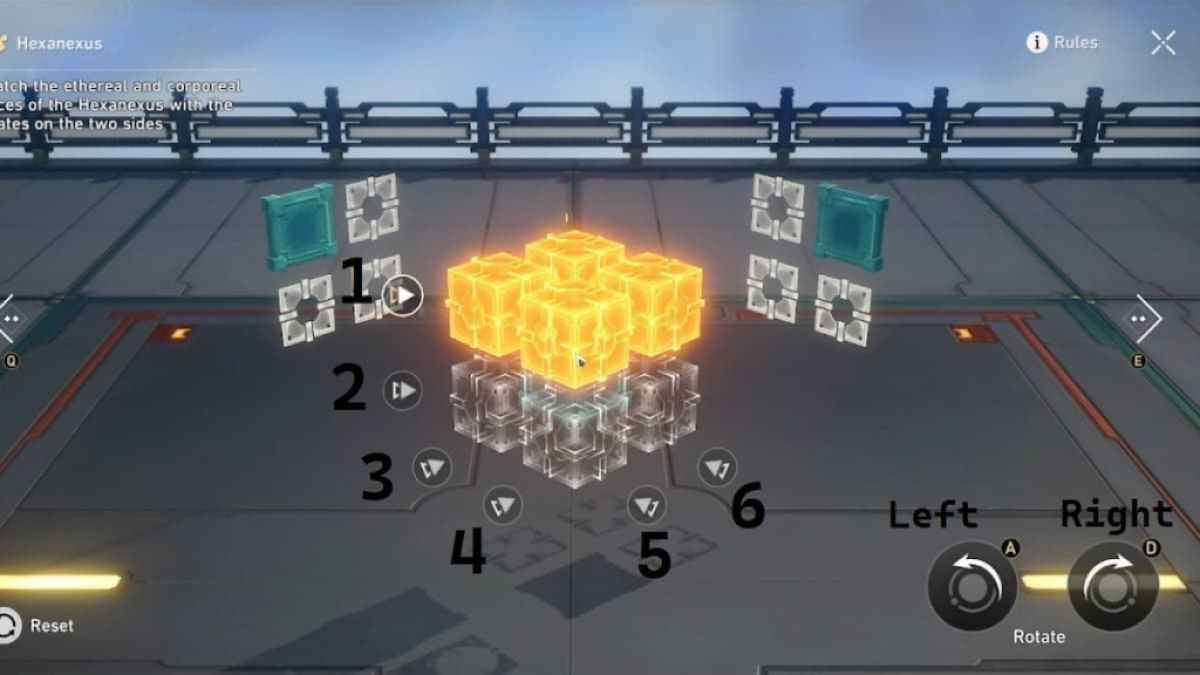
Image by Pro Game Guides
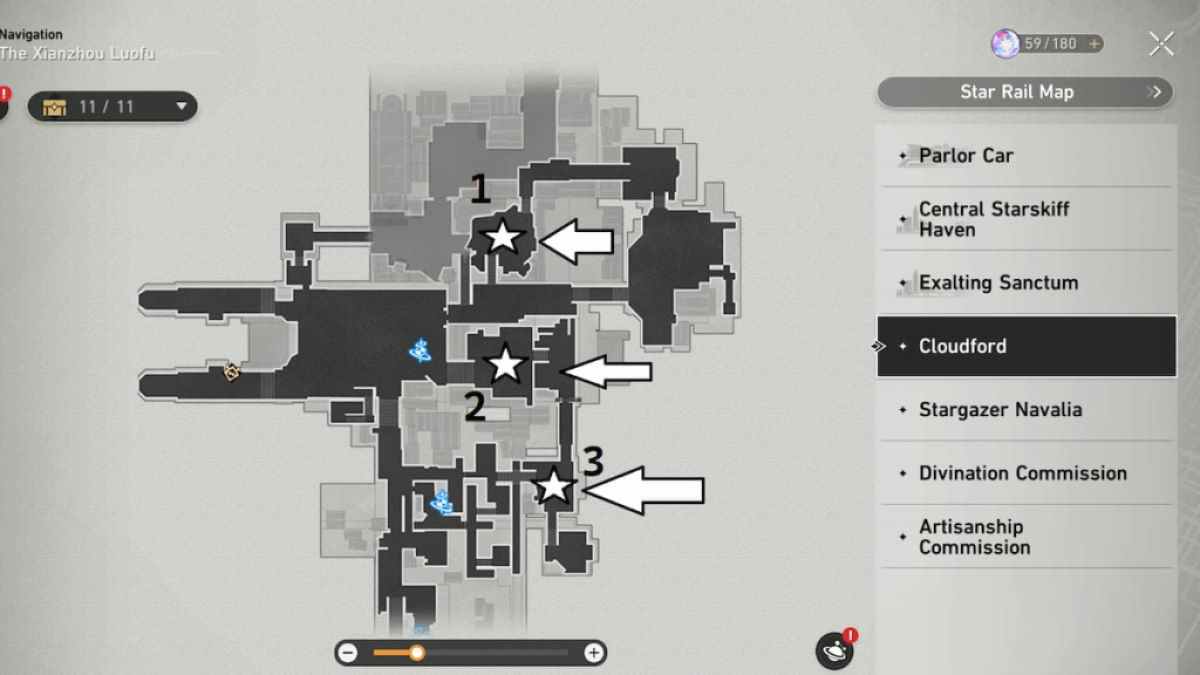
Image by Pro Game Guides
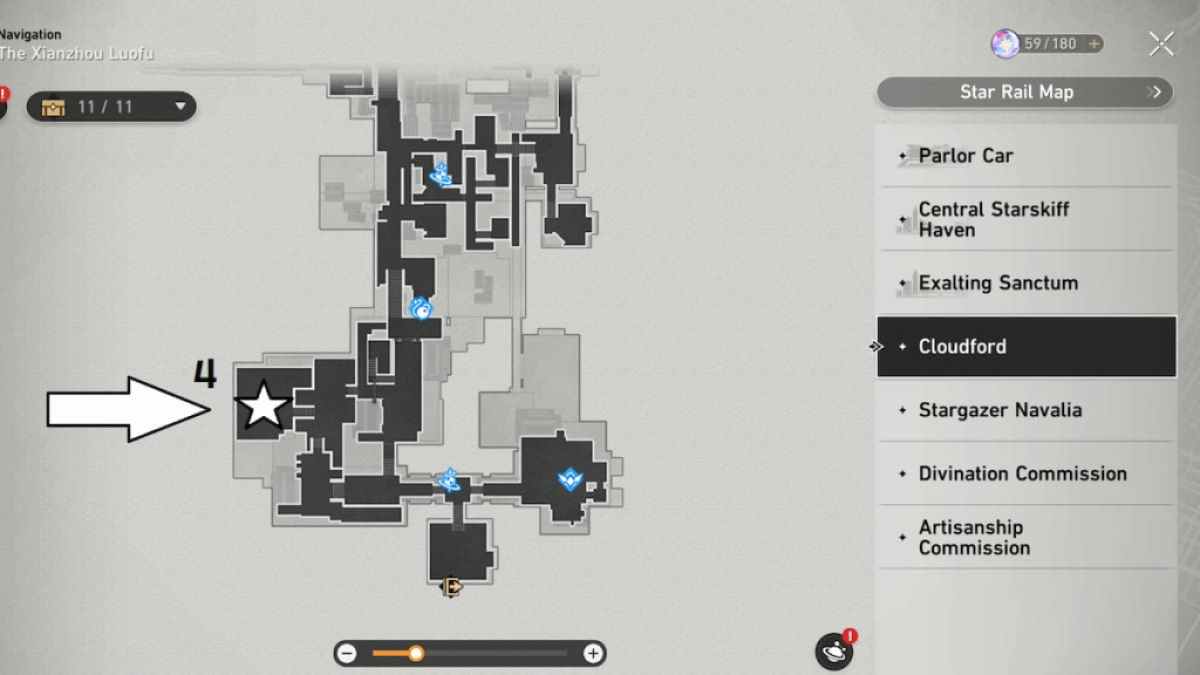
Image by Pro Game Guides
Screenshot by Pro Game Guides
Screenshot by Pro Game Guides
Screenshot by Pro Game Guides

Screenshot by Pro Game Guides
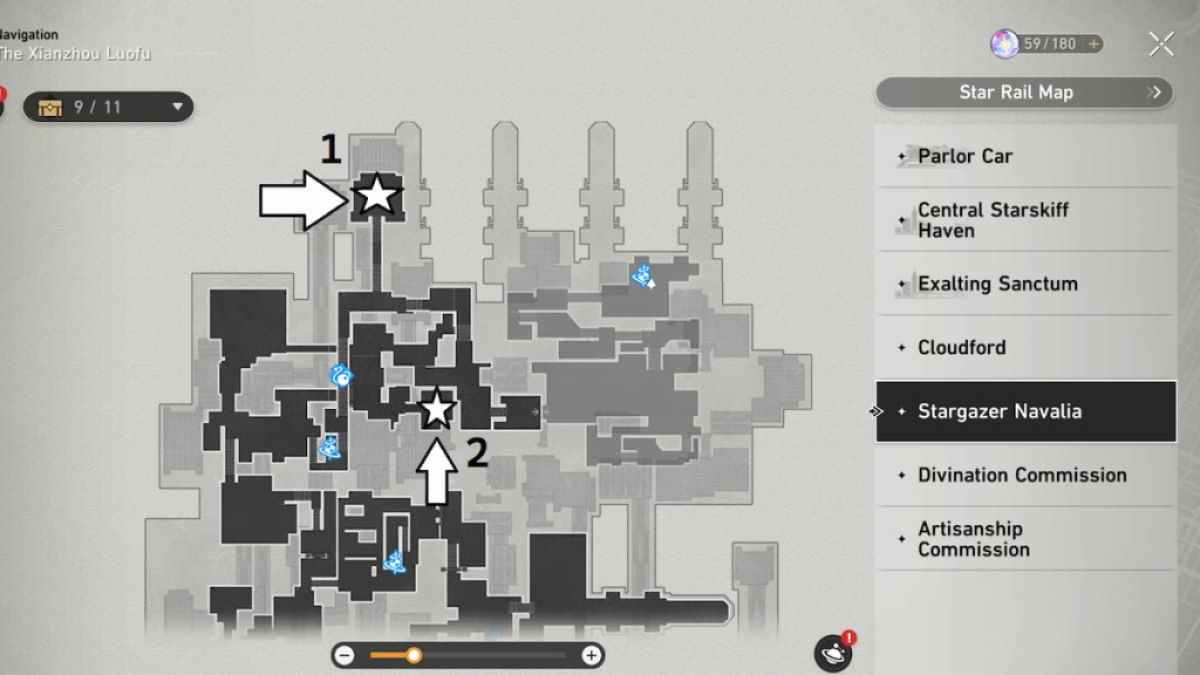
Image by Pro Game Guides
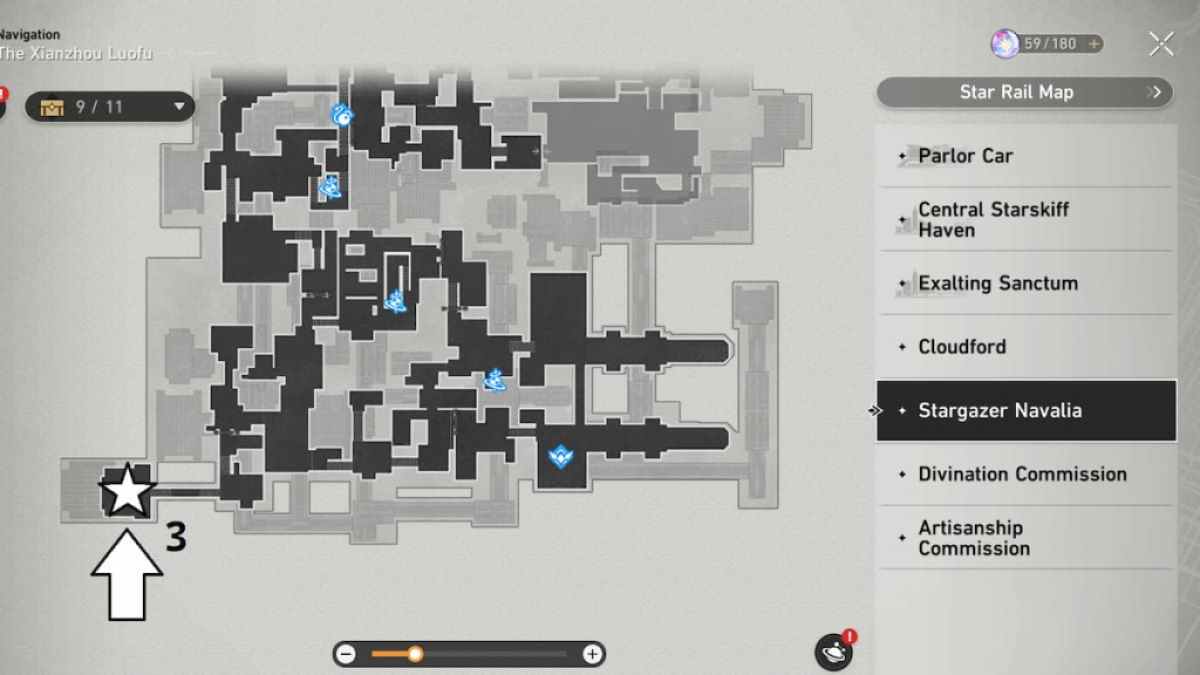
Image by Pro Game Guides
Screenshot by Pro Game Guides
Screenshot by Pro Game Guides
Screenshot by Pro Game Guides
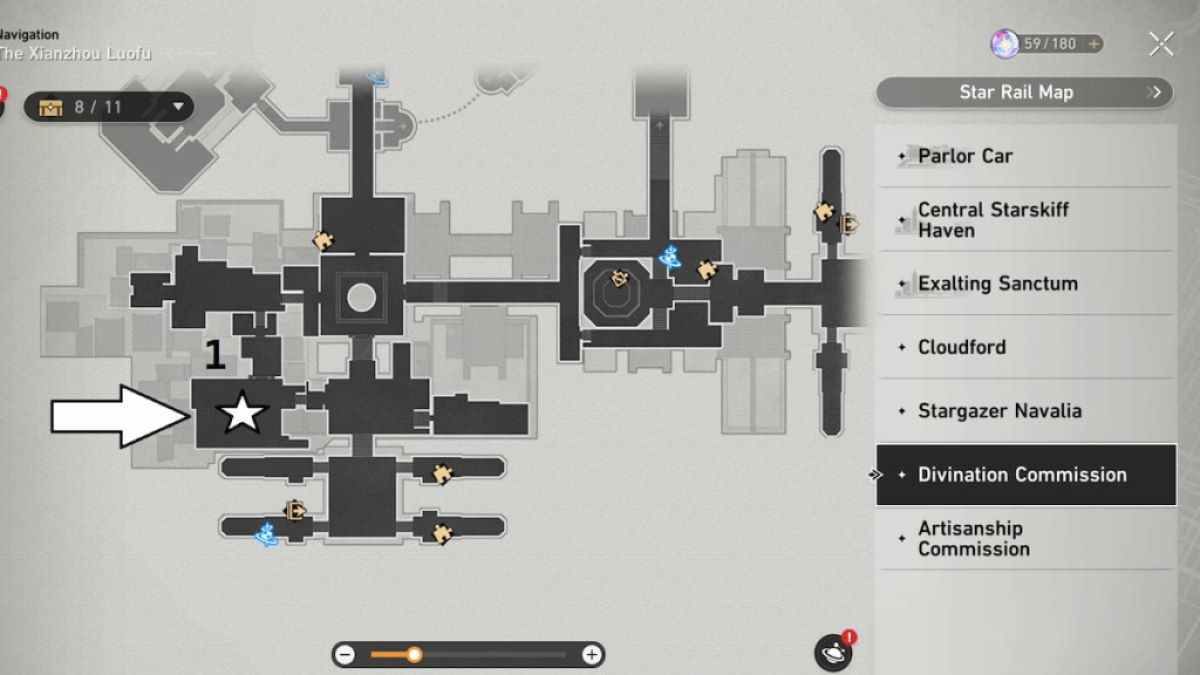
Image by Pro Game Guides
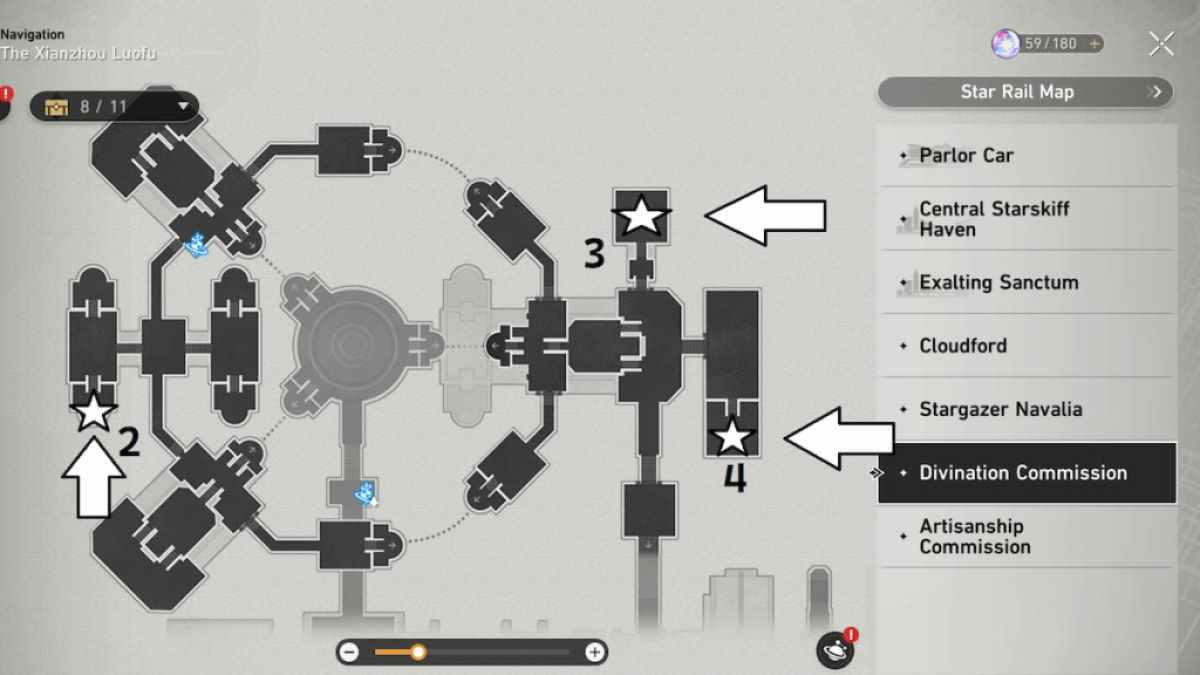
Image by Pro Game Guides
Screenshot by Pro Game Guides
Screenshot by Pro Game Guides
Screenshot by Pro Game Guides
Screenshot by Pro Game Guides
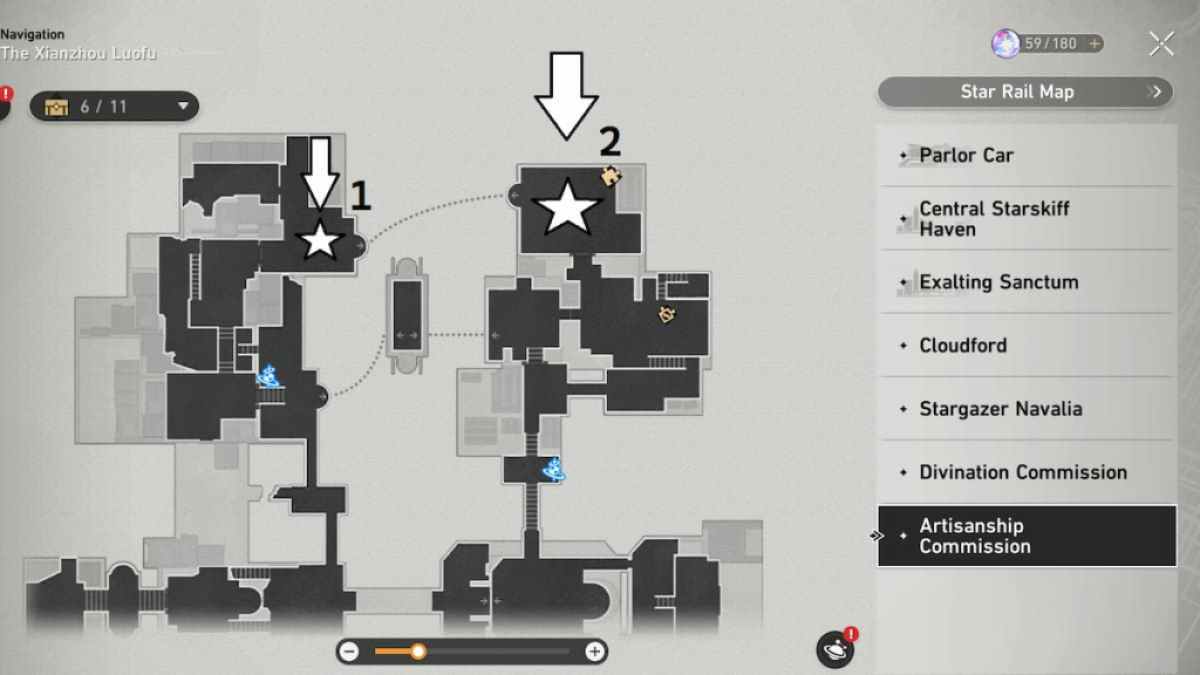
Image by Pro Game Guides

Image by Pro Game Guides
Screenshot by Pro Game Guides
Screenshot by Pro Game Guides
Screenshot by Pro Game Guides
Screenshot by Pro Game Guides
Screenshot by Pro Game Guides

Screenshot by Pro Game Guides
Screenshot by Pro Game Guides
Screenshot by Pro Game Guides
Screenshot by Pro Game Guides
Screenshot by Pro Game Guides
Screenshot by Pro Game Guides

Screenshot by Pro Game Guides

Screenshot by Pro Game Guides

Screenshot by Pro Game Guides
Screenshot by Pro Game Guides
Screenshot by Pro Game Guides
Screenshot by Pro Game Guides
Screenshot by Pro Game Guides
Screenshot by Pro Game Guides
