Got ta make that fresh armour .
In the Adamantine Forge in Baldur ’s Gate 3 , you will need both a mold and a composition of Mithril to forge armor or weapons . The molds are dispel aroundGrymforge , but the Mithril can be a little more ambitious to find ; I had a footling worry making sure I ’ve find every ore location around the Forge ’s pick up all the pieces of this precious metal .
All Mithril Veins in Baldur’s Gate 3 and where to find them
There are a totality of two different vein of Mithril to find in the totality of BG3 ; both of these are located in and around theAdamantine Forge . While you could find tiny act of Mithril in other place , you ’ll need a full chunk of it to make anything utile . This think of you may only make two of the six weapons and armour from the Forge .
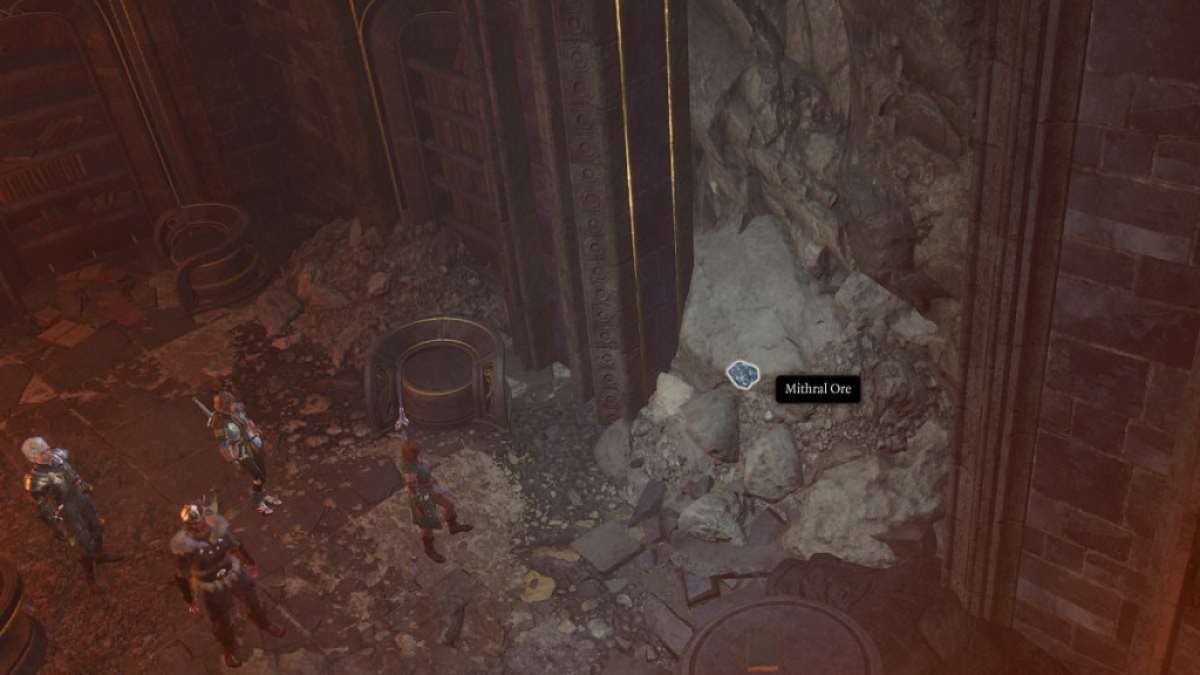
The first of the Mithril Ores is near the Waypoint for the Forge . If you guide toward the station where the skeletons attack you near the Forge ’s Waypoint , then walk past the ambush point and head down into the lava perdition , there is a Mithril Vein below by the gargantuan gear(-641,247 ) . taste it with piercing or bludgeoning damage to break it , then take the ore from the inside .
The other Mithril Ore is along the path to the Forge ; as you head down the broken stairs to the Forge itself , there is a turn - off to the left . Hop down ; there is a depository library of sort down there ; fight off theMagma Mephitsthat spawn , then calculate for the giant spike of Mithril stick out out of the back wall(-550 , 273 ) . I would also evoke a Potion of Fire Resistance for each of your party members for this fight .

Where to find all the Adamantine Forge molds in BG3
There are six different molds located around Grymforge and the Adamantine Forge areas . Two of these are armour , one is a shield , and the residuum are artillery . you may make two of the follow : medium armour , heavy armor , a shield , a longsword , a scimitar , or a mace ; you may also make two of the same kind of armour or weapons if you would like . The first is aLongsword Mold , which is on the catwalk above the Grymforge .
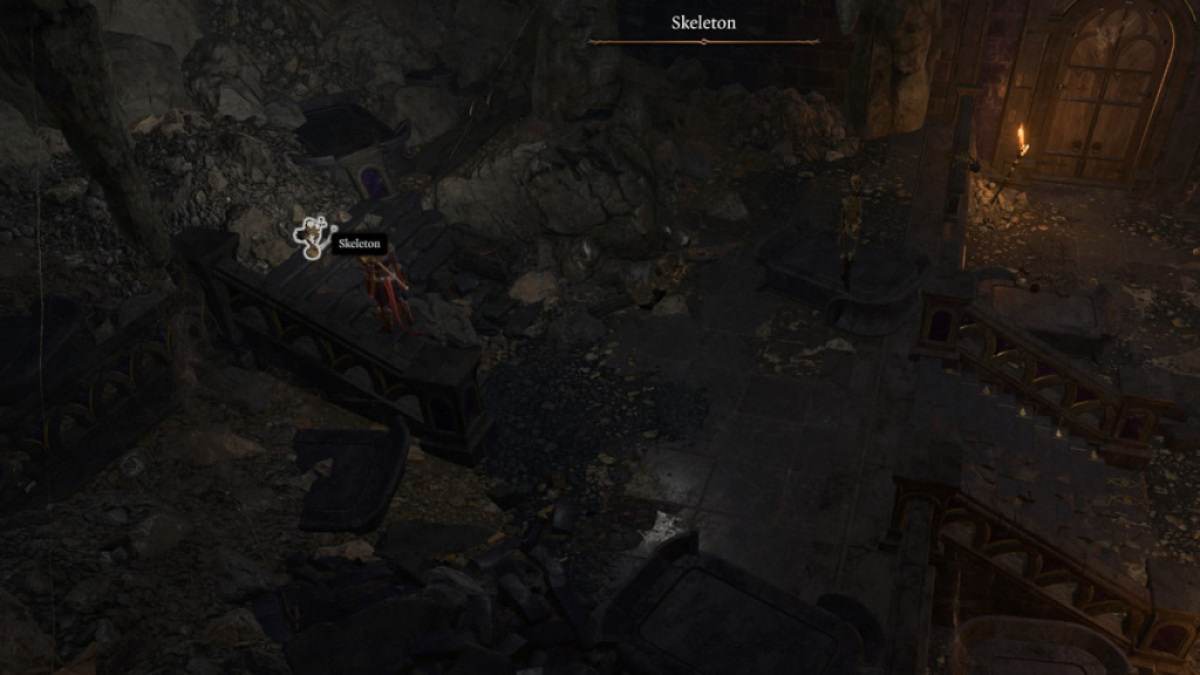
The 2d is settle in the inventory of a skeleton near the door on the west side of Grymforge . You will need to guide up toward the catwalk , then take the incite platform across to the western upper side of Grymforge . Look for the large , interlock double threshold near where the infernal are conceal .
relate : BG3 – How to bring around the Shadow bane
Screenshot by Pro Game Guides
Next up , look for a skeleton next to the controls for the rusty move platform . It is wearingDark JusticiarArmor , and it has a mould in its armoury .
The last three molds are located near to the Waypoint for the Adamantine Forge . The Scale Mail mold can be find oneself powerful at the foot of the skeletal system ' trap full point , at the base of the rope ravel .
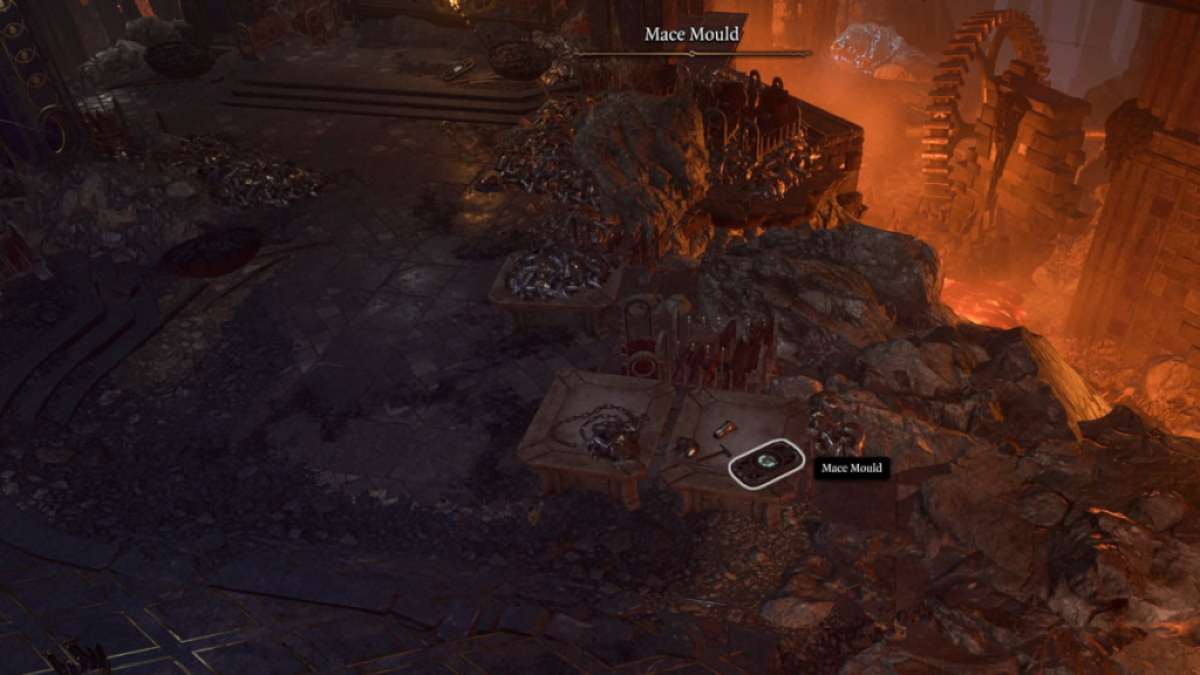
The Mace Mold is also very skinny to the ambush item ; there is a table close to the Waypoint that has a mold on top of it .

Screenshot by Pro Game Guides
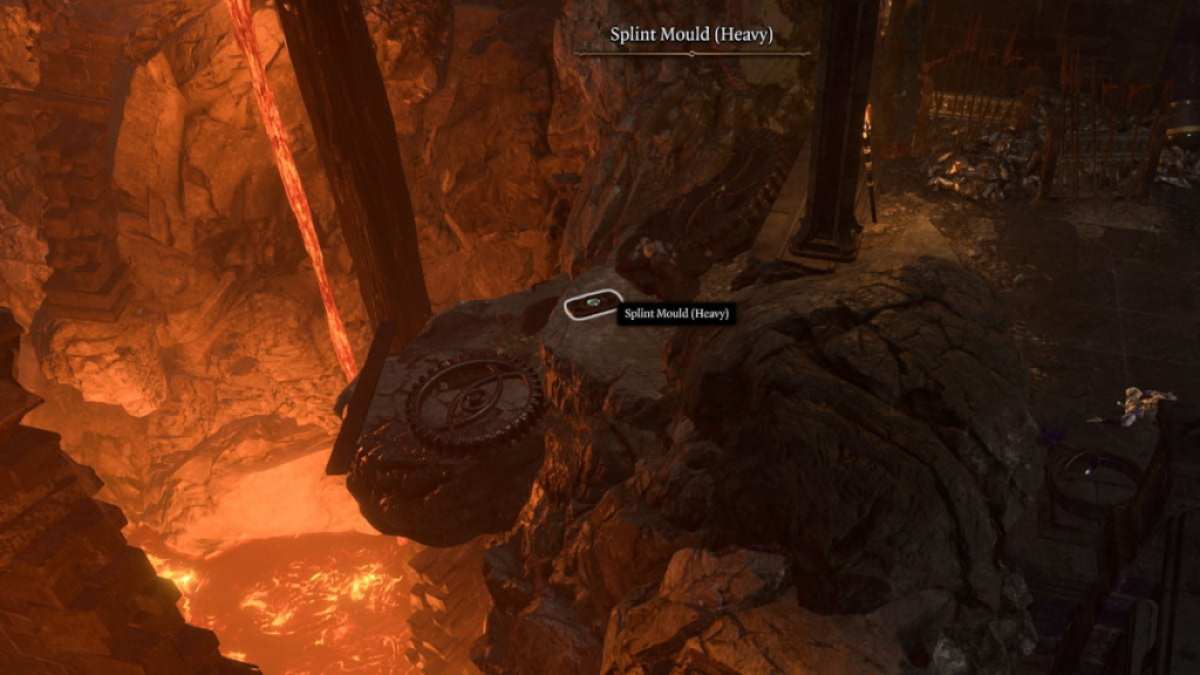
The heavy armour mold is settle on the diametrical side of the Waypoint from the Mace . If you are standing with your back to the Waypoint look the step to the Forge , the mold will be on the flat coat to the left hand .
All Adamantine Forge armor and weapons stats
Now you know where to get the molds and where to get the Mithril Ore , so you ’ll need to figure out which two of the six molds you ’ll use in the Forge . Since there are only two of the ore , you ’ll want to figure out which of the following fits your team the good . While they are all great Act 1 item , I prefer two piece of spiritualist or heavy armor . They seem to be the items that are relevant the longest . Here are all the stats for each item :
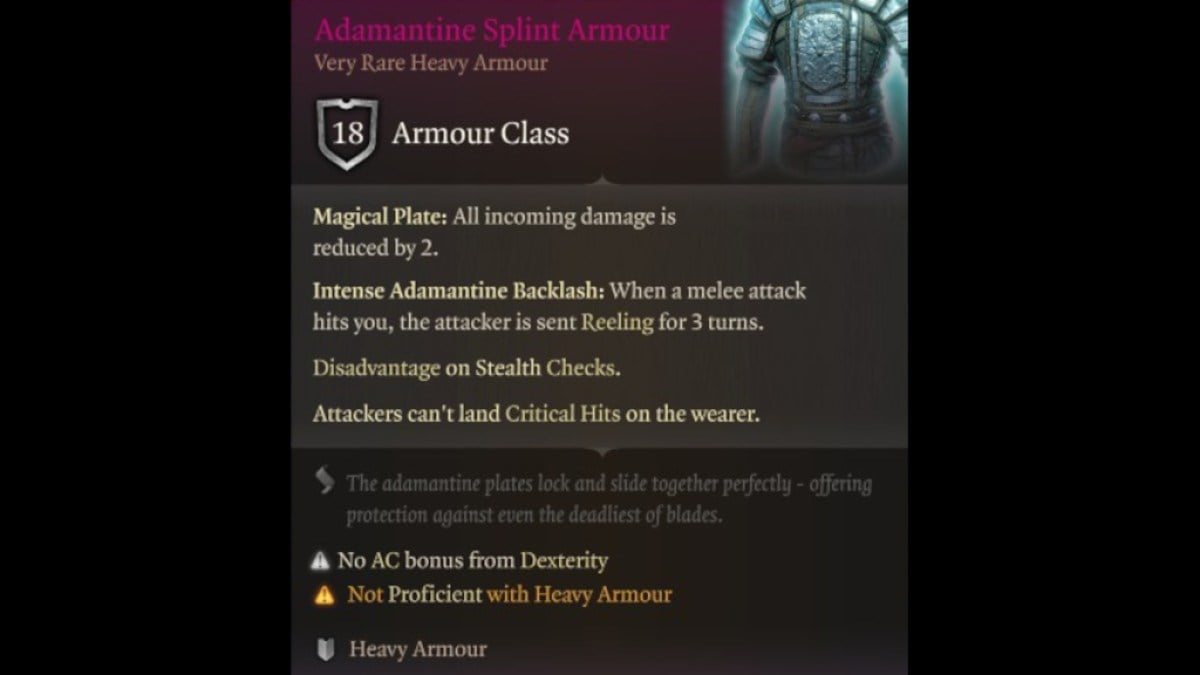
Adamantine Splint
This is a herculean Heavy Armor proceed intoAct 2for any warrior , barbarian , War Cleric , or anyone with a Heavy Armor feat .
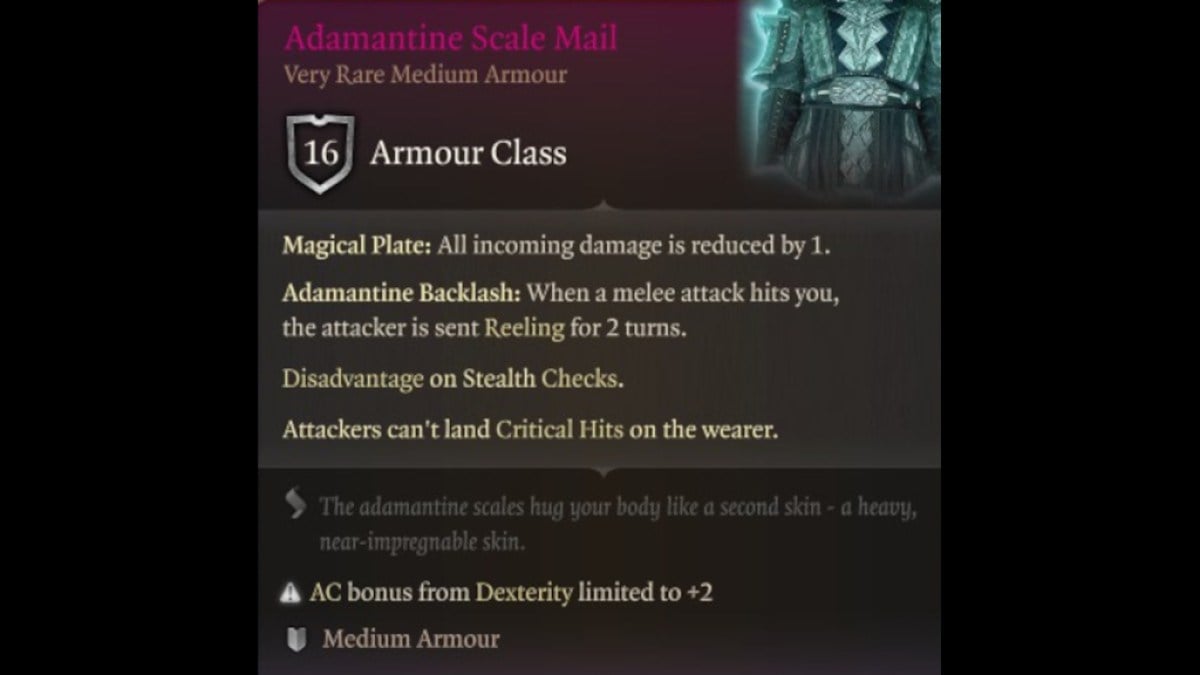
Adamantine Scale
The Scale variation of the Adamantine Armor is not quite as powerful as the Splint version , but medium armor can be wear by many more classes .
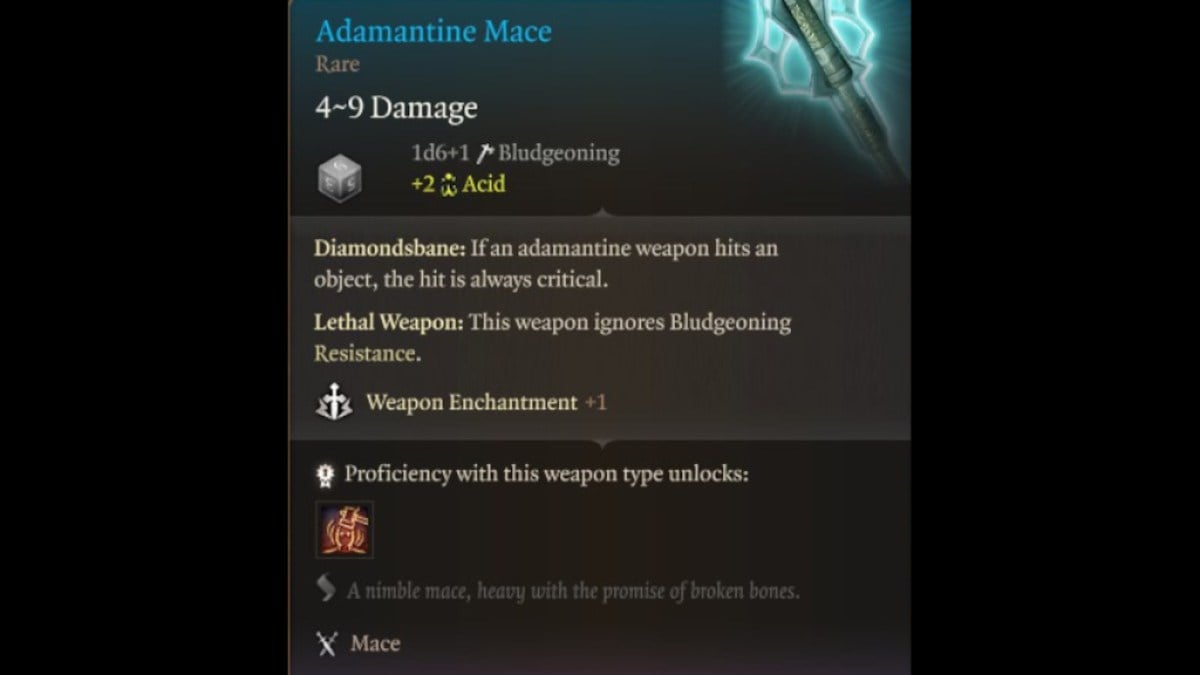
Adamantine Mace
There are also a couple of Adamantine weapons , one being the Mace . It ’s a bludgeoning weapon with a sight of power in it .
Related : Eldritch Knight Build Guide BG3
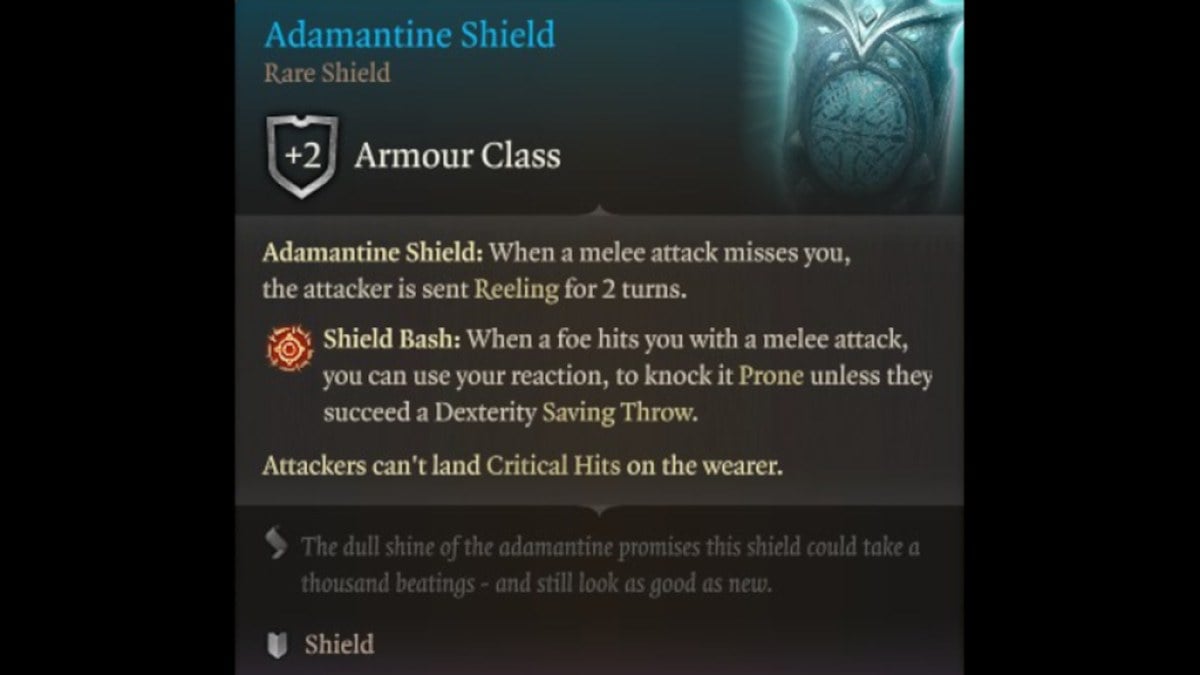
Adamantine Shield
A great spouse to the Mace is the Adamantine Shield , which is one of the better shields in Act 1 .
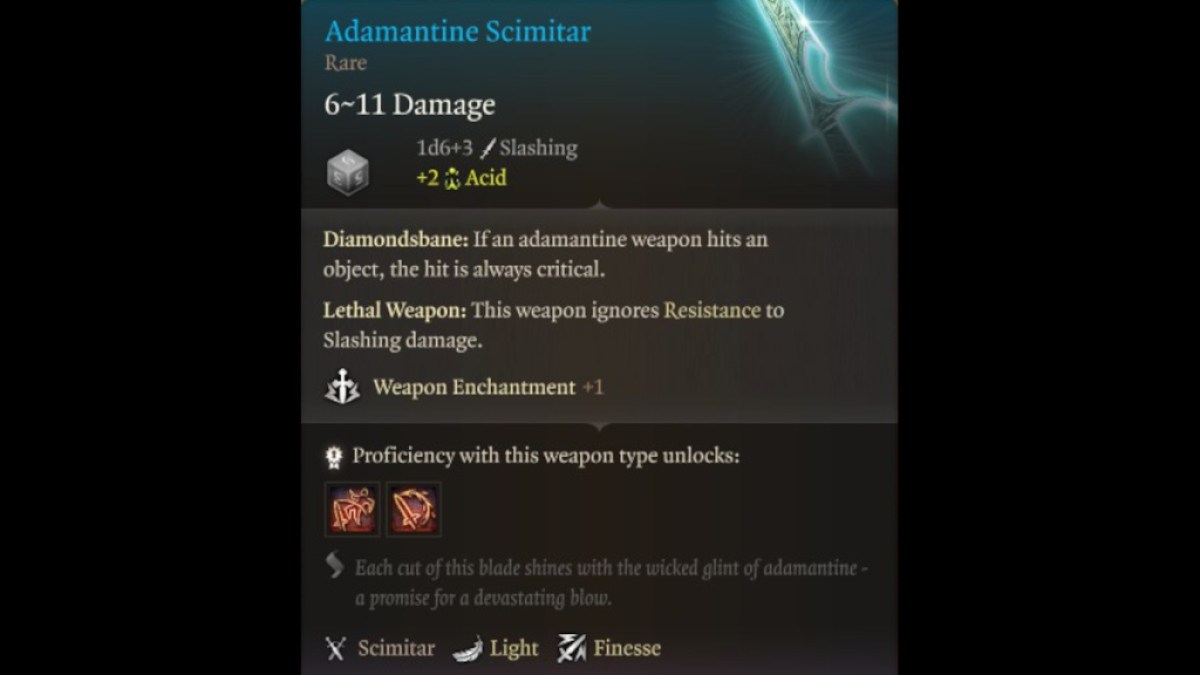
Adamantine Scimitar
For those using Wyll in their political party , the Adamantine Scimitar might be worth a look . It ’s not as good as the armour , but it ’s a pretty good Scimitar for Act 1 .
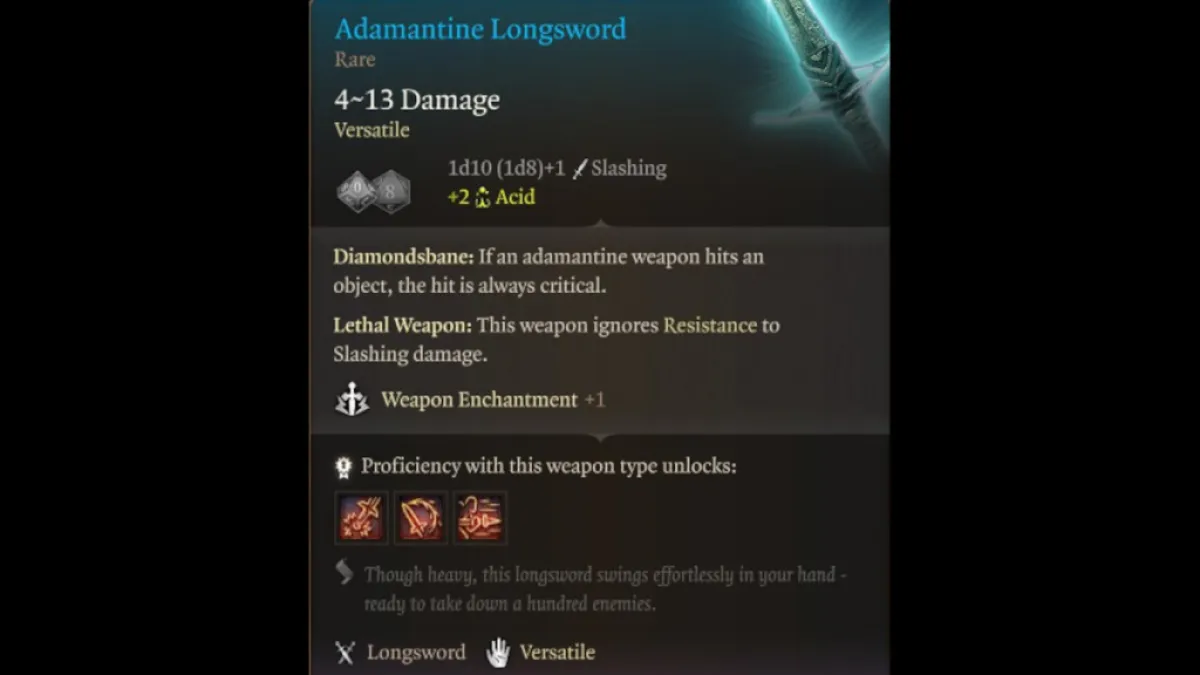
Adamantine Longsword
The Longsword made of Mithril is a various weapon that can be equipped as one - handed or two - handed . This is not bad for warriors , war clerics , and other melee form .
How to use the Adamantine Forge
In ordination to use the Forge , select the Mold Chamber ; it is located between the step down to the Forge and the round Crucible in the center . Put in the chosen mold , then clack on the Crucible to put the ore inside . Next , frown the Forge with the Forge Lever on the southerly chopine .
Once the Forge has been lowered into place , twist on the Lava Valve on the easterly platform of the Forge . The platform will flood with lava . Then , you ’ll involve to kill the Grym Construct that spawns .
The Mold Chamber will pop subject when the particular is end . Grab the detail , then interact with the Mold Chamber one more time to get rid of the mold and put a novel one inside .

Screenshot by Pro Game Guides
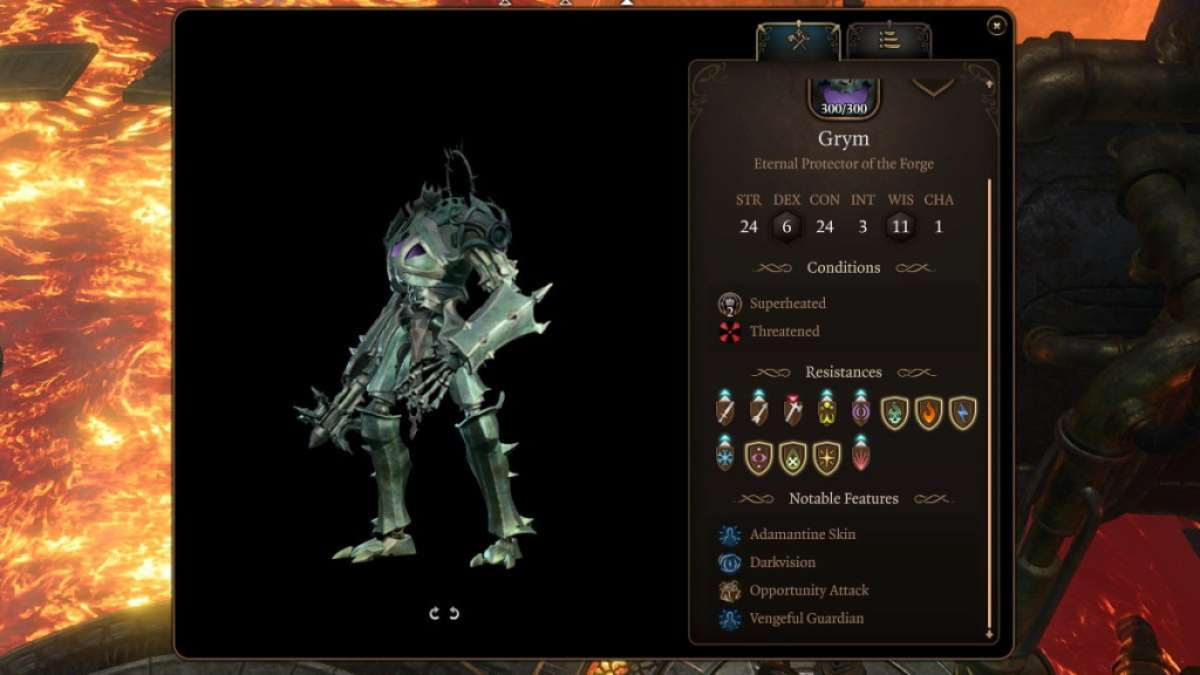
How to defeat the Adamantine Forge’s guardian construct Grym
Grym is a monumental construct that will attack you the moment you essay to fire up the Adamantine Forge . It is a construct that is n’t easy to kill unless you know its closed book . It is invulnerable to damage when it is not Superheated , and it is only vulnerable to Bludgeoning damage when it is Superheated .
Here are its stats :
The illusion to getting rid of this monolithic construct is to Superheat it byflooding the battlefield with Lava via the Lava Valve rack . Hit Grym with ranged fictitious character across the field to spark its Threat Assessment ; it will always walk toward the last character that examine to damage it . lay it in the center of the Forge , then perpetrate the lever to smash it under the Forge ’s pound .

Screenshot by Pro Game Guides
It will take more than one hit , but it ’s the only way to do enough hurt to get rid of it in a well-timed personal manner .
For more Baldur ’s Gate 3 , check outBaldur ’s Gate 3 Finesse Weapons Guideon Pro Game Guides .
Screenshot by Pro Game Guides

Screenshot by Pro Game Guides

Screenshot by Pro Game Guides
Screenshot by Pro Game Guides
Screenshot by Pro Game Guides
Screenshot by Pro Game Guides
Screenshot by Pro Game Guides
Screenshot by Pro Game Guides
Screenshot by Pro Game Guides
Screenshot by Pro Game Guides
Screenshot by Pro Game Guides

Screenshot by Pro Game Guides
Screenshot by Pro Game Guides

Screenshot by Pro Game Guides
