A skillful intellect to explore the Vivarium .
Hogwarts Legacy is full of collectable thorax that rewards players with unique items to decorate theirRoom of Requirement , and their Vivariums . These chest are have intercourse in - secret plan as Collection Chests , and a pre - determined number of them can be found in every region . However , what most actor might not be cognisant of is that you could also get Collection Chests inside the four different Vivariums which you could get at through your Room of Requirement . The following are the location of all 12 Collection Chests that you will bump in your Vivarium in Hogwarts Legacy .
All Collection Chest Locations in the Vivarium in Hogwarts Legacy
Vivariums are the magical sanctuaries where you could shelter and breed magical beasts in Hogwarts Legacy . Inside your Room of Requirement , you will encounter the gateway to four dissimilar vivarium . To unlock the Vivarium , you must first dispatch Deek ’s pursuance , The Elf , the Nab - Sack , and the Loom . Here are the emplacement of all the Collection Chests you will line up in the four Vivariums in Hogwarts Legacy .
Grassy Vivarium Collection Chest #1
The first Collection Chest inside the grass covered Vivarium is on top of a minor pitcher’s mound to your left as you enter the Vivarium . Once you introduce , reverse left , and then climb up the path on the left side of the part . You will find the Collection Chest on the top of this hill where the path ends .
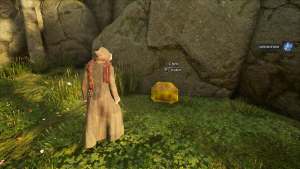
Grassy Vivarium Collection Chest #2
Grassy Vivarium Collection Chest #3
The terminal Collection Chest in the grassy Vivarium is find inside the cave that is located in front of you as you recruit the Vivarium . crawling through the opening , and then reverse mighty to find the Collection Chest .
Related : All Hogwarts Valley Ancient Magic Hotspots in Hogwarts Legacy
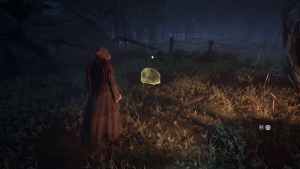
Dark Vivarium Collection Chest #1
The first Collection Chest in the dark Vivarium is found beyond the swampland . To line up it , enter the Vivarium , and then turn left to find the swamp . Cross the swamp by skipping over the rocks , and then enter through the gap between the lamp spot and the exposed tree diagram roots . Climb up the ledge , and the Collection Chest will be in front of you .
Dark Vivarium Collection Chest #2
To get to the second Collection Chest in the colored Vivarium , climb up the shelf with the lamp post that is situated in front of you as you enter the Vivarium . Once you ’re up , jump over the gap to the careen formation on the other side , and then turn right to get the Collection Chest at the bottom of a Sir Herbert Beerbohm Tree .
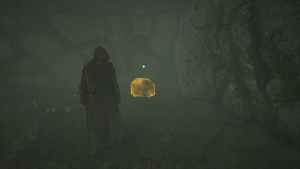
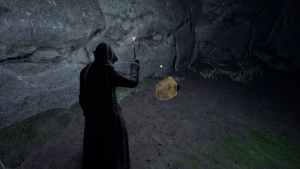
Dark Vivarium Collection Chest #3
The net Collection Chest in the dark Vivarium is found inside a cave to your northeast as you come in the Vivarium . To discover it , go through the gaps in between gravid roots of the Sir Herbert Beerbohm Tree point in the image above . Then , turn right , climb up the ledge , and use Confringo or Incendio to transfer the cobwebs and go in the cave . The Collection Chest will be located behind a large bowlder inside the cave .
Coastal Vivarium Collection Chest #1
To find the first Collection Chest in the coastal Vivarium , turn left as you enter the Vivarium . climb up up the ledge , and go through the narrow way of life in between the rock . Then , turn aright to regain the Collection Chest at the destruction of the path .
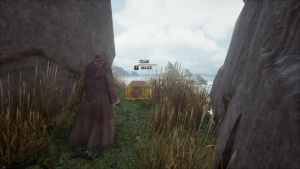
Coastal Vivarium Collection Chest #2
The second Collection Chest in the coastal Vivarium is come up on top of a flat rock formation near the sea . To get there , climb up the shelf , and go through the path that is marked in the epitome above . Once you reach , you will notice a ledge to your left which you could mount to retrieve the Collection Chest .
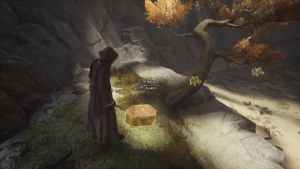
Coastal Vivarium Collection Chest #3
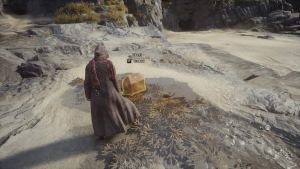
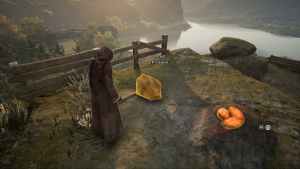
The final Collection Chest in the coastal Vivarium is locate inside the cave establish in the Vivarium . just participate the cave , and then follow the path until you find the Collection Chest under a small tree diagram to your left hand .
associate : All Hogwarts Valley Balloon Locations in Hogwarts Legacy
Mountain Vivarium Collection Chest #1
Inside the hatful Vivarium , you will discover the first Collection Chest on top of the rock formation that resemble a nosepiece . go up up the shelf that is marked in the persona above , and you will rule the Collection Chest at the end of the path .
Mountain Vivarium Collection Chest #2
To find the 2d Collection Chest in the mountain Vivarium , you must go through the archway create by the careen formation . Keep going down the path as it turns right , and you will get the Collection Chest where the road ends .
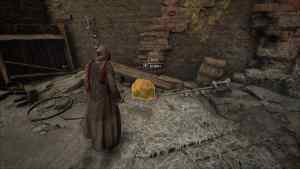
Mountain Vivarium Collection Chest #3
The final Collection Chest in the stack Vivarium is found inside the ruining of the castle bump in the realm . Enter through the doorway , and then turn right . You will encounter a couple of cobwebs which you must remove by using Confringo , or Incendio . Then , manoeuvre forward , and you will find the Collection Chest in the room where the road terminate .
Looking for more Collection Chests in Hogwarts Legacy ? Check outAll Irondale Collection Chests in Hogwarts Legacy , right here on Pro Game Guides .

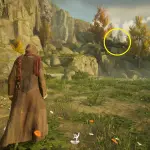
Image by Pro Game Guides

Image by Pro Game Guides
Screenshot by Pro Game Guides
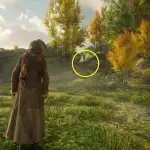
Image by Pro Game Guides
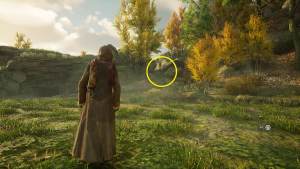
Image by Pro Game Guides

Screenshot by Pro Game Guides
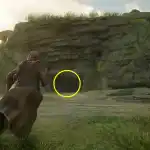
Image by Pro Game Guides
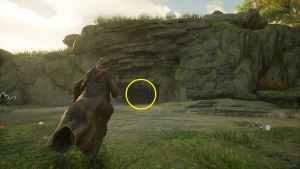
Image by Pro Game Guides
Screenshot by Pro Game Guides

Image by Pro Game Guides
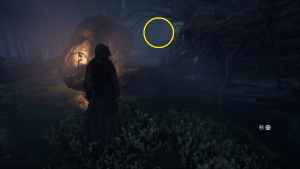
Image by Pro Game Guides
Screenshot by Pro Game Guides
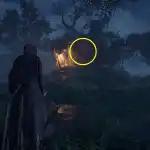
Image by Pro Game Guides
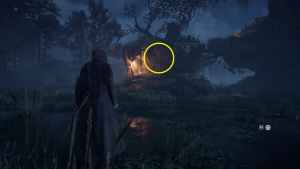
Image by Pro Game Guides

Screenshot by Pro Game Guides
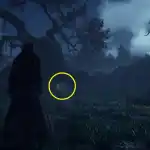
Image by Pro Game Guides
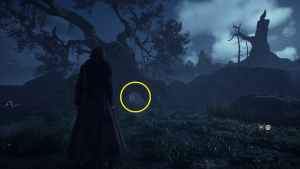
Image by Pro Game Guides
Screenshot by Pro Game Guides

Image by Pro Game Guides
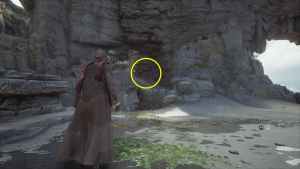
Image by Pro Game Guides
Screenshot by Pro Game Guides
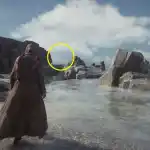
Image by Pro Game Guides
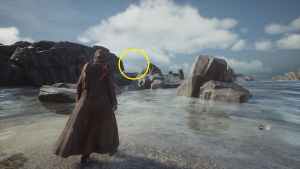
Image by Pro Game Guides
Screenshot by Pro Game Guides
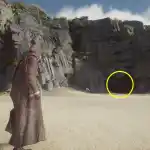
Image by Pro Game Guides
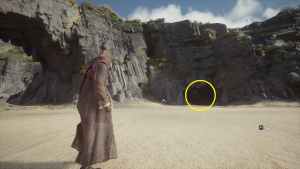
Image by Pro Game Guides
Screenshot by Pro Game Guides
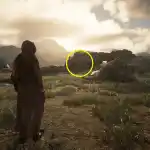
Image by Pro Game Guides
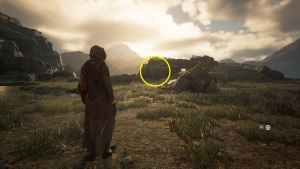
Image by Pro Game Guides
Screenshot by Pro Game Guides
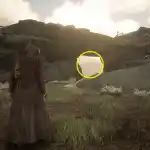
Image by Pro Game Guides
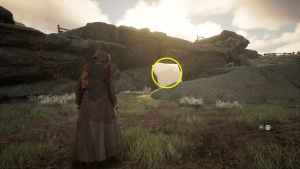
Image by Pro Game Guides

Screenshot by Pro Game Guides
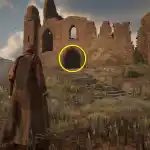
Image by Pro Game Guides
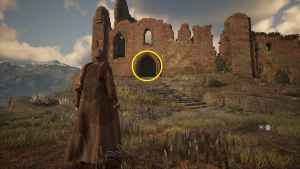
Image by Pro Game Guides
Screenshot by Pro Game Guides
