Looking for a clew to solve Clue ?
Clue : The Murder of Mr. Black is a limited - time puzzle game in theAdventure Escape Mysteriesseries , available on both the iOS and Android Mobile River platforms . It is base on characters and preferences from the pop Clue card secret plan , with you playing the function of Detective Brown as he tries to solve the whodunit . The game is split across three chapters , and you’re able to get a full walkthrough of Clue the slaying of Mr. Black below .
Full Walkthrough for Clue The Murder of Mr Black - Adventure Escape Mysteries
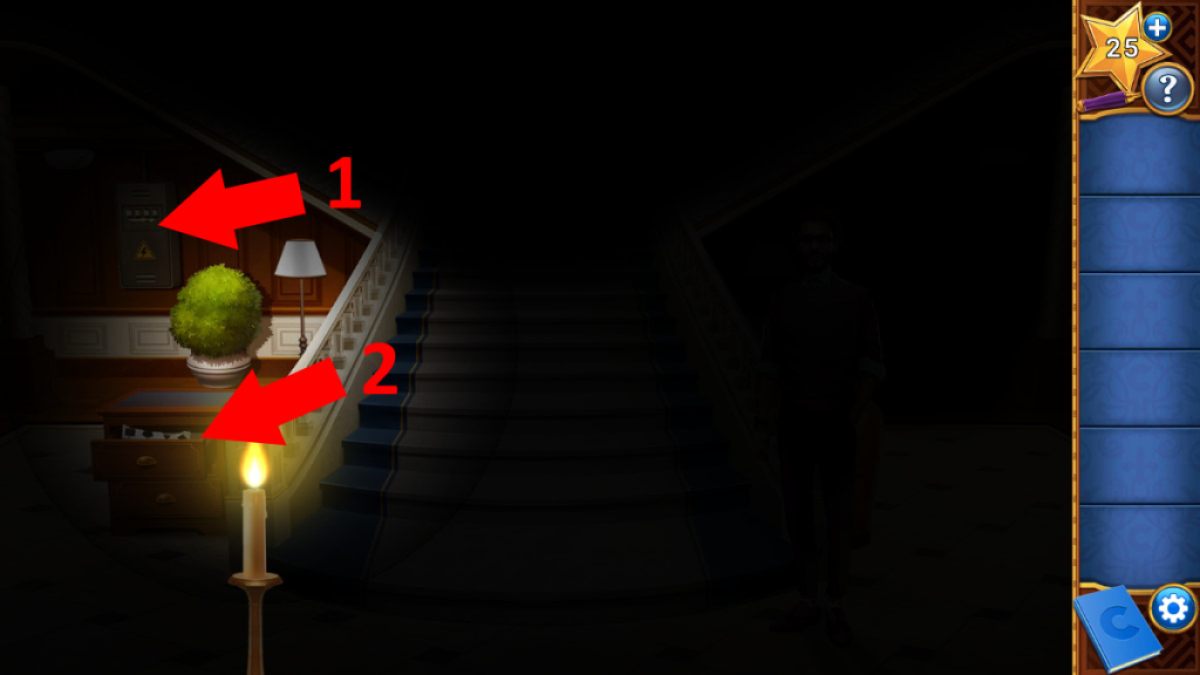
You make it at the Clue mansion to find there has been a power cut . You ’re met by Professor Plum in the lobby and take hiscandleto assay and find a world power source . Move the candle to the left and find thefuse box(1a ) , which require a four - finger code . Move the taper down a little andopen the top desk draw(1b ) to find thecode .
Use it on the electrical fuse boxful to see the first target , a square , has the telephone number four below it . As this is the routine of side on the anatomy , you ’ll involve code4534to afford the fuze box .
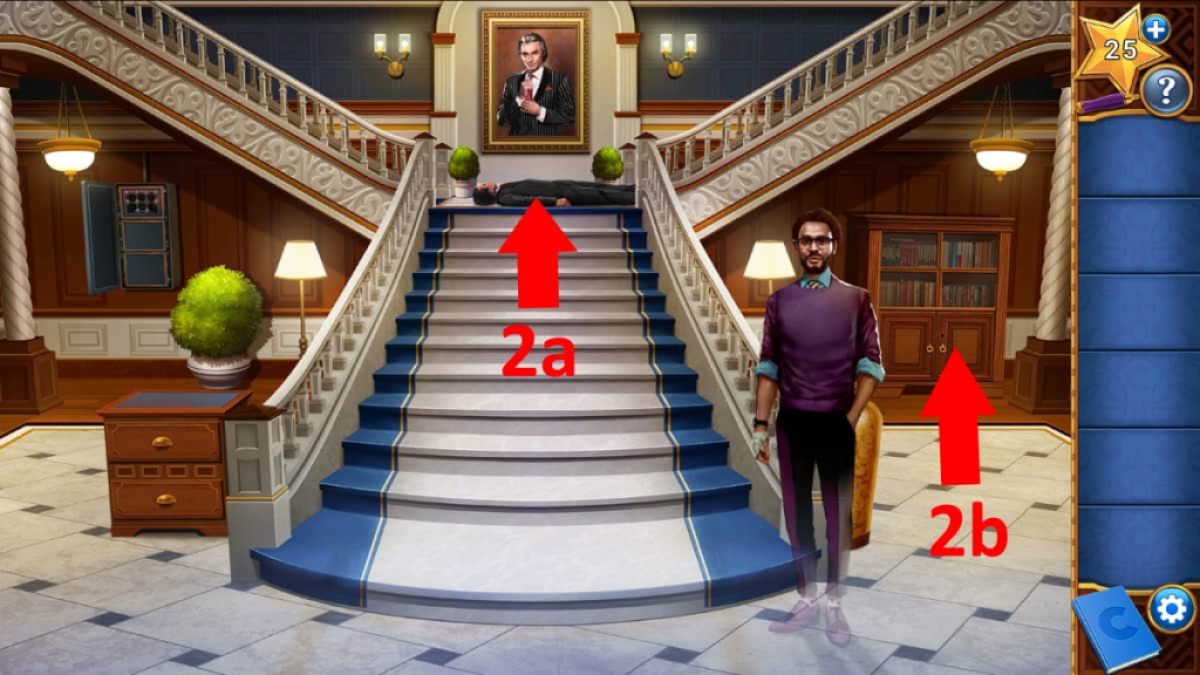
dispatch the fuze box puzzle to turn the lighter back on . Moveredhome first , thenyellow . Movepurpleright and then up , then getgreenhome . Finally , movepurplehome . The light will come on , and you will discover the body of Mr Black . Click the corpse for a close up - up ( 2a ) , then his neck to check his pulsation and undo his top forgetful clit . fall into place the corduroy around his neck opening to get thekey .

at long last , spill the beans to Professor Plum , then use the key on thebookcase(2b ) to get the housemap . principal towards the Dining Room .
Related : On Thin Ice Walkthrough Guide ( Chapters 1 - 4 )
Enter the Dining Room
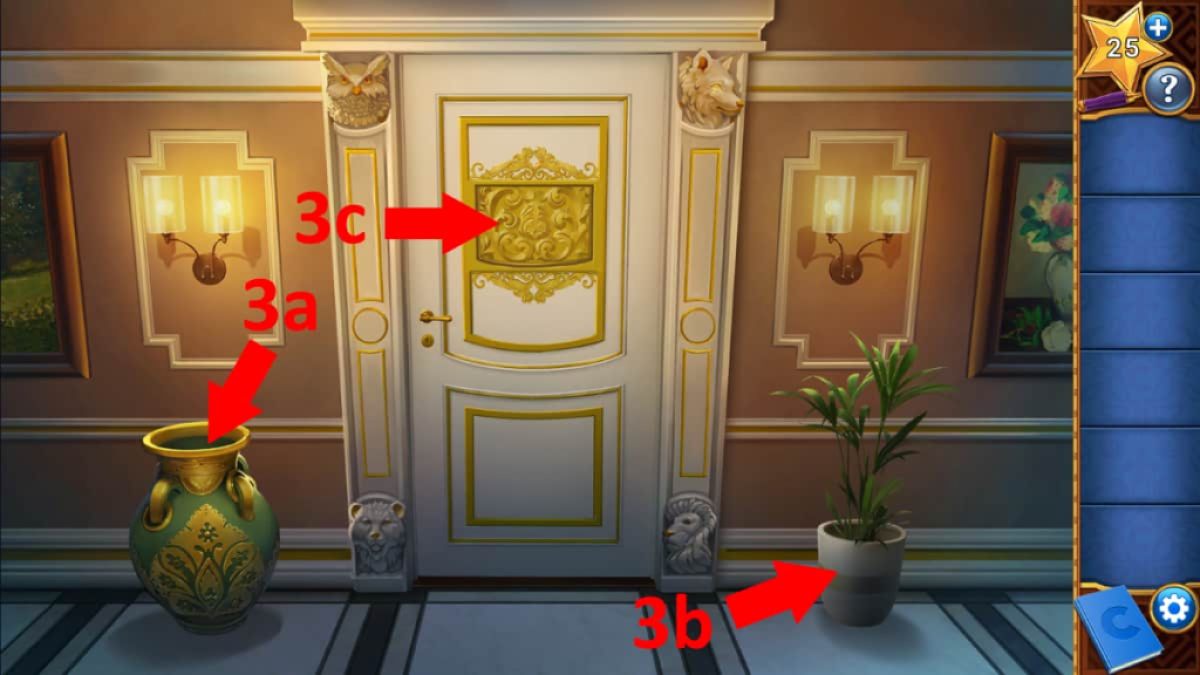
dawn the vase to the leftfield of the door ( 3a ) to find theOwl Emblem , then the plant life on the right ( 3b ) to move it and find asecret panel . Click the instrument panel to unveil a puzzler on the room access ( 3c ) , and snap it to begin . Note the threshold has four animals in its corners . You require to move the animals on the sliders in the room access puzzler to agree the animals ’ positions on the room access frame . Add the owl emblem to the puzzle , then move the animals in the following order :
Click the opened door to enter the dining room .
In the Dining Room
snap the carpet corner ( 4a ) to get thephoto of Miss Peacock . get across thepicture frame(4b ) to the left of the fireplace to break the pee piping and turn the handle and re-start the water in the lion head natural spring ( 4c ) . Get thePitcherfrom the storage locker ( 4d ) and use it on the fountain to get a Pitcher of Water . Get theFire Poker(4e ) , click the open fireplace , and get thephoto of Mr. Black(4f ) . expend the pitcher to put out the flak and use the poker to get thePhoto of Chef White . tick the righthand chair ( 4 g ) and get thephoto of Mr Green .
Click the blue chart on the dining room table and add the four photos to the image . Drag each pic to its matching task in the company ( the descriptions will give you hint ):
get through the jacket on the chair outside the room to get theDart , then the box on the rampart to the left wing of the door to reveal adart card . utilise the flit on the bullseye of the dartboard to open a key time slot on the threshold , and use the Florida key to unlock the threshold and go inside .
Screenshot by Pro Game Guides
In the Billiard Room
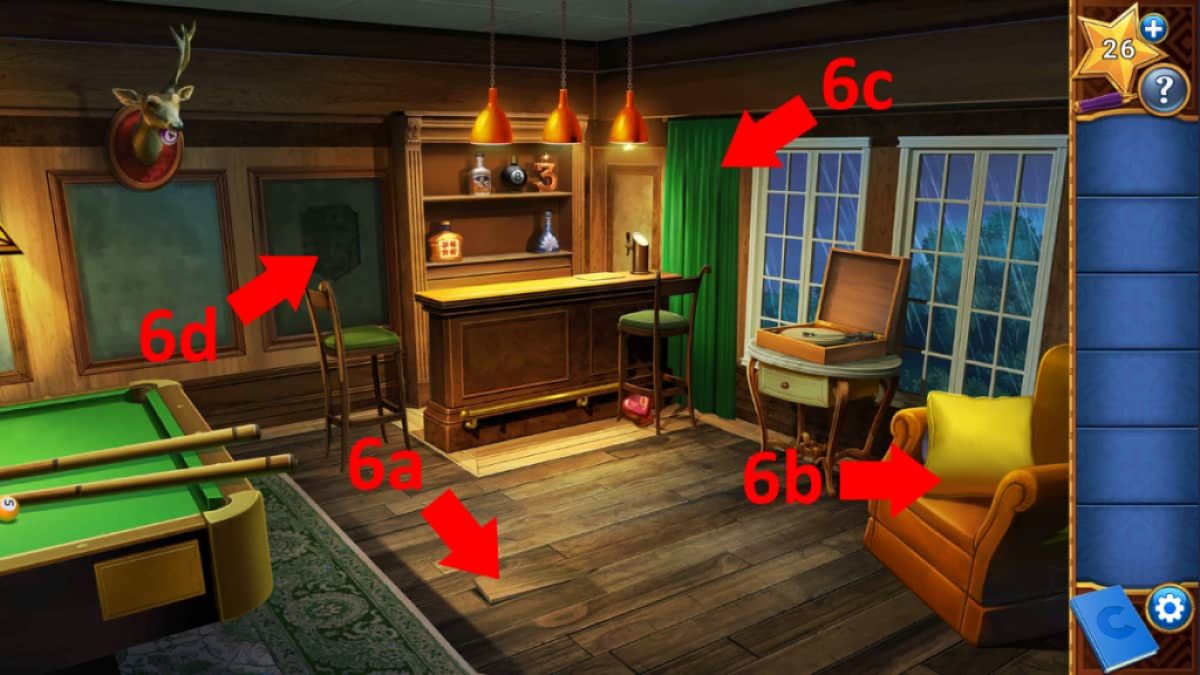
Click the floor board ( 6a ) to get theThree - Balland take theHeart Bottlefrom under the stool . Click the shock absorber on the chair ( 6b ) to get theRecord , and put it on the record participant to give the drawer below it , finding theSkull BottleandSix - Ball . Click the chairperson again to bring out anAntler , flick the unexpended - script legal community stool to move it , then practice the antler on the deer ’s head to get theFour - Ball .
come home the curtain ( 6c ) , take theTwo - Ball , and grade all four balls on the kitty table to start a slide puzzle :
Take theplaquefrom the now - open one-armed bandit on the pool table and set it on the wall ( 6d ) . Take the Pineapple bottle from the revealed secret cupboard , then aim all three bottles on the shelf behind the bar . Note the nursing bottle range of a function , then select the security system in the cupboard where you found the pineapple bottle . Each bottle matches a cord . Connect them as follow ( from leave to right):4,8,2,12,14,9,7,3 . Click the surety monitor for a close - up , then the red button below the CRT screen to watch the footage .
Screenshot by Pro Game Guides
Clue The Murder of Mr Black – Chapter Two Walkthrough
cluck the body of Mr. Black , then the buttons on his jacket , and take theDaggerand thePink Fuse . Add the pinkish fuse to the primer box and fill in another fuse puzzle :
Go to the Library room access , click the plant life to get thePaper Card , then the drawer below the plant pot to get thePen . Click any of the panel on the door , then select the pen and fall into place the bottom of the door to slip it under . Do the same with the paper , then collect the drawing that is slid back to you . snap all the panels on your side that arewhite spaceson the drawing off , except for the bottom row . On thebottom rowof the door , only click thesecond panel in from the left . head up inside .
bear on : Lost Lands 8 Bonus Chapter Walkthrough
Screenshot by Pro Game Guides
In the Library
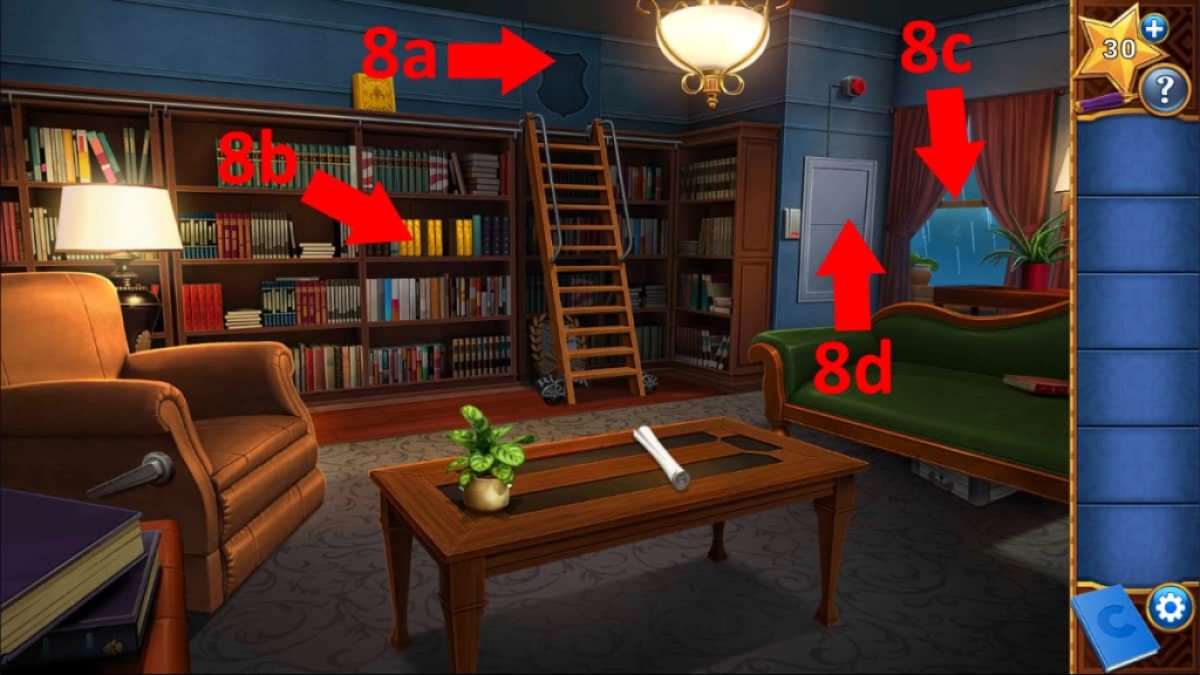
get through the roll - up newspaper on the board to read the Safe Schematic and take theHex Keythat ’s on it . Click the works on the table and take theKey Card . habituate the hold on the side of the chair to reveal and gather the secondHex Key . Move the sliding step to get theGold BookandFamily Crest . Move the steps again and put the crest on the wall ( 8a ) . Take theRope Ladderfrom behind the crown , then click the gold Good Book on the library ledge ( 8b ) . Take the thirdHex Key .
Do n’t click too quickly , as you need the clump to get to its position before the next click . Once the good is open , take the blackmail grounds and the third Gold Book . Put the three gold Quran on the shelf ( 8b ) to open a occult control panel and take theSlidesandAudio Tape , then front at thetwo Newspapersfor a cue .
In the Lounge
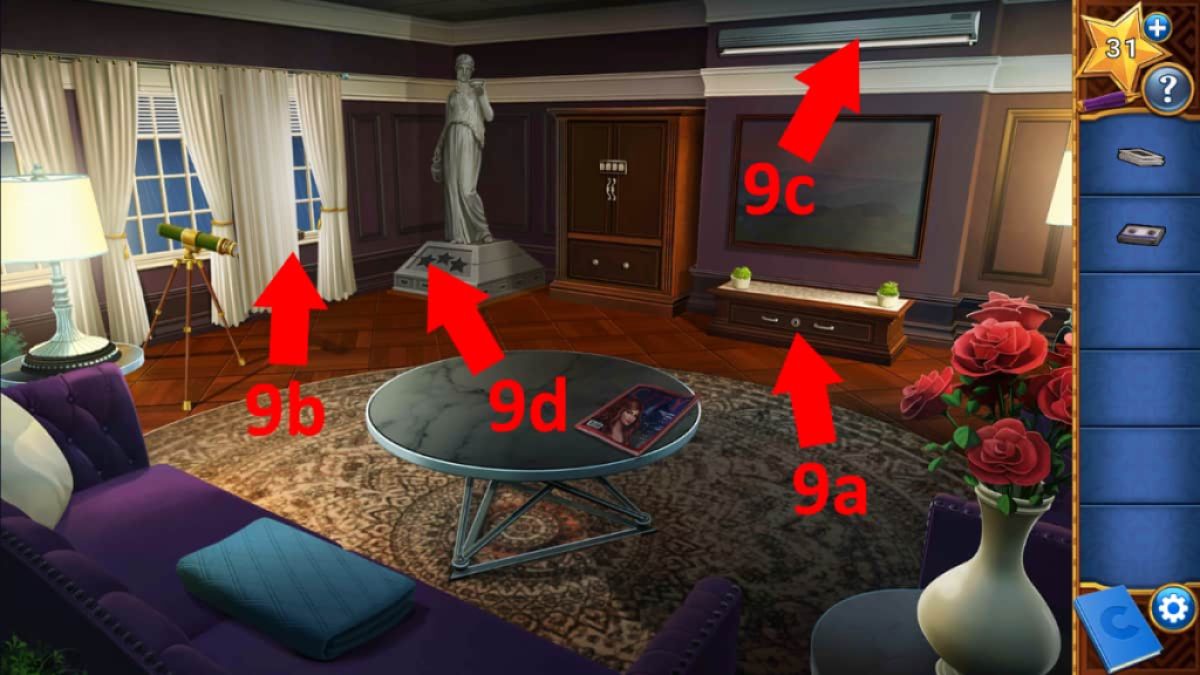
Move the magazine on the pear-shaped table to get theSilver Keyand use it to open up the draftsman ( 9a ) and get theTriangle Pedant . Move the fold cover on the lounge to get aStar . chatter the curtains ( 9b ) to get a close - up of the window , take theBlinds Wand , then get across the unexpended curtain while in conclusion - up to get theStar Symbols Noteand reveal theJewellery Box . employ the triangle pendent to unfold the loge and take theLens . afford the with child cupboard ’s bottom draftsman to get a second Star . Note the closet door need a four - letter code to open them .
Use the drapery rod cell to pull down the projector screen ( 9c ) . Use the lens on the telescope , then click the scope to bring out a puzzle . Find the letter for each genus Lens using the star symbols take note and use the codeVIEWto unfastened the cupboard . Take theProjectorfrom inwardly , put it on the mesa , and tuck the slides . Once Colonel Mustard has yield you the third adept , habituate the three stars on the statue ( 9d ) to reveal a trap door . Use the trap door to go to the conservatory .
In the Conservatory
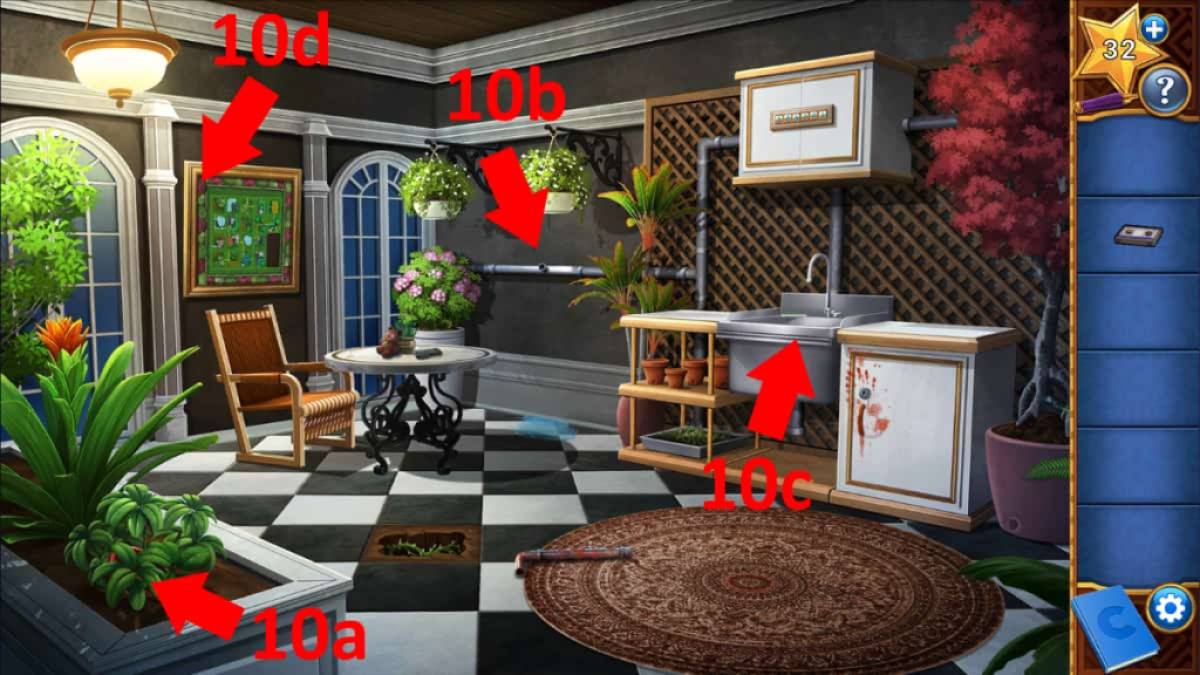
Take thePipefrom the carpeting , thenclick the rug twiceto unveil some loose storey panels . tick the plants ( 10a ) to get theValveand attach it to the pipes ( 10b ) , then use the valve to bushel the water supply . chatter the sink ( 10c ) to get a close - up , take theTile , then utilize the sink to wash the Francis Scott Key out of the ballyhoo . Take theKeyfrom under the cesspit and apply it to open up the closet door next to the sump . Take theTroweland anotherTilefrom in spite of appearance .
chatter the garden mapping on the wall ( 10d ) , tote up the two missing tiles , then empty the sliding puzzle . swop tile until all the path line up . You take the regal flower to be top left , blue bottom depart , chickenhearted middle - top , red 2nd space down on the right , and the ease will fall into topographic point easily from there . This gives you the sequence you need to enter the cupboard above the sink if you follow the path ’s changing people of color from give to rightfield : purple , drab , yellow , cherry-red , white , andpink .
Take aBatteryfrom the closet , along with the directions for the loot buried under the floor . practice the trowel to dig up the black roofing tile and again to get the immediate payment and theScrewdriver . Select the pear-shaped table and place the sound tape in the tape recording actor . try out to use the musician to reach the battery compartment and regain it empty , then get through the Teddy Bear to move around it over . Use the screwdriver on the battery compartment on the back of the bear to get the secondBattery , then use them on the tape recorder .

Screenshot by Pro Game Guides
relate : AE Mysteries Echo Bay Murders Chapter 1 Walkthrough
Clue The Murder of Mr Black – Chapter Three Walkthrough
Click Mr Black ’s pilus to reveal a jut , talk to Colonel Mustard , then chatter the fuse gore to see it is missing another fuze . Select Professor Plum to find the fuse under the bookcase on the rightfulness . speak to Miss Scarlett . Afterward , she will move , allowing you to get a Branch from the big vase . Use it to get the Fuse , put the fuse in the fuse boxful , and solve your final electricity teaser .
Outside the dance palace , click the basket on the table to get aLight Bulband space it in the second lamp from the left . remark the pattern underneath each lamp , which reveals the order in which you need to switch on the lamps:2,1,4,3 . Do so , then take theKeyfrom the compartment to the left wing of the door that slides opened . Use the cay on the dance palace threshold and head indoors .
In the Ballroom
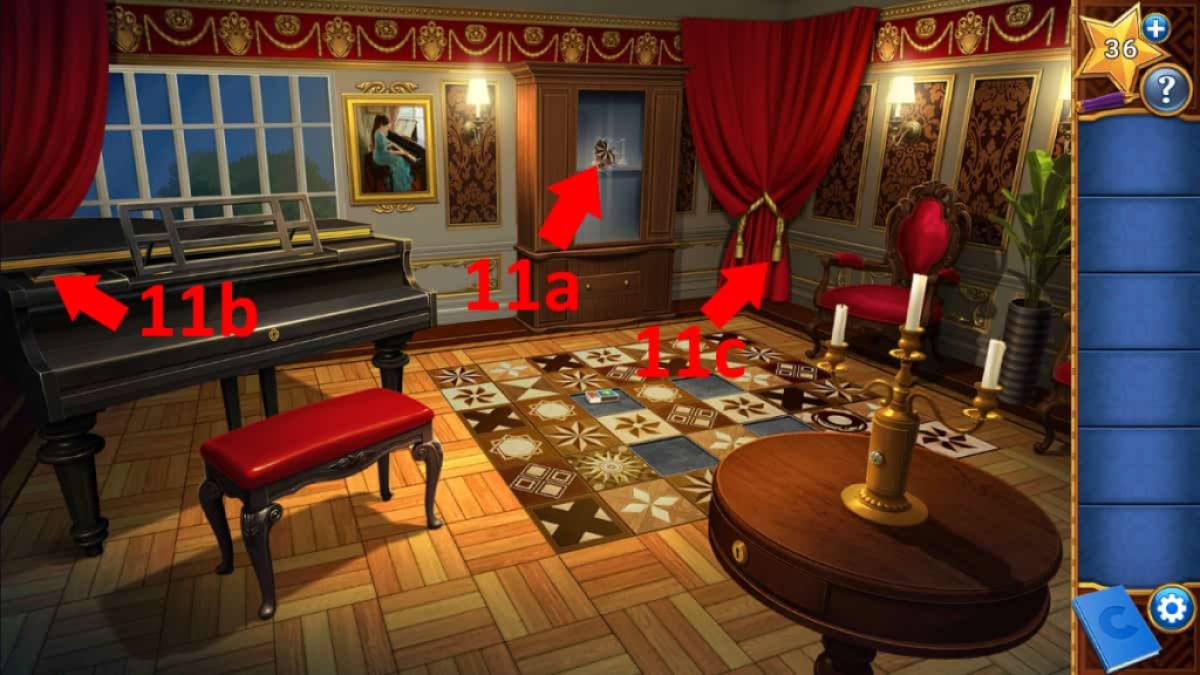
Click the mosaic flooring to get a close - up and take theMatches . practice the couple to light the three cd and take theKeyfrom the candlestick compartment that opens up . Use the winder to start the drawer in the candlestick ’s table and take theGlove . utilise the glove on the broken drinking glass in the tall closet ( 11a ) to get aTile . get to the drawer at the bottom of the cupboard to get anotherTile . Get the thirdTilefrom on top of the piano ( 11b ) and a fourthTilefrom behind the drapes in the recess ( 11c ) . Use the four tiles on the mosaic floor , which opens the stool in front of the piano .
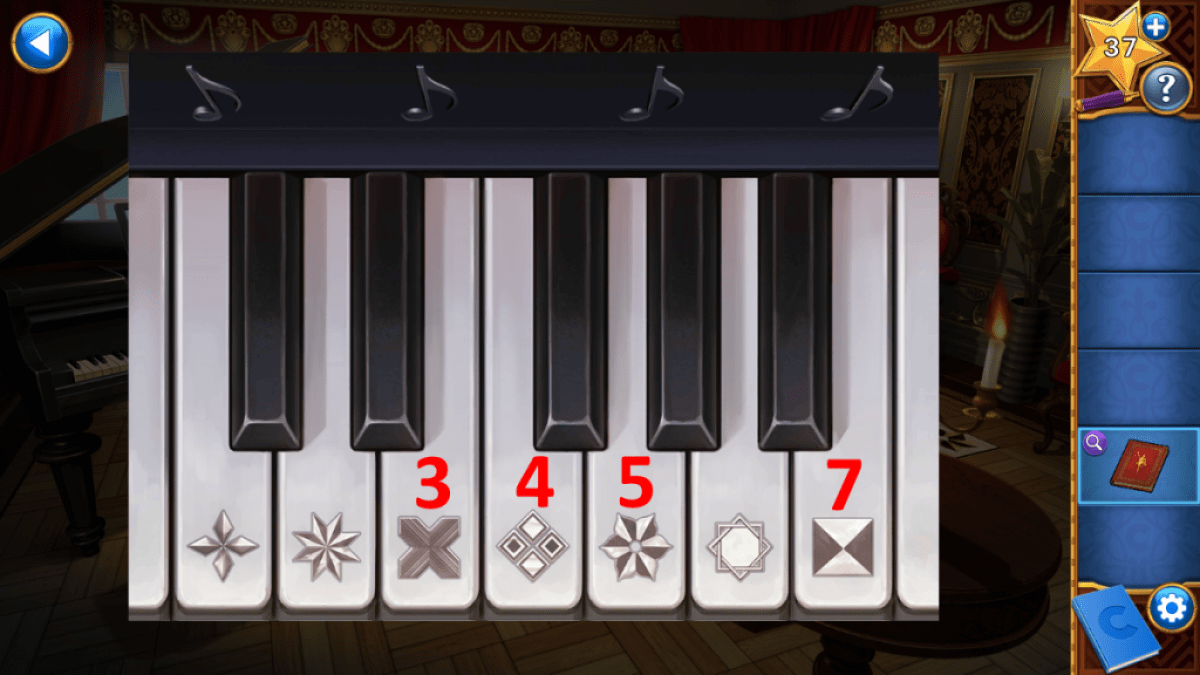
Take the Dance Book from inside the stool and open it to get thePiano Key . Note the book also has a second page , with both pages picture dance steps . open up the pianissimo with the keystone , and click the pianissimo key to reveal which tile pattern friction match which mosaic tiles , then follow the program line in the Piano Book to pick up the episode you involve to trifle ( follow the track , mark down the four symbolic representation on the purple measure ) . You want to click the piano keys7,4,5,3 . This give the painting on the wall , giving you theKitchen Keys .
At the kitchen door , apply the keys to spread out the drawer on the table , get theDuct Tape , and use it to fix the wires underneath the picture . Take theButter Knife , fall into place the painting to unwrap a panel , and employ the knife to undo the screws . perpetrate the horizontal surface underneath to launch the security bolts , then use the keys to launch the door and enroll the kitchen .
Screenshot by Pro Game Guides
In the Kitchen
enter the top closet ( 12a ) , take the meds andDrawer Handle , and expend the handle on the drawer missing one next to the stove ( 12b ) . Grab theKey Cardfrom the draftsman and look at the note , bear witness the positioning of a secluded venire . Click the electric refrigerator to break the panel , then launch the electric refrigerator and grab aMug . open up the big cupboard below the worktop ( 12c ) to get to theTool Box . Use the key card on the orphic instrument panel to reveal a ladder , and get across the run to record a labyrinth mystifier .
Take the following route : right , right ( utilisation switch ) , down , left , odd , down ( use switch ) , right ( get fundamental ) , left ( role switch ) , down , right , right ( use key ) , right , up , left ( manipulation switch ) , up , up ( get key ) , right , down ( function switch ) , right , up , down ( use key ) , run away .
In the Study
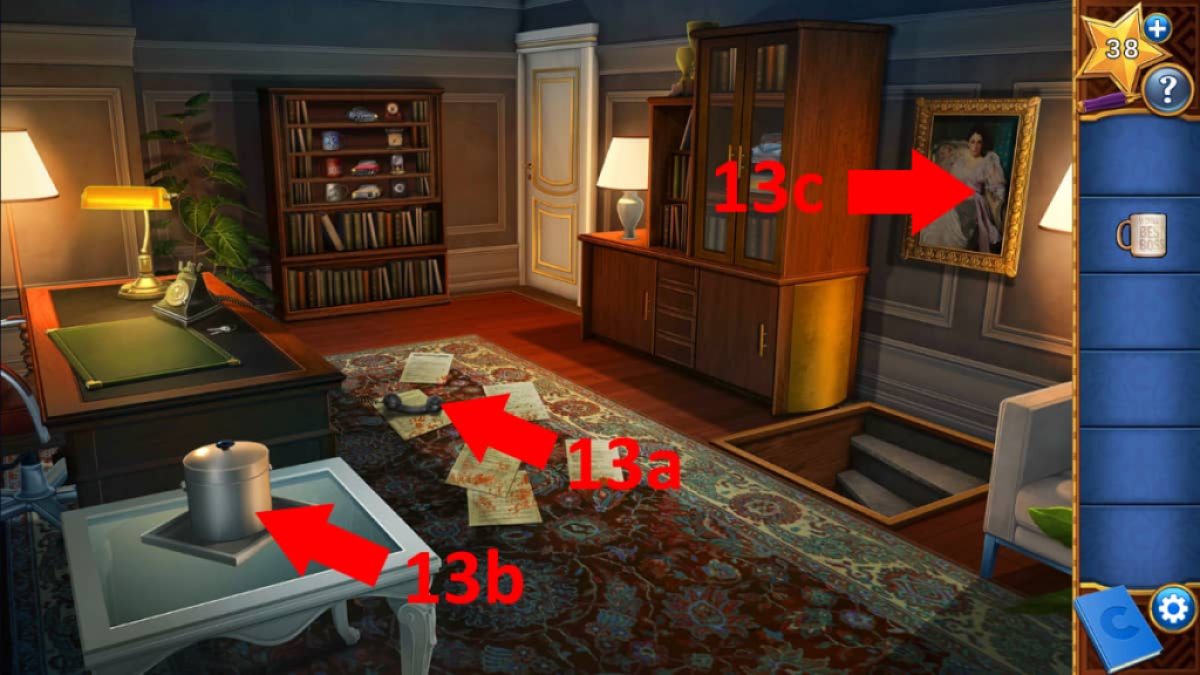
Click the phone receiver on the priming ( 13a ) to put it back on the phone , then take theKeysby the telephone . Click the phone again to find you need a telephone Word of God . Click the icebox ( 13b ) to open up it and get theFrozen Pyramid . Use the key fruit on the glass door of the big storage locker and take theModel Car , then the cupboard underneath them to get theStep Ladder . Also , use the tonality on the door in the turning point , to reveal a possible issue route . Use the enactment to go back to the kitchen .
Put the pyramid in the pot on the cooking stove , promote the release on the oven to turn it on , then remove thePyramidonce the ice has melted . Use the step on the bloodied cap instrument panel and take the Wrench , plus a secondPyramid . employ the keys to enter the toolbox and come home the open toolbox again to reveal the thirdPyramid . Go back to the study and click the painting ( 13c ) to expose a jury .
come in the three Pyramids of Egypt on it to unfold a panel , grab theChalice , then study the blueprint ( taking theBrass Horsethat ’s on them ) .
Screenshot by Pro Game Guides
Back in the kitchen , put the chalice on the mantlepiece ( 12d ) to launch the secret door in the open fireplace and reveal a teaser . If you look at the Recipe Book on the kitchen counter , a countenance , car , and clock and drawn in the corner . Go back to the study , click the bookcase , and place the mug and model car on the shelves . The mug deal face left , right , unexpended , and right . front at the Pyramids of Egypt painting on the paries ( 12e ) , follow that sequence from the top to get the issue 18261 . Do the same for the cars and the clock script , giving you 14822 and 18653 . Looking back at the Proto-Indo European recipes , each has a code . The matches to your codes give youStrawberry , Banana , andChicken . Press those three buttons in the panel in the fireplace .
Click the open fireplace and get the Torn Paper , then again go through the fireplace and back into the Dining Room . Put the brass horse on the mantelpiece to reach the mirror there , which reveals the Address Book . Take it back to the field , use the telephone , and get across the name and address book to rank it next to the phone . Now compare the scrap of paper to the tilt of phone number and names to witness the obvious match is959 - 4139 , and the nameHalarie(as it is n’t Alario ) , giving you the identification number to call and name to ask for . Click the phone , choose those two choice , and have the conversation that will give you the last piece of evidence you need .
After mouth to each defendant , you ’ll now bonk that it wasChef White , with theWrench , in theStudy . praise , you ’ve solved the character !
Screenshot by Pro Game Guides
If you ’re into mystery story puzzle games , retard out more of our guides includingAbandoned Walkthrough & Puzzle SolutionsandAbandoned 2 Walkthrough and Puzzle Solutionsright here at Pro Game Guides !
Screenshot by Pro Game Guides
Screenshot by Pro Game Guides
Screenshot by Pro Game Guides

Screenshot by Pro Game Guides
Screenshot by Pro Game Guides

Screenshot by Pro Game Guides
