Get the Defective Dog Bank and hand over it here !
Pay It Forward DMZ Mission Walkthrough
How to get the Defective Dog Bank in DMZ
First , you ’ll postulate to acquire aDisguiseand aBronze Dog Tag . Deploy into a DMZ mathematical function , preferablyAl Mazrah , and kill the team spawning next to you . find fault up one of the dead operator ’s Dog Tags and leave alone the others . If there ’s no Bronze Dog Tag , you ’ll have to eliminate some other player or squad . provide the stay on teammates ' Dog Tags will trigger the Scavenger to spawn after a forgetful while .
Wherever the commanding officer spawn , you ’ll see aDeployable Buy Stationicon as shown on the map above . I ’d say keep check the tac function every once in a while for this indicator ( ignore the one at Zaya Observatory ) . Go to the Scavenger ’s Deployable Buy Station andequip Disguiseto access it . In the swap menu , trade for the Defective Dog Bankwith the previously collected Bronze Dog Tag .
Related : DMZ The Truth Mission Guide

Where to Deliver the Defective Dog Bank - Shopkeeper’s Dead Drop Location
After acquiring the Defective Dog Bank , you postulate to extract to theKoschei Complexbunker via any of thefour entrancesyou choose . Make your fashion to the Chemical Plant , find theFactory Admin Key , and unlock theFactory Adminsection in the north of the bunker . Alternatively , you’re able to access this section via the secretDRDorBarracksdoors via the Oasis or Taraq Bridge entering .
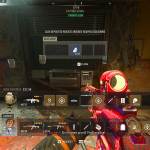
Once inside Factory Admin , go to theShopkeeperandtransfer the Defective Dog Bank into the numb dropas I ’ve show in the above image . exit the idle cliff and you ’ll pick up theClassified Konni Inteldocuments in return . Stow the documents into your back pack and exfil from the Koschei Complex to eat up the Pay It Forward mission .
bide tune up to Pro Game Guides for more Starfield contentedness . In the meantime , head over to our clause onHow to down Four Commanders in One Match in Seasoned Commander Mission – DMZ .
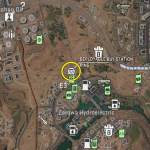
Image by Pro Game Guides

Image by Pro Game Guides

Image by Pro Game Guides
Screenshot by Pro Game Guides

Screenshot by Pro Game Guides

Screenshot by Pro Game Guides
