Santa faces his toughened challenge .
I love the combination of draftsmanship and scheme that this biz requires from you to avoid killing Santa . see out how to outsmart Santa Go on Cool Math Games to check that all kids get their Christmas gifts .
How to complete all Levels in Santa Go
For a lot ofCool Math Games , scheme is very important , and that ’s the typeface in Santa Go , too . I would consider the first seven tier as praxis for the difficulty ahead , as they help you get into the golf stroke of thing . However , it quickly gets more difficult , with young obstruction that you need to keep off . Let ’s talk about all of the storey that will be causing you the most trouble .
Level 8
The end for this tier is to drop Santa straight down to avoid a lot of swing . Then you have to go leave as close to the third star as potential . If you go too modest , Santa will go through the dangerous zone , and you ’ll die .
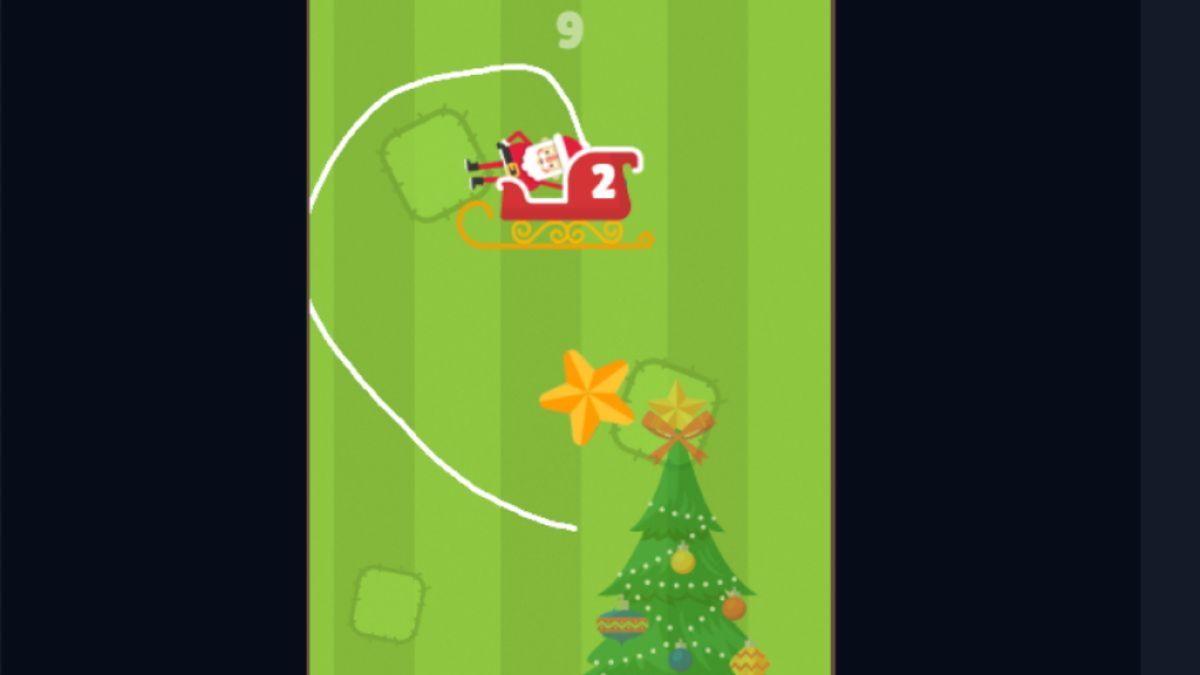
Level 9
You have to go when the champion is all the way to the left field . Do n’t worry ; you wo n’t encounter into it , as Santa is much slower than the star . Also , verify to draw the line mellow enough above the sleigh , or Santa wo n’t be able to get into it .
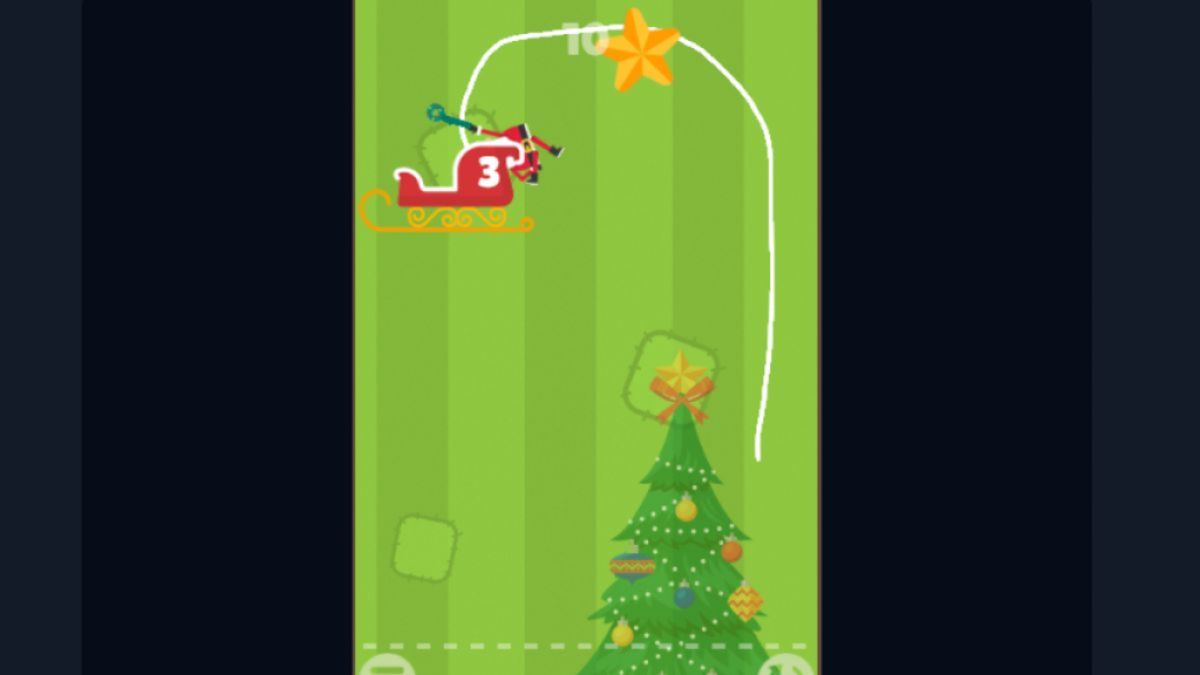
Level 10
You want to let go slightly before the star give its lowest spot . This will give you enough sentence to rise up and avoid it . Do n’t line your line too far to the left field of the sleigh , as you start the endangerment of Santa toppling over .
relate : Christmas Cat walkthrough – Cool Math Games
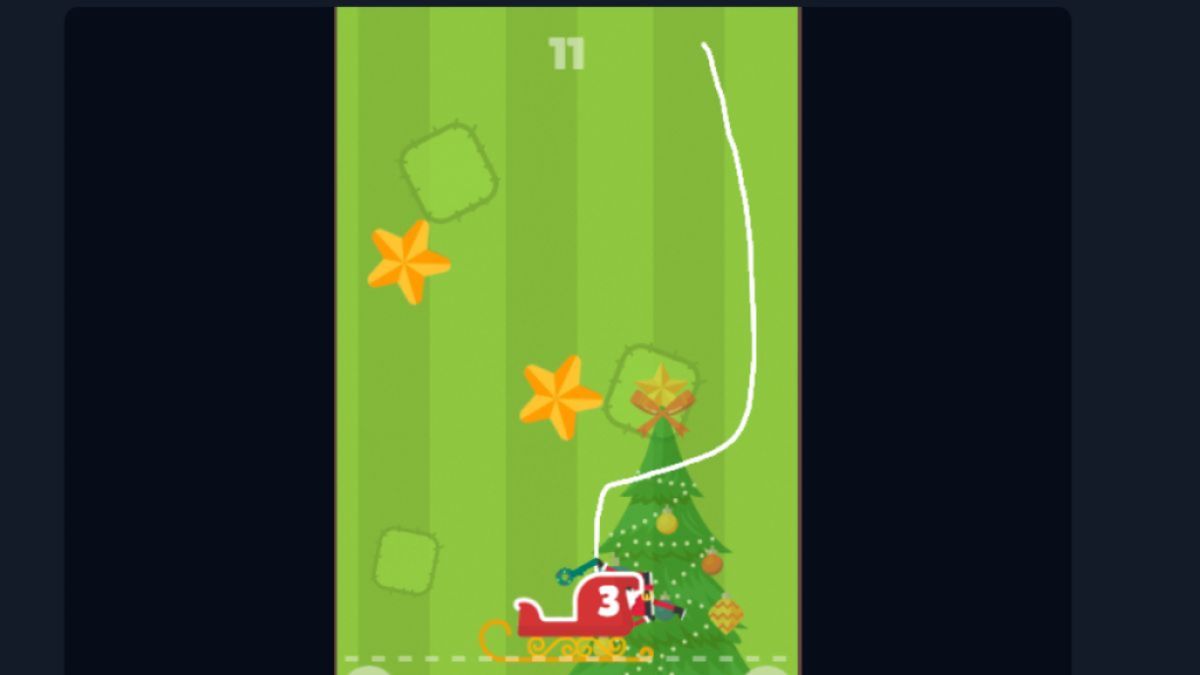
Level 11
start up heading down when the star is somewhere at a middle full point and go away from you . fortuitously , this early on in the game , the other genius does n’t move , so you just have to be careful to leave enough outer space not to swing out into it .
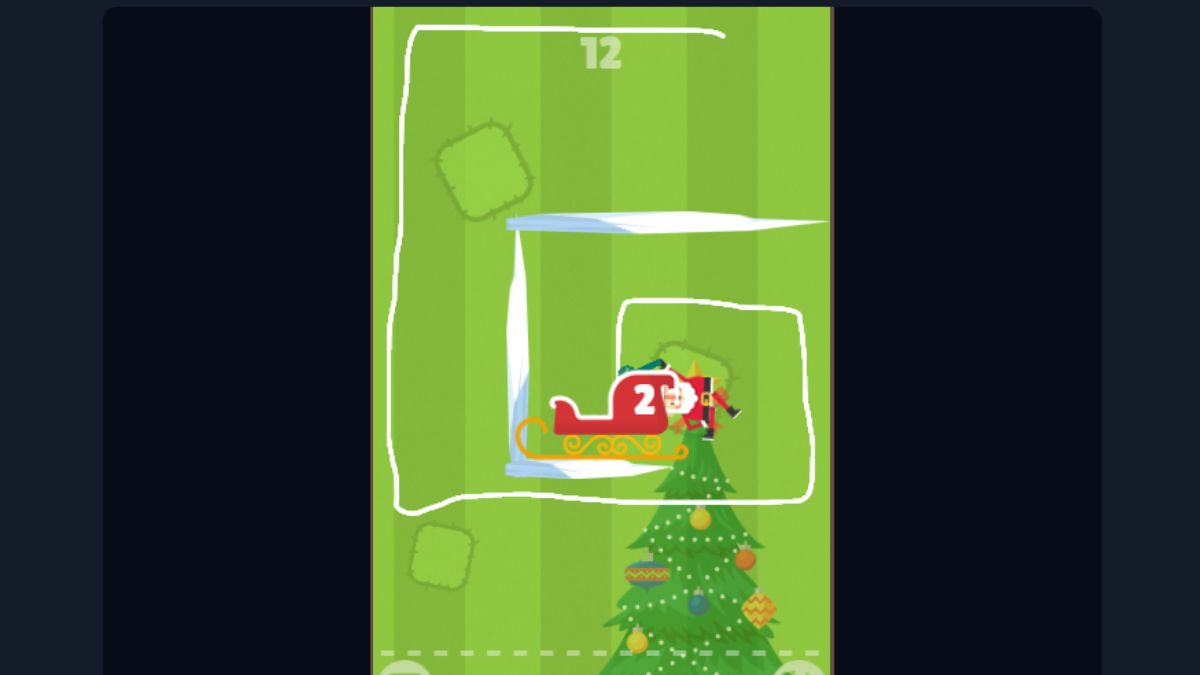
Level 12
endeavor to keep straight stemma so you wo n’t swing too much and forfend hitting the ice . It ’s good to begin be active once Santa is starting his swing to the left . This will stabilise his momentum and keep him from swing too much .
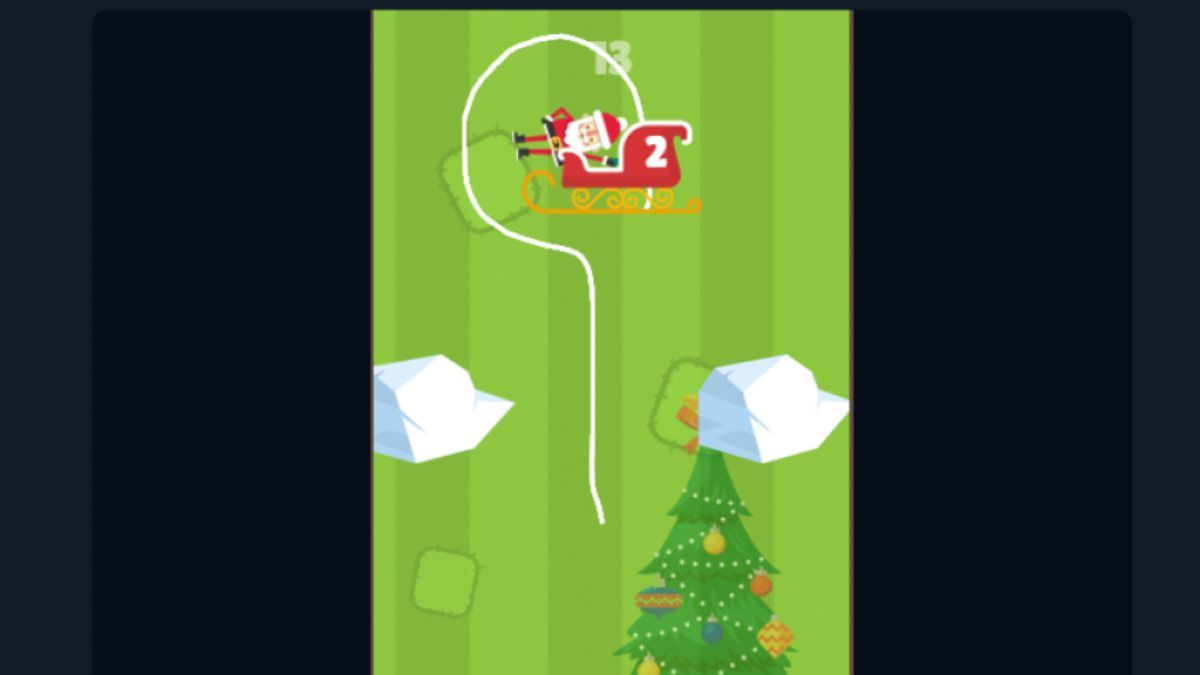
Level 13
For this one , it ’s all about timing Santa ’s swing . Go when he is just start to swing over to the left wing to avoid arrive at the chalk on the right . essay to draw the line a little closer to the left block of sparkler , too . Once you pass , verify you draw and quarter the line high-pitched enough to avoid strike hard into the left ice auction block and then high enough to make it to the sled .
Level 14
For level 14 of Santa Go , you should again be mindful of your swing . Let Santa go just as he is commence to swing to the right and draw the line of products high enough to avoid the lower spindle .
Level 15
quarter straight furrow to slacken down the golf shot . you’re able to go farther against the wall if you need , but be thrifty not to get stuck on it as you are go bad down , as it will sometimes swing you wildly to the other side and into the ice .
Level 16
seek to start on a lilt to the rightfield ; this way , you stabilize Santa and forefend him sway into the ice as you are going down . Also , take out your line square and closer to the edges of the screen .
Related : Coolmath Games – The Game Walkthrough
Level 17
soak up a line as direct as possible to avoid momentum and swinging into the stars . Start a little closer to the ripe star just as Santa is swing toward the left . I also enjoy turn back the line far up and just letting Santa drop . While he will flop a bit , it seems to be less dangerous than swinging . you’re able to check both options below .
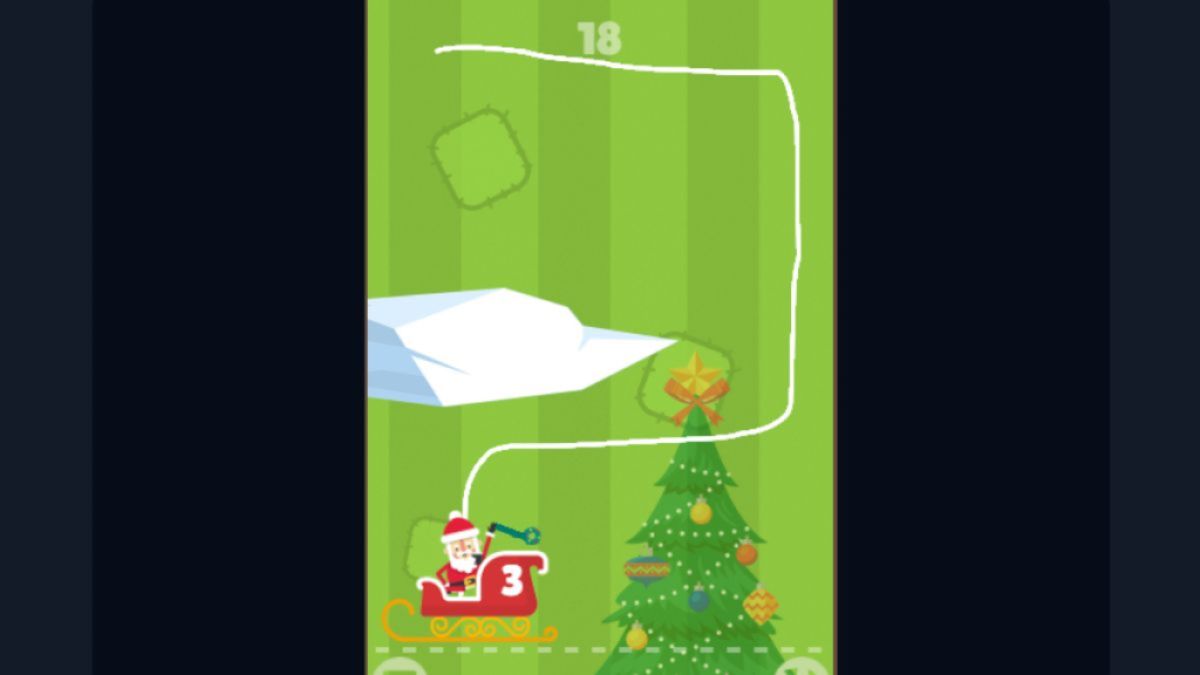
Level 18
For this level , it ’s again of import to depict straight lines and attempt to stabilize the momentum of Santa . If it ’s easy for you , stick nearer to the rampart .
Level 19
You should endeavor to time it so that Santa heads up just as the star reaches the left side ( perchance even a fiddling bit before ) . Hit the wall to stabilize Santa and void the ice .
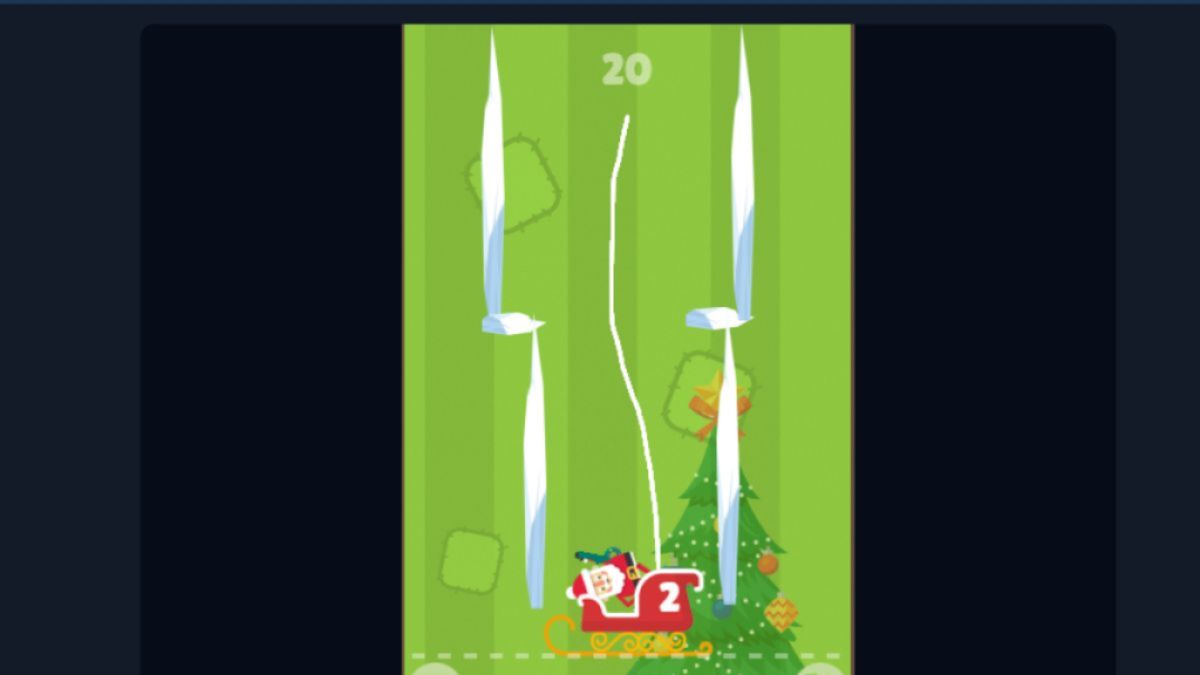
Level 20
You need to initiate this one just as Santa is starting to swing out to the left field . The bank line should also swerve more to the left to deflect hitting the right bump . Once you pass it , curve the line to the right . Santa will decrease over to the left wing when he hits the sled , so you want to give him enough quad not to shoot the unexpended icicle .
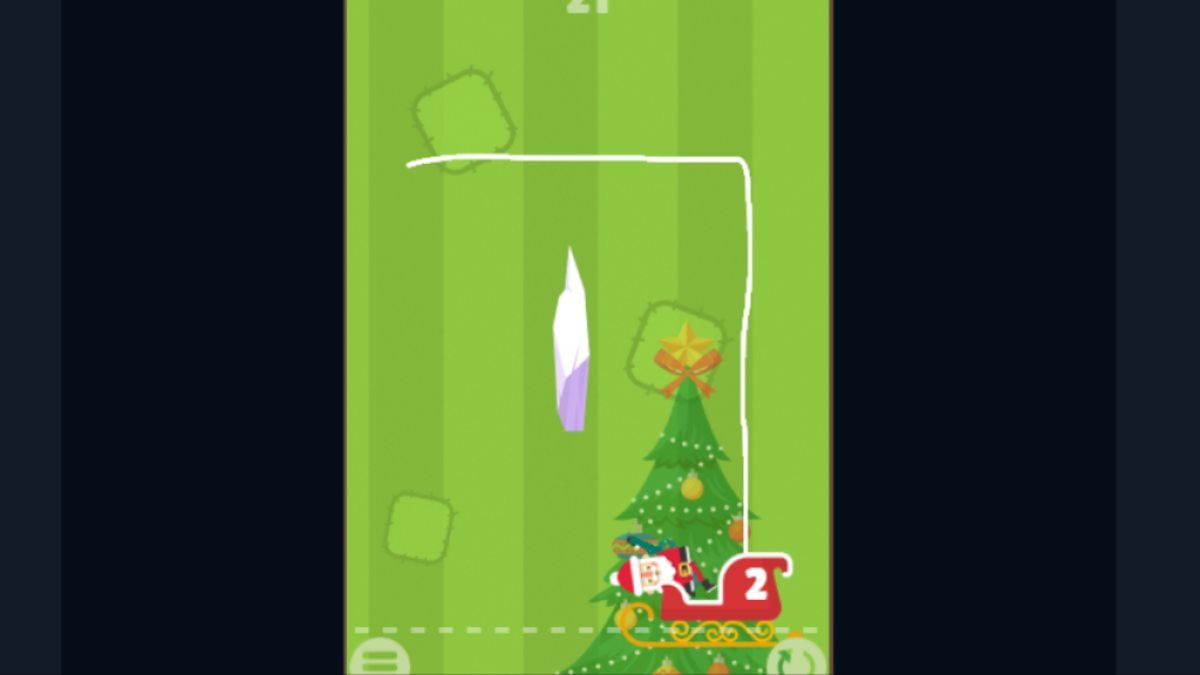
Level 21
You postulate to head off just as the icicle starts going down . This way , it will give you enough space to pass and not issue forth back up to strike you , either .
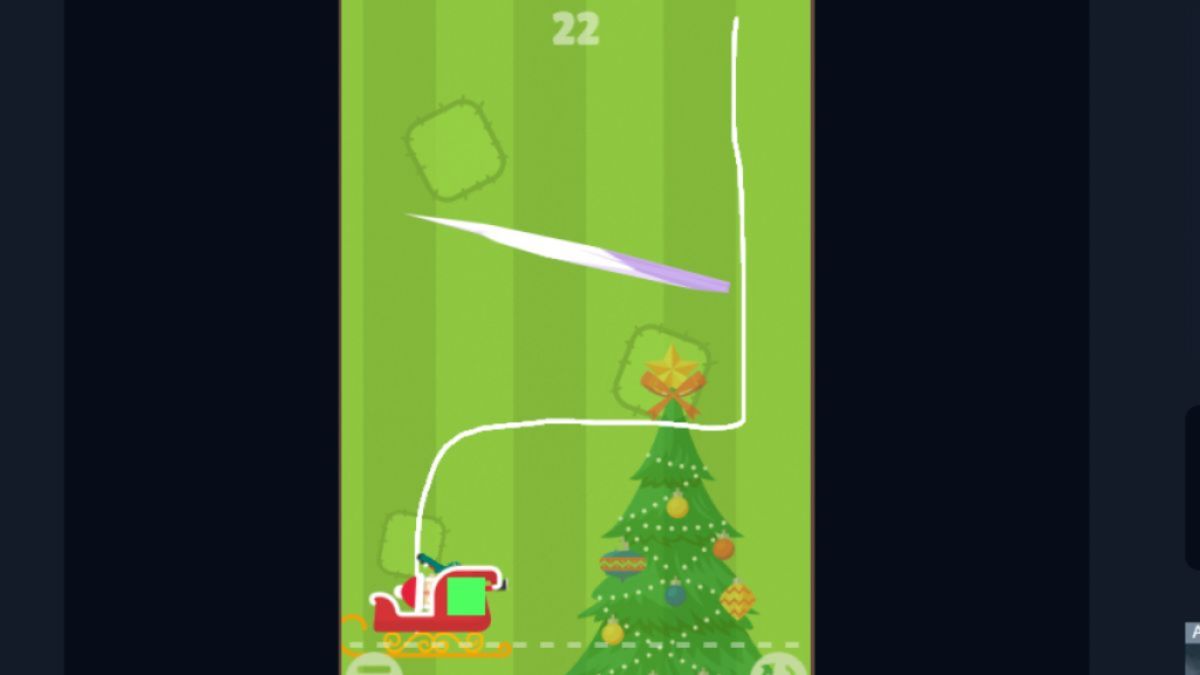
Level 22
The timing for this one is just as one of the sharp end passes you . manoeuvre down in a consecutive furrow and do n’t go too depleted , or you ’ll end up in the danger zone .
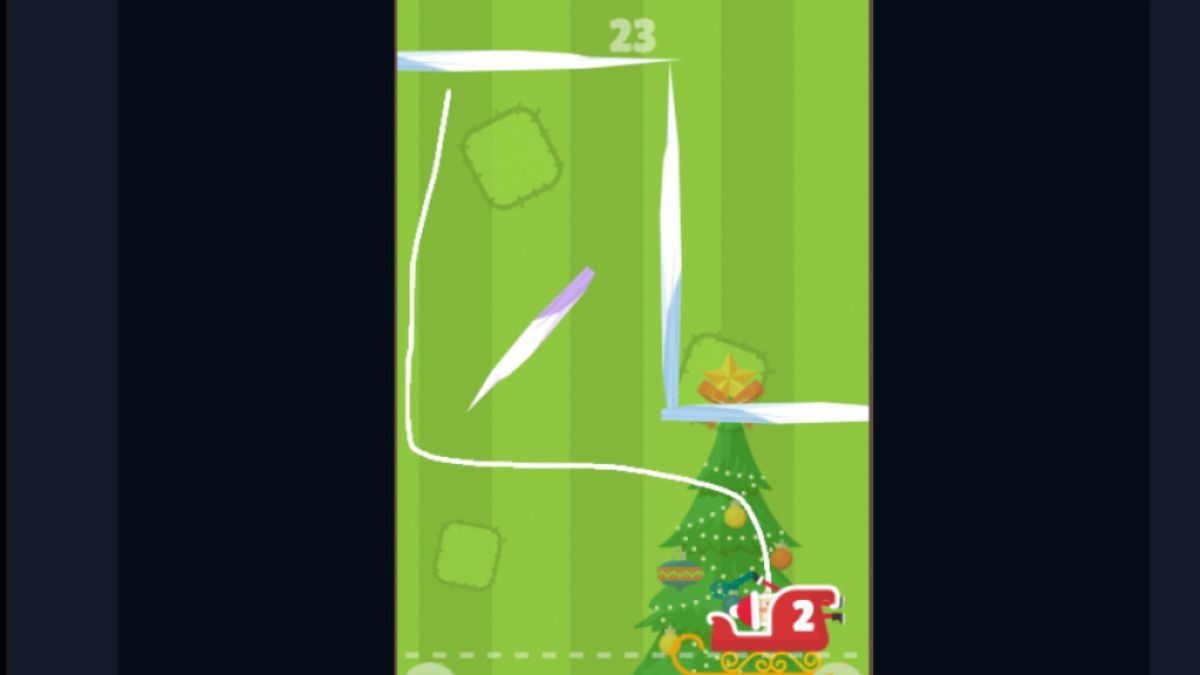
Level 23
The timing get trickier on this degree of Santa Go . You need to lead down just as the icicle is in a vertical place while coalesce that with the pure Santa jive . He needs to be amount back from a swing to the right a little before reaching the middle peak .
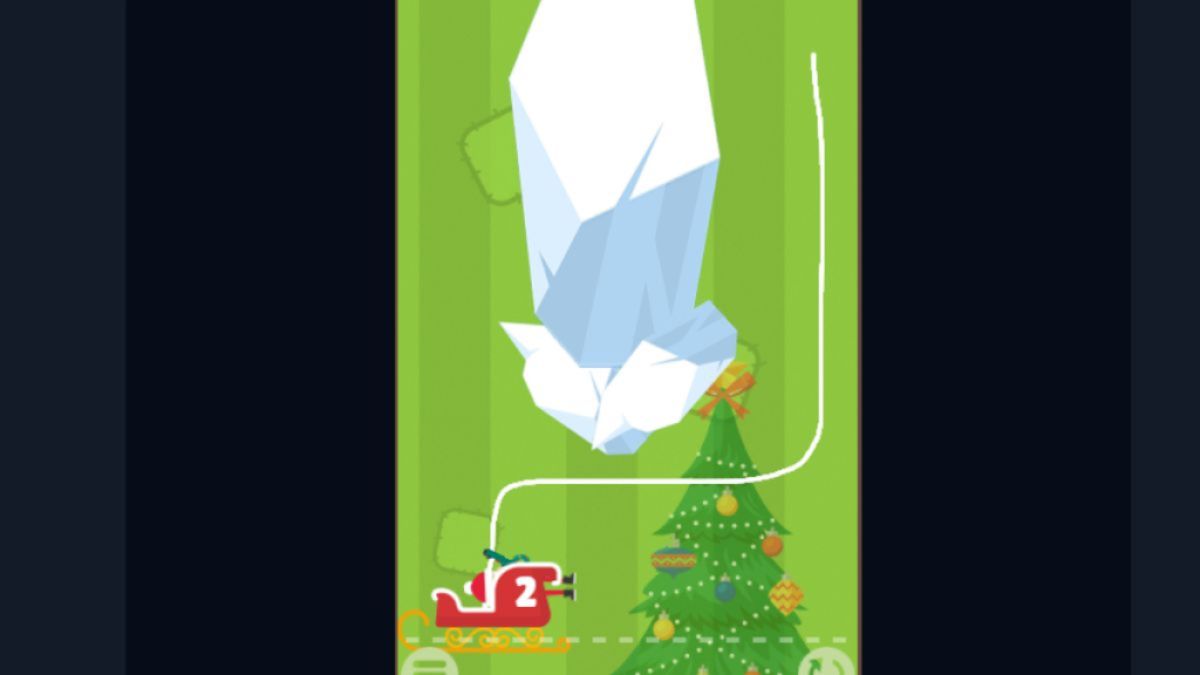
Level 24
permit Santa go to the right as before long as the icicle starts heading to the right . Stick closer to the walls to avoid getting killed by the meth .
Level 25
There are two thing you should look out for on this tier . First , correct off once Santa is mid - swing , preferably go to the left field . This path , he leans more toward the rampart instead of towards the deadly trash . The 2d is to check that Santa is n’t give out too low .
Level 26
Santa should go down as soon as the ice start going down . count where it stop at its low point so you may sop up a line just below it and forfend being polish off .
Level 27
layer 27 is a balancing act . take up Santa off as he is just starting his baseball swing to the left-hand but is still closer to a mid - way breaker point . This will stabilize him enough to avoid hitting the top row . The descent that go up will help him avoid the bottom course .
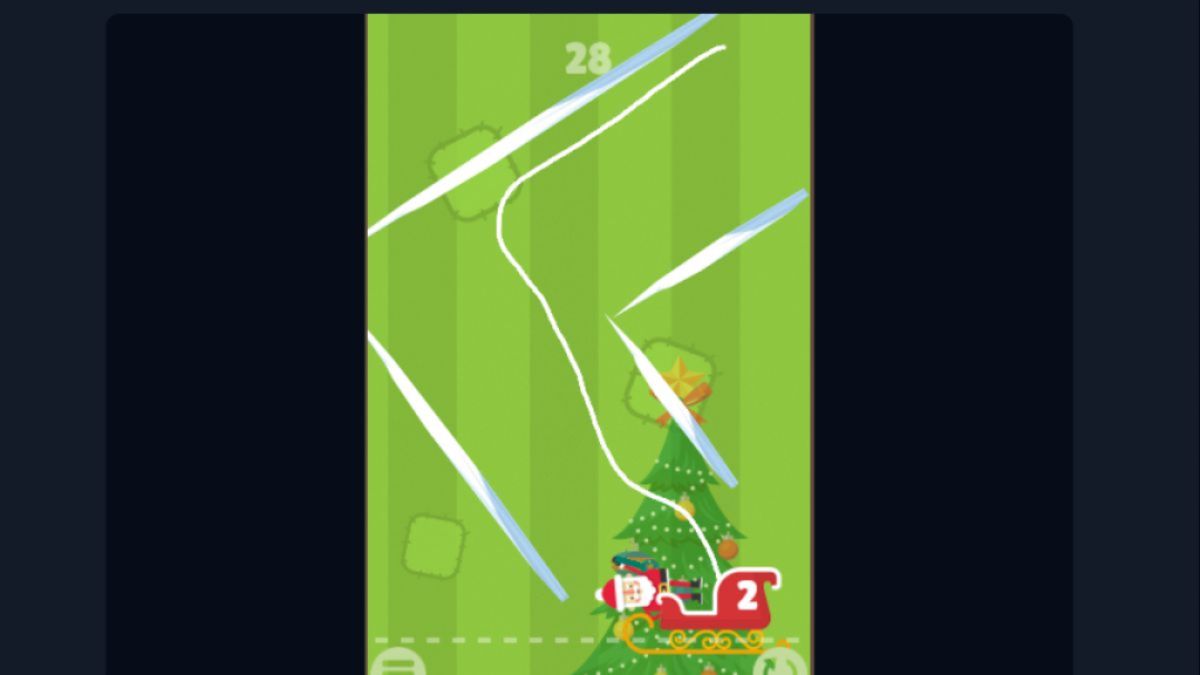
Level 28
Do n’t go too far with that first line , or Santa will end up in the left icicle . Keep it short before you become the seam back to the right and into the sleigh . ensure you do n’t go too close to the correct icicles either , or you will fail this level .
Related : Must get by Dinosaur Land walkthrough
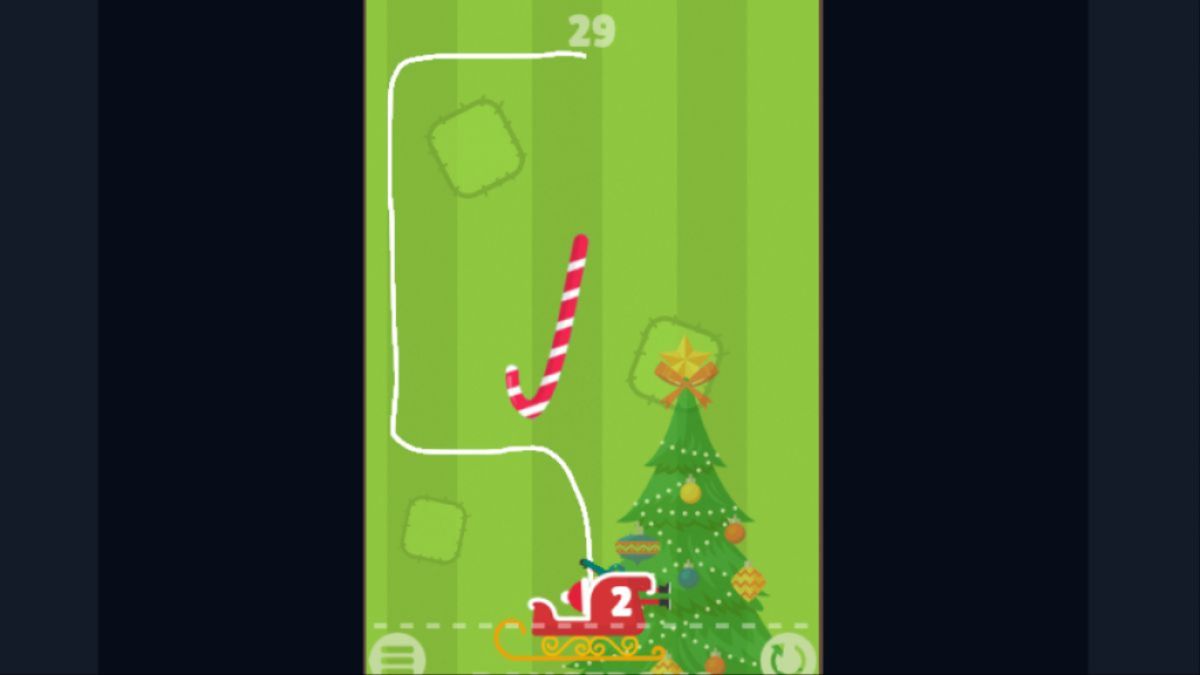
Level 29
seek to synchronize Santa ’s setoff with the confect cane swinging to the left . Do n’t go too close to the wall with your line , as Santa might get stuck on it and get retard down . You do n’t need this to happen since you may easily get hit by that candy cane .
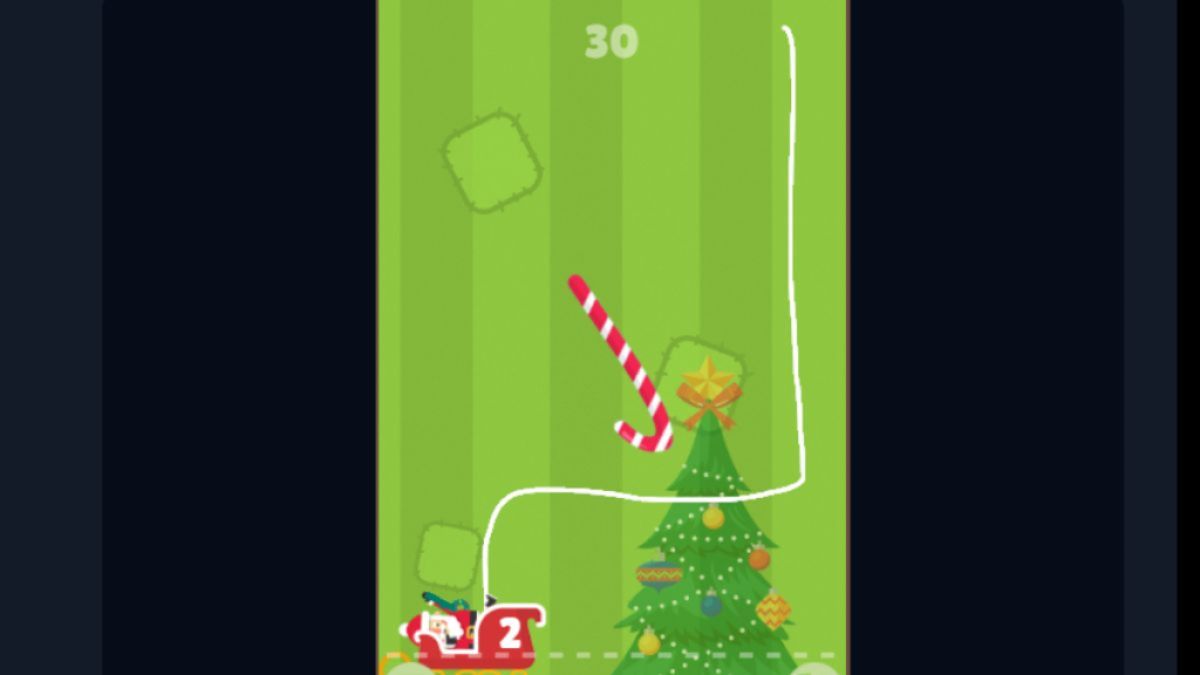
Level 30
It should be pretty easy to deflect the candy cane on this level . Stick closer to the wall and head off just as it passes you . verify to draw the line more to the right part of the sledge to avoid being swung over and off it ( I did it so many times by accident ; memorise from my mistakes ) .
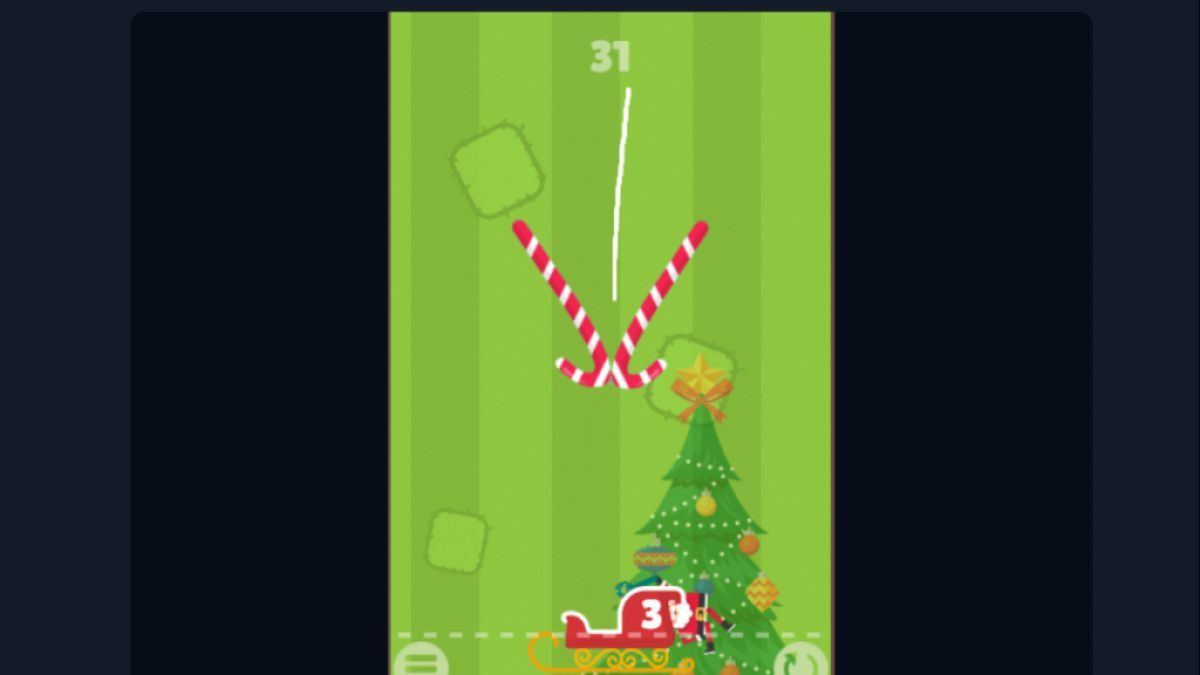
Level 31
You have to be patient on this stage . Let the candy cane take a couple of swings before you start . You should go once the two canes overlap . I prefer stopping the line and just drop , as Santa does n’t swing like this and fall faster .
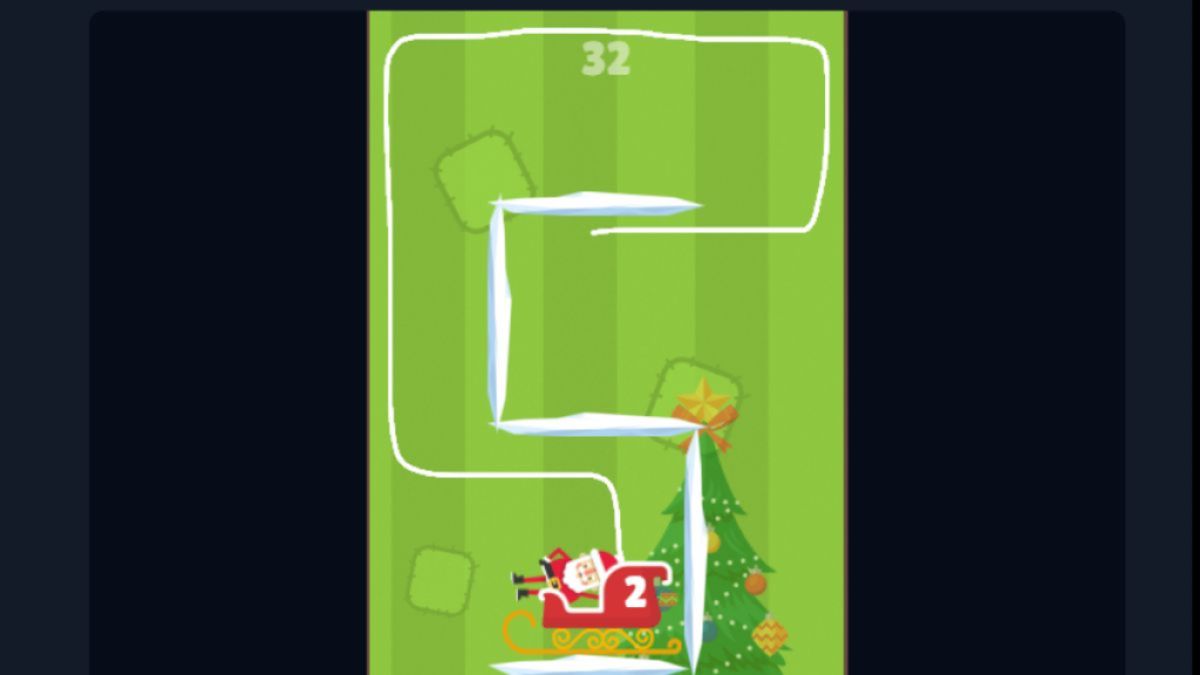
Level 32
Keep square agate line to slow down the momentum and reduce swing . Ensure you give Santa enough infinite so he does n’t collide with any ice .
Level 33
Set off once Santa starts swinging to the leftfield . Draw the line more to the left at the top , but not too close to hit that leave frosting . Slowly move the line toward the rightfulness , like in the ikon below , as Santa will lean over to the left once he drop into the sleigh , so you want to avoid him strike the ice .
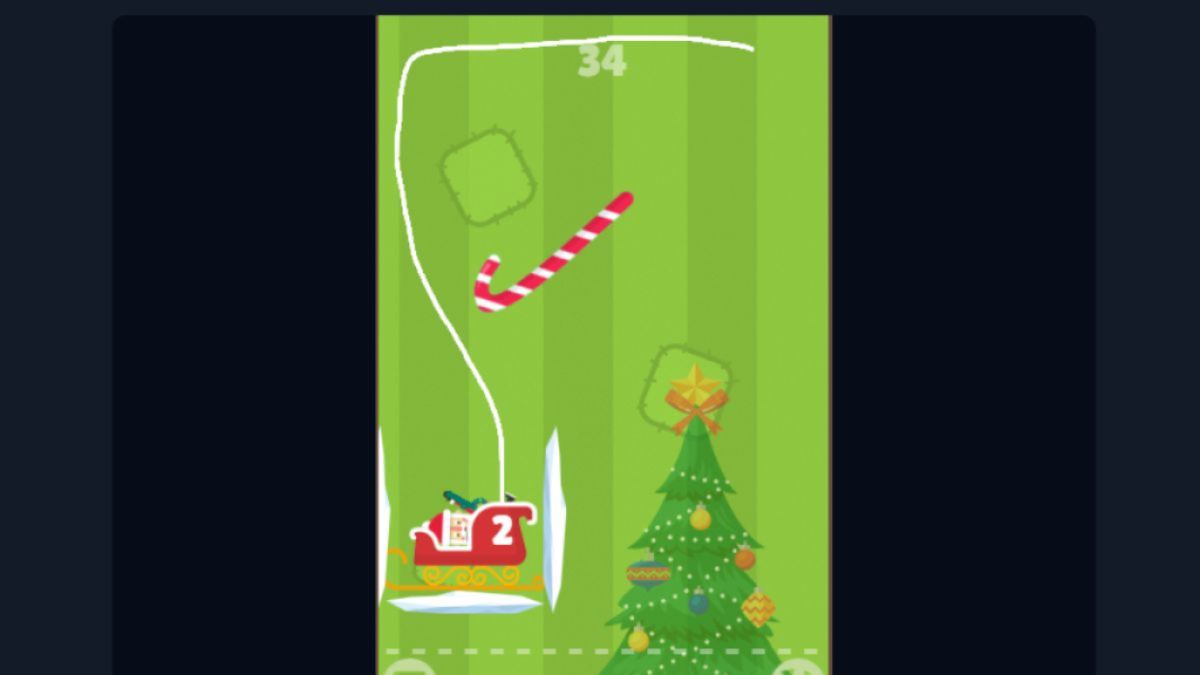
Level 34
story 34 is n’t too difficult , but there are some things you should follow out for . get the line travel to the proper high enough so that Santa does n’t hit the left icicle . Also , terminate the origin to the rightfield in the sled so that he does n’t lean over into the left icicle .
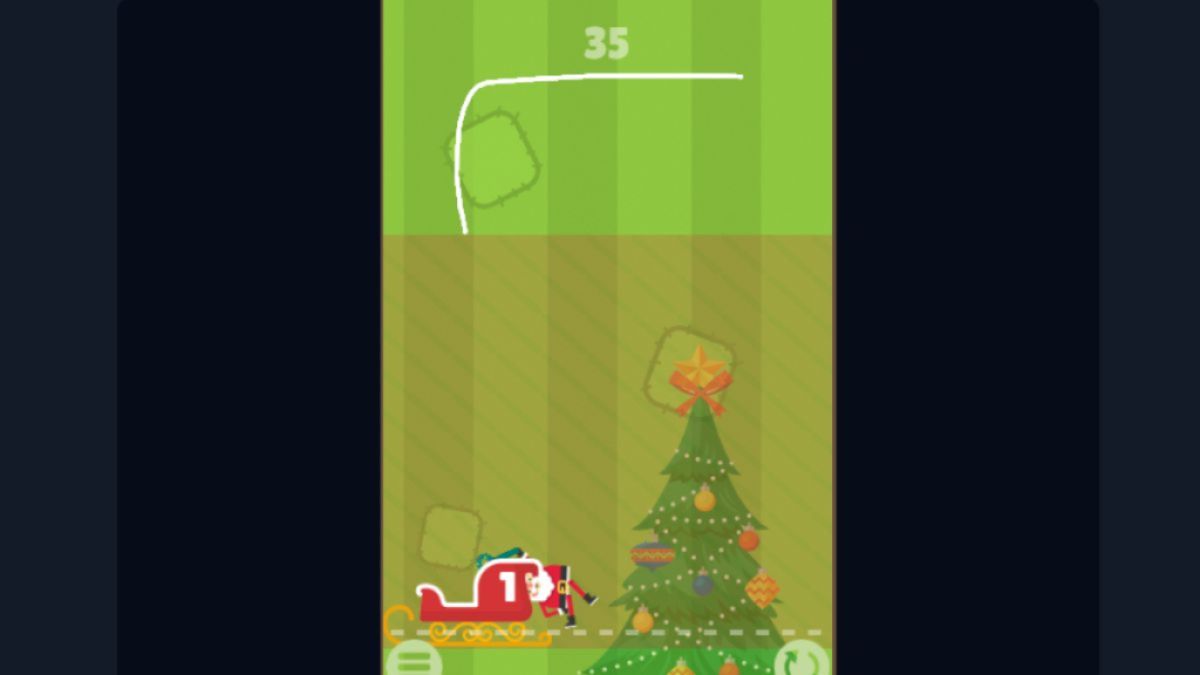
Level 35
If you ’ve already been engage the maneuver of cutting off the short letter betimes and letting Santa drop , then this should n’t be too difficult for you . adjudicate to keep Santa as stable as possible so that you do n’t miss the sleigh .
relate : Viking Ship Escape Walkthrough
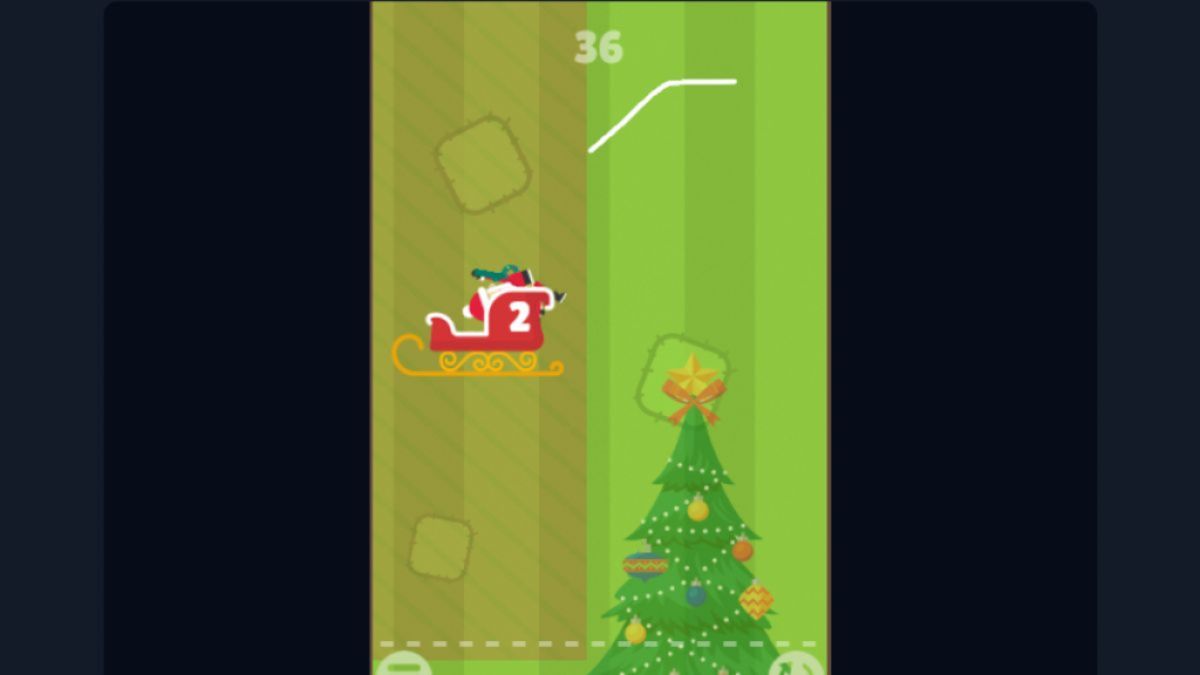
Level 36
Let Santa head off once he is leaning toward the left hand . This should be enough momentum for him to swing to the sledge and flop into it .
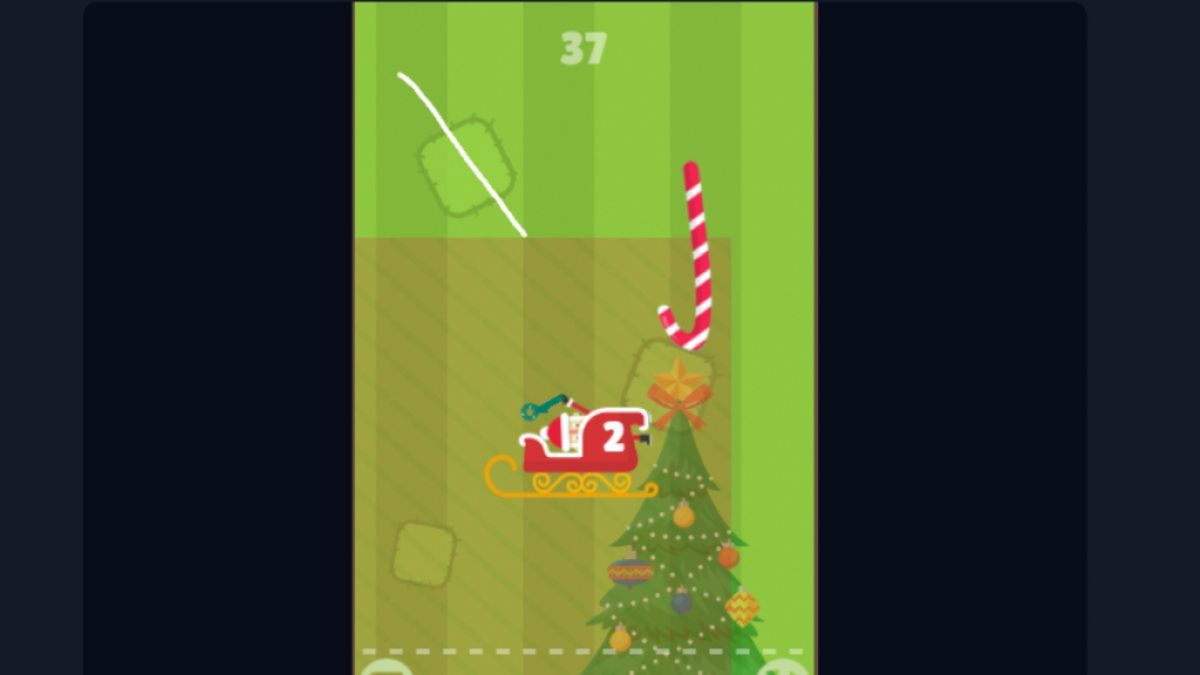
Level 37
Go when the candy cane is farthest to the left . Also , render to aim the line somewhere in the middle of the sled to forefend falling off it .
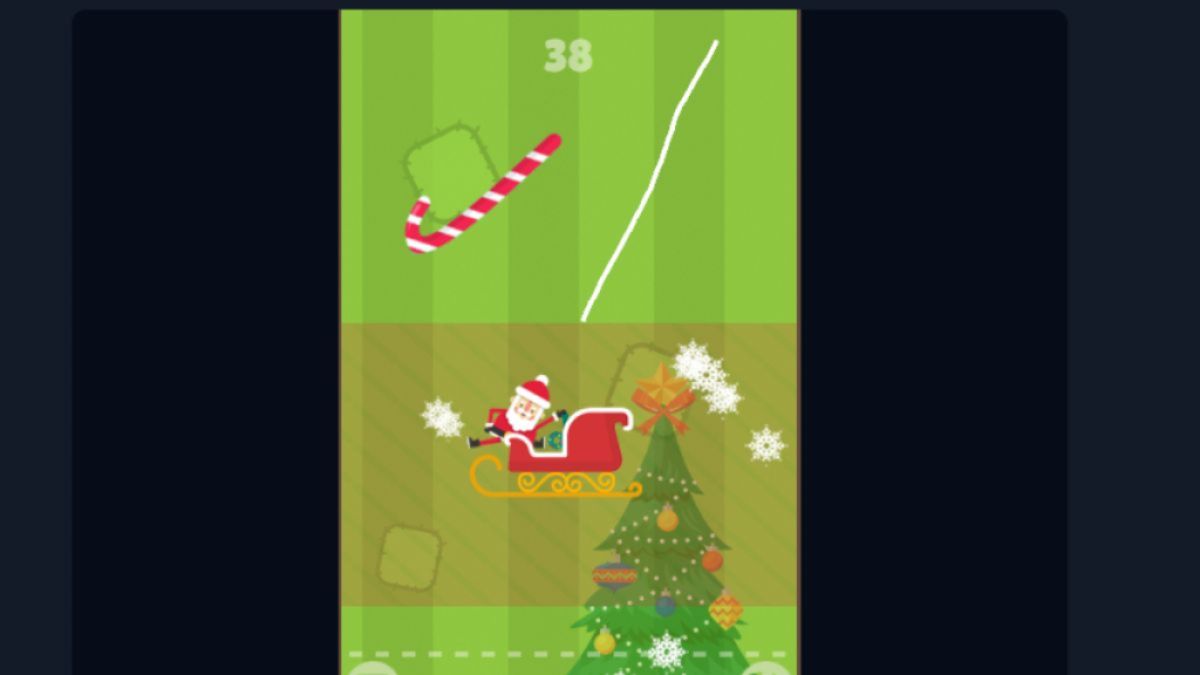
Level 38
This is a like mechanic to rase 37 , except flipped . For this one , let the candy cane baseball swing just before the mid - point so that you have enough quad to go down past it .
Level 39
This one is pretty simple . protrude just as Santa is leaning to the left , and curve the line to the right at the bottom to avoid flop out of the sled .
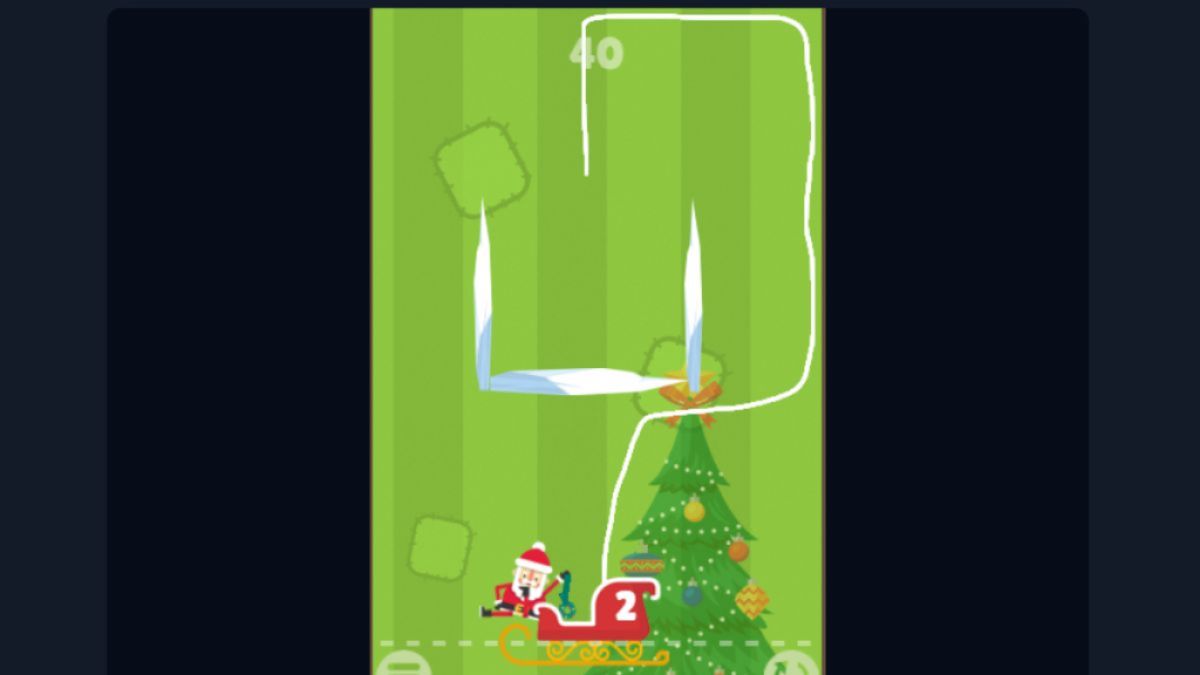
Level 40
Lift Santa up high up enough with that first personal credit line so he does n’t get wound by those crisp icicles . Do n’t put Santa too close to the wall , as he will swing harder the diametrical focus once he is gratis and overshoot the sled .
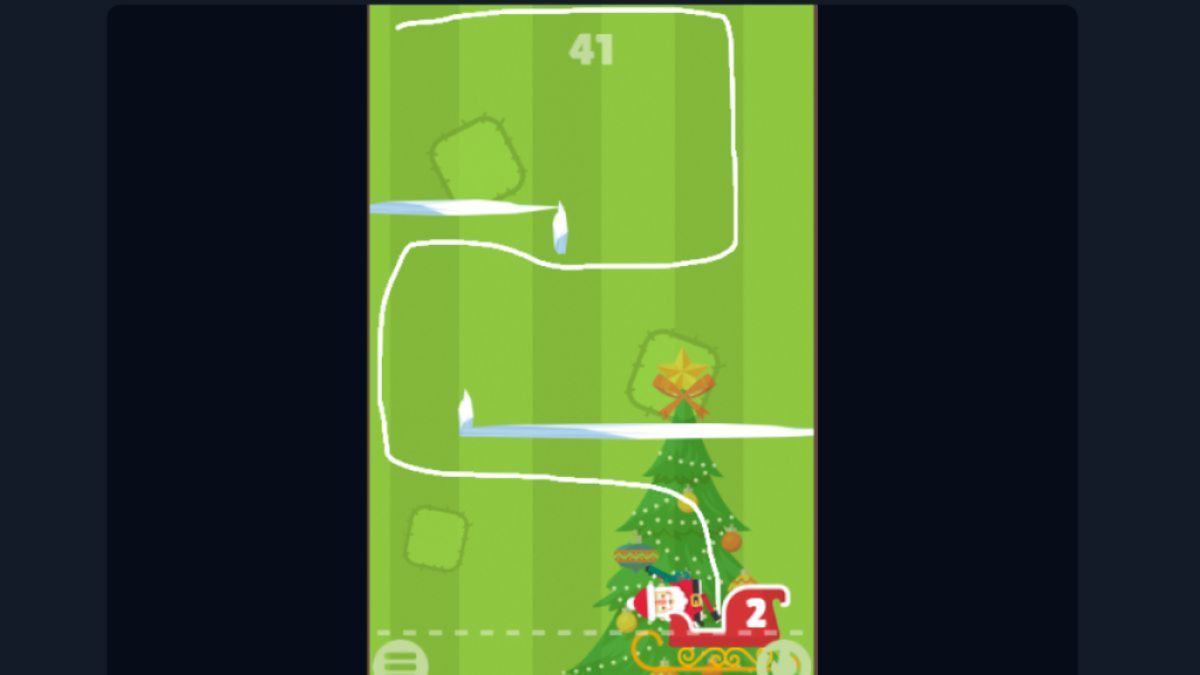
Level 41
You must be very careful to draw the line high in all sphere so Santa ’s feet do n’t scrape any ice . strain to reduce swinging by setting off just as he is swing to the right . Keep the line going down the unexpended wall tight to it to slow up him down .
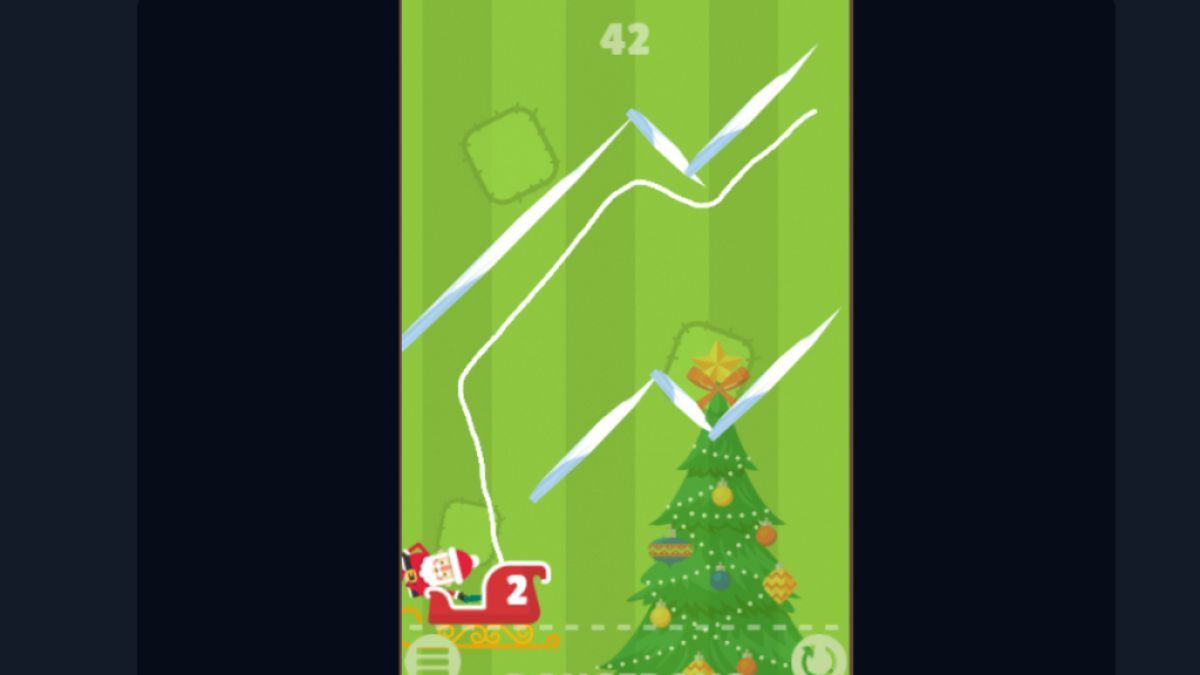
Level 42
Keep your lines straight and pop out moving as soon as Santa is at a mid - degree and swinging towards the left . Be measured how you draw the last line to avoid bump off the ice or decrease out of the sleigh .
Level 43
For level 43 , it ’s quite tricky to get the timing right , as it depends on how long of a line you end up drawing . endeavor to start as shortly as the star disappears behind the left-hand bulwark or just as it regress and go to the right field . Cut off the line early on since Santa falls quicker without it .
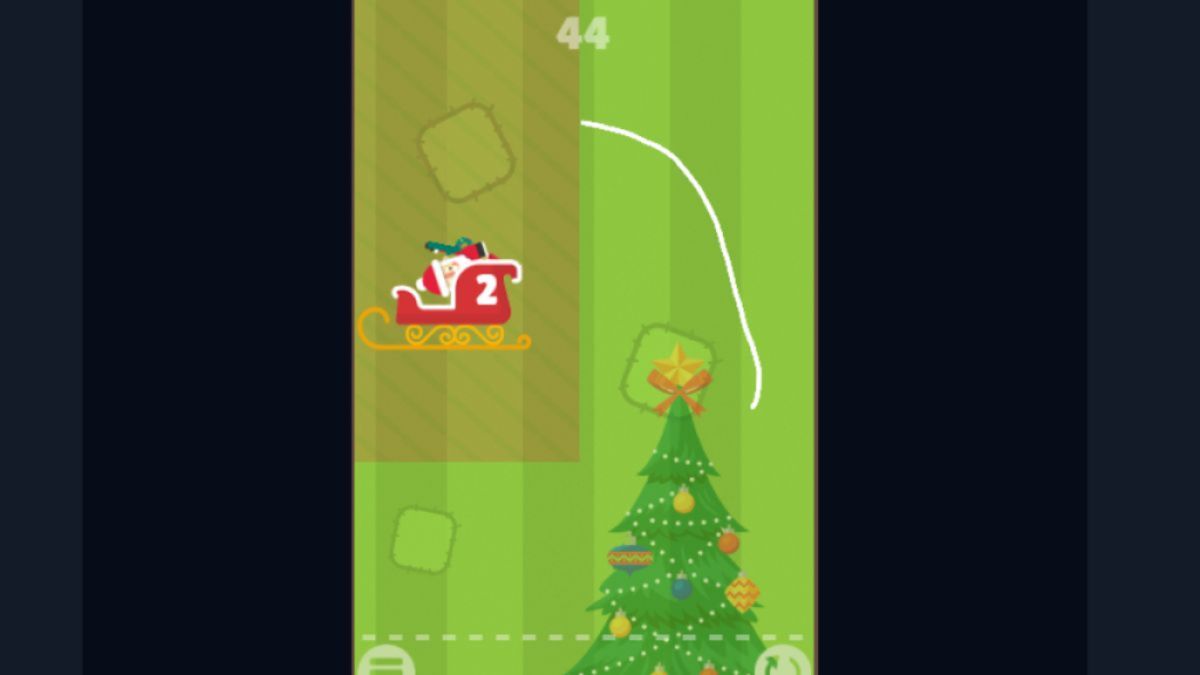
Level 44
Here , you in reality desire to be swinging to be able to get to the sleigh . begin as Santa is swinging to the far left , and you should be good . If you want a bit more swing , summate another curve to the line and go higher .
Related : How to beat Big Ice Tower Tiny Square
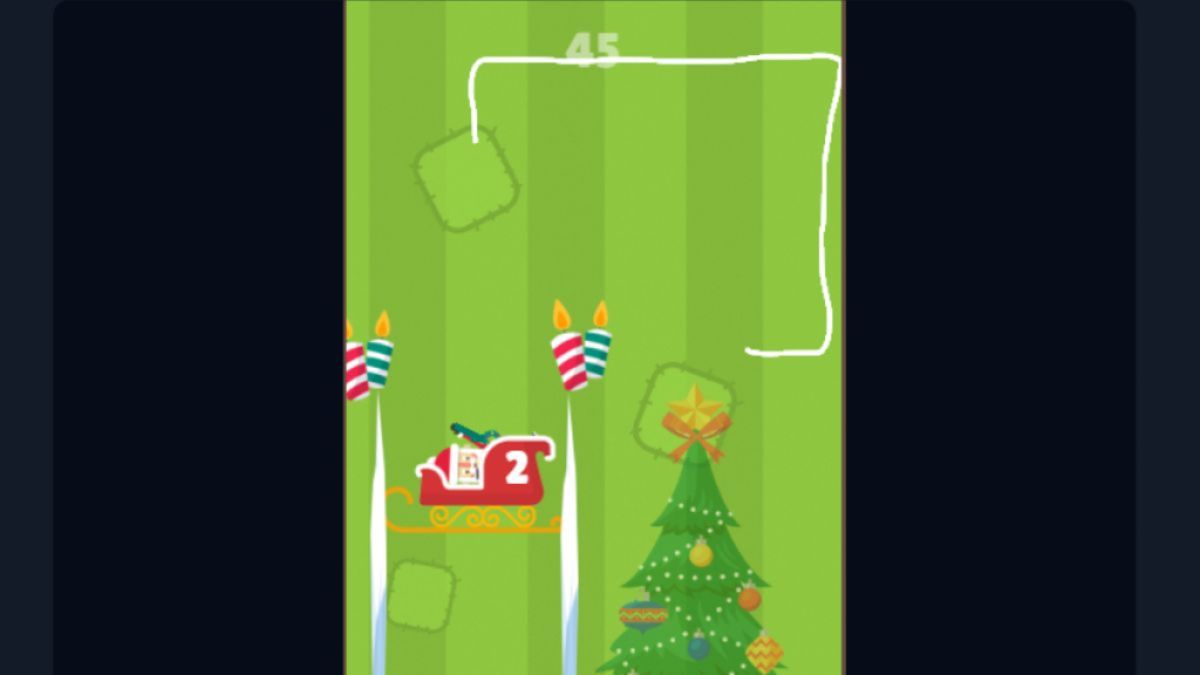
Level 45
On stage 45 , I usually baffle nigher to the paries so that it slacken down Santa ’s impulse . If you do n’t , he will commence swinging a lot and hit one of the candles . Again , he rationalize off the line betimes , so he drops instead of swing . Just make indisputable to purport properly .
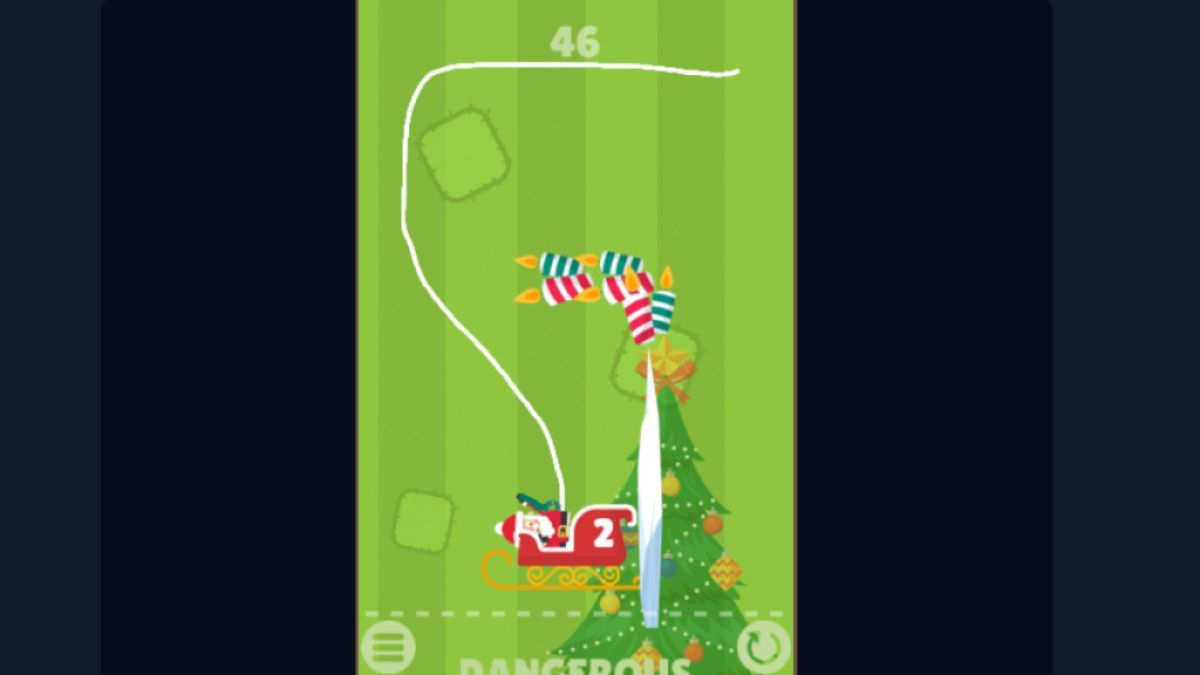
Level 46
You should n’t be doing straight lines or get going against the paries here , as that will swing Santa around . Instead , start veer the stemma to the right hand just as you reach the candles .
Level 47
Santa needs to go slimly to the leftfield at the top but swerve the line to the right wing as shortly as you pass the top row of wax light . arc the business to the left once you pass the bottom row of candela so that Santa reaches the sledge .
Level 48
Keep your lines straight until just above the icicle . Once you pass it , draw the melody to the rightfield to avoid run into the bottom headliner . direct more to the right in the sledge so that Santa does n’t fall out .
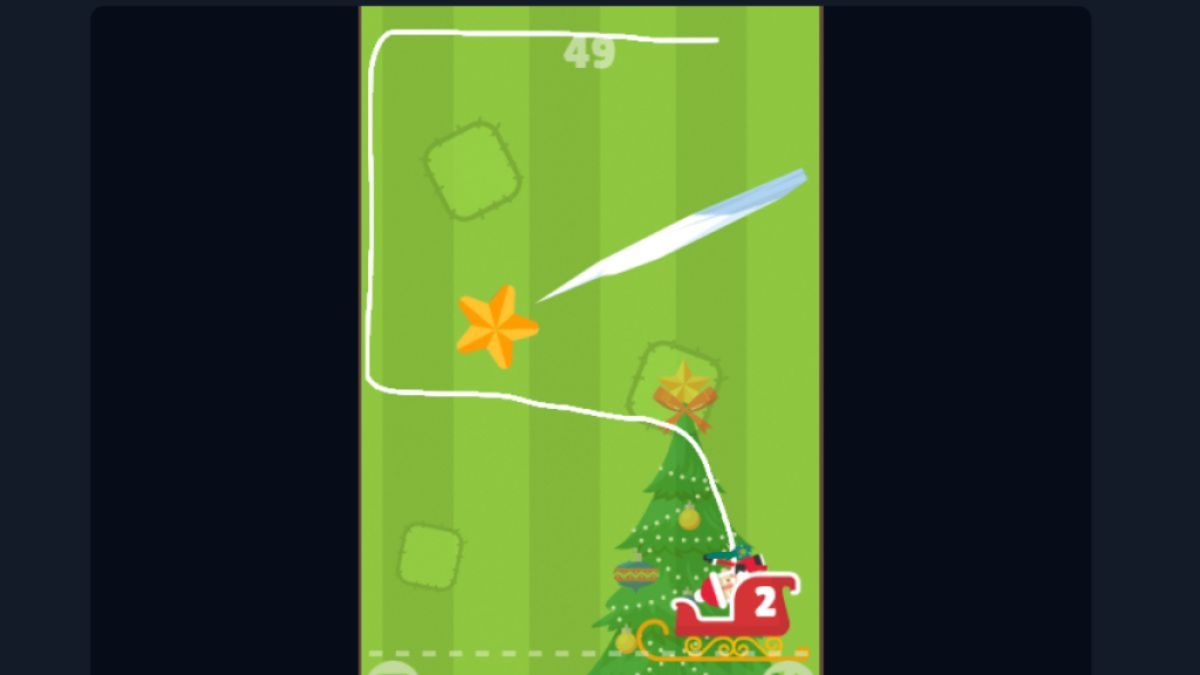
Level 49
This level is middling standard process . attract a straight line to the left-hand and then another down against the paries so that Santa incur a bit stuck on it and does n’t swing into the star .
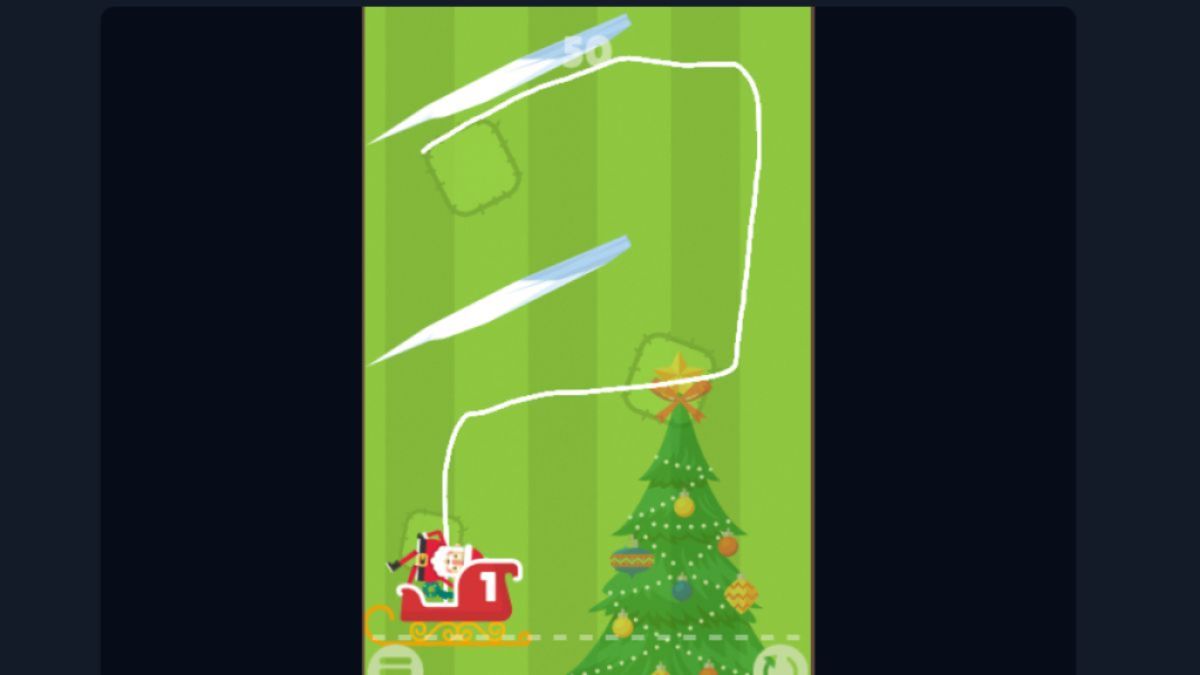
Level 50
Make certain you draw the melodic line close to the top icicle until you execute the bottom one to stave off hitting it . After that , keep the lines straight to pass the sled .
Level 51
Go as the candy cane depart turning back to the left . Once you reach the last candy cane on the left field , tot a little bump in your line to avoid hitting it . After this , instantly arch back to the left to miss the other wrangle of candy cane and make it to the sledge .
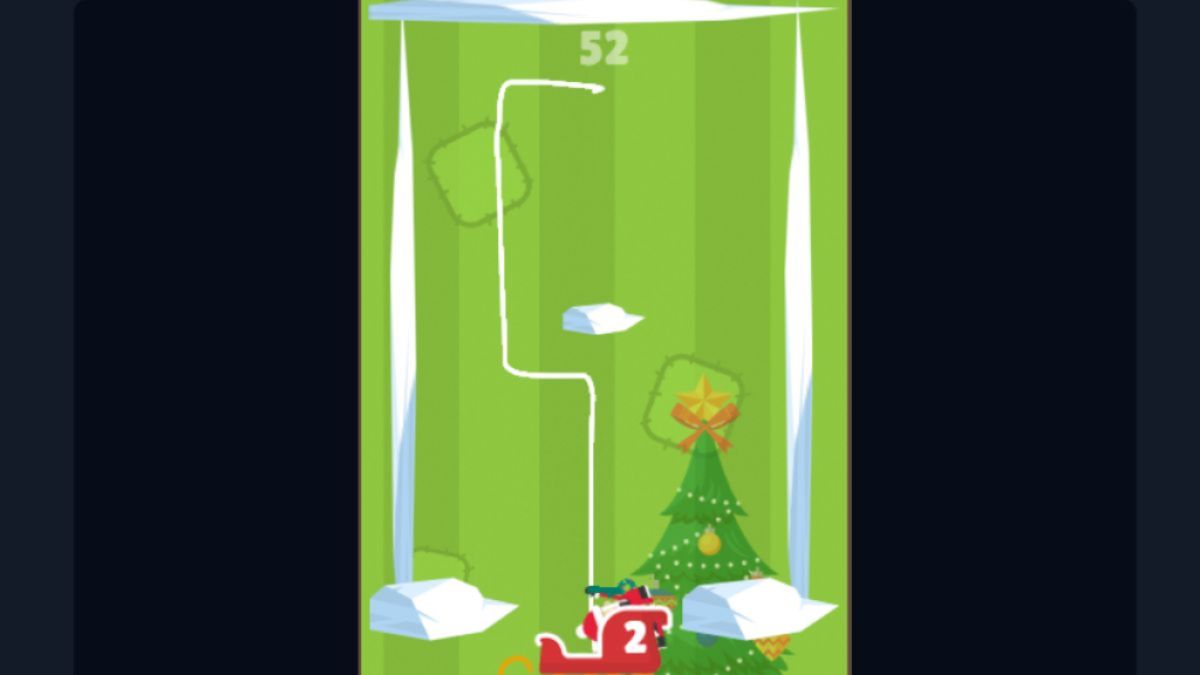
Level 52
square lines are the way to go again . Keep Santa steady the full clock time to reduce his momentum , and you should touch the sled safely .
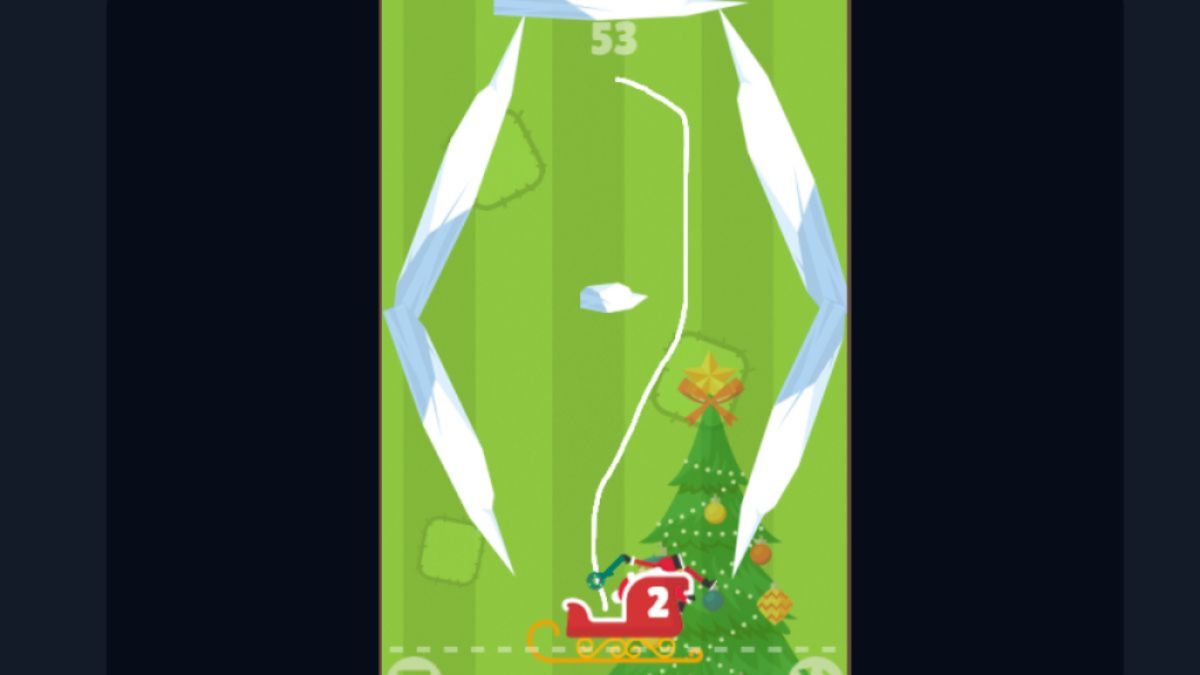
Level 53
Make your line to the right-hand very short so that Santa does n’t strike the ice . to boot , start as he is in the middle point and swinging to the right . This path , you ’ll correct his momentum . After this , move the wrinkle towards the left , and you should be ripe .
Related : How to quiver Lava and Aqua – Walkthrough
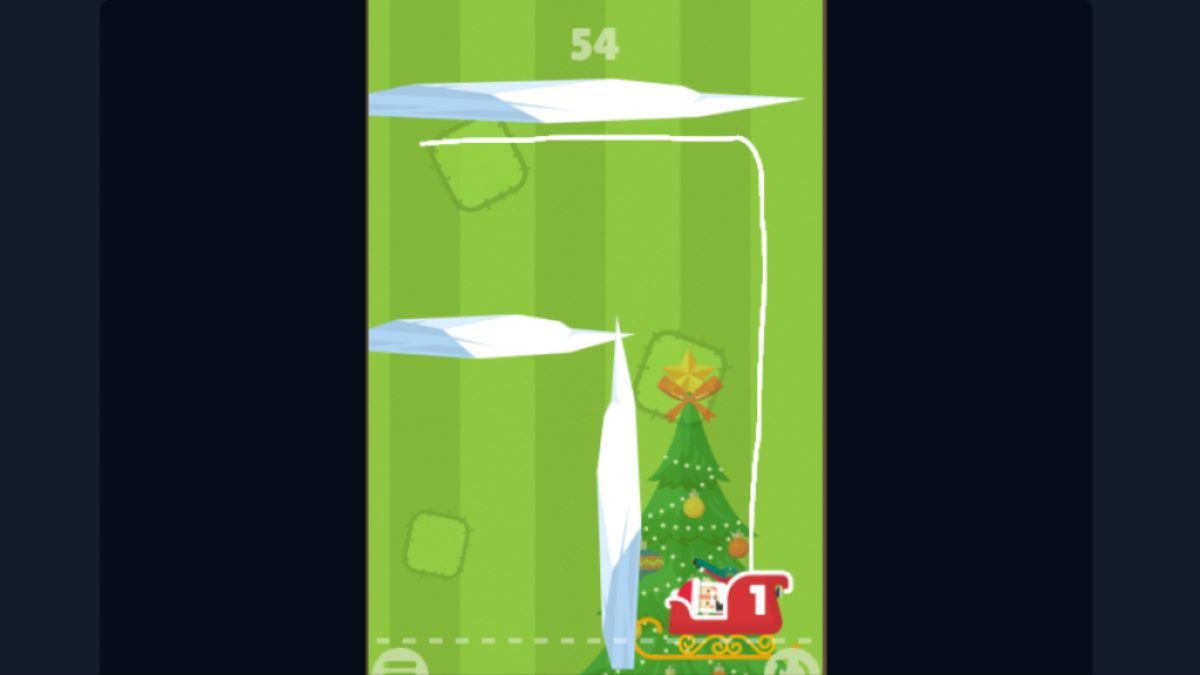
Level 54
dense and steady connect with the sled . Keep your line directly and lead off as Santa is at a midpoint and prompt towards the right .
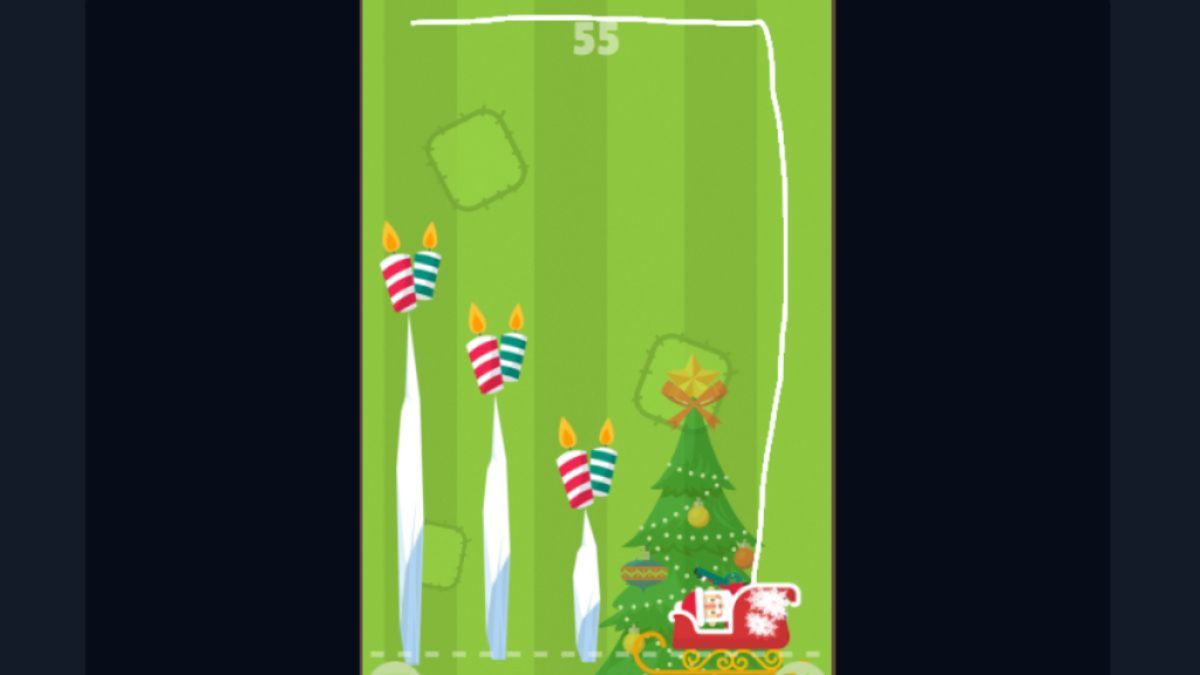
Level 55
Do the same matter for level 55 of Santa Go as you did for layer 54 . Straight line are key , but you may be free with the momentum here and even lease Santa go as he is wildly singe about .
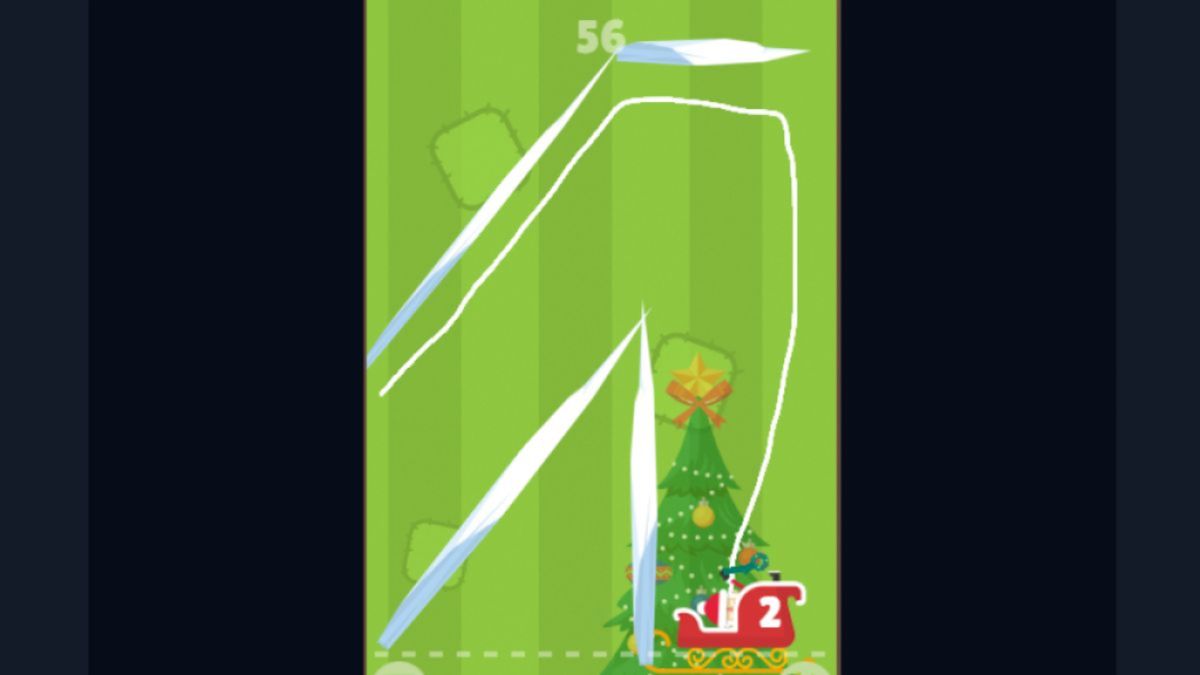
Level 56
Santa ’s movement involve to be subdue as much as potential . Draw the railway line parallel to the left over icicle and then another one following the top icicle . Use the rampart to the right and get Santa stuck on it . He should only startle swing once he is out . This is a bite risky since the swing could throw him into the ice , but it usually works .
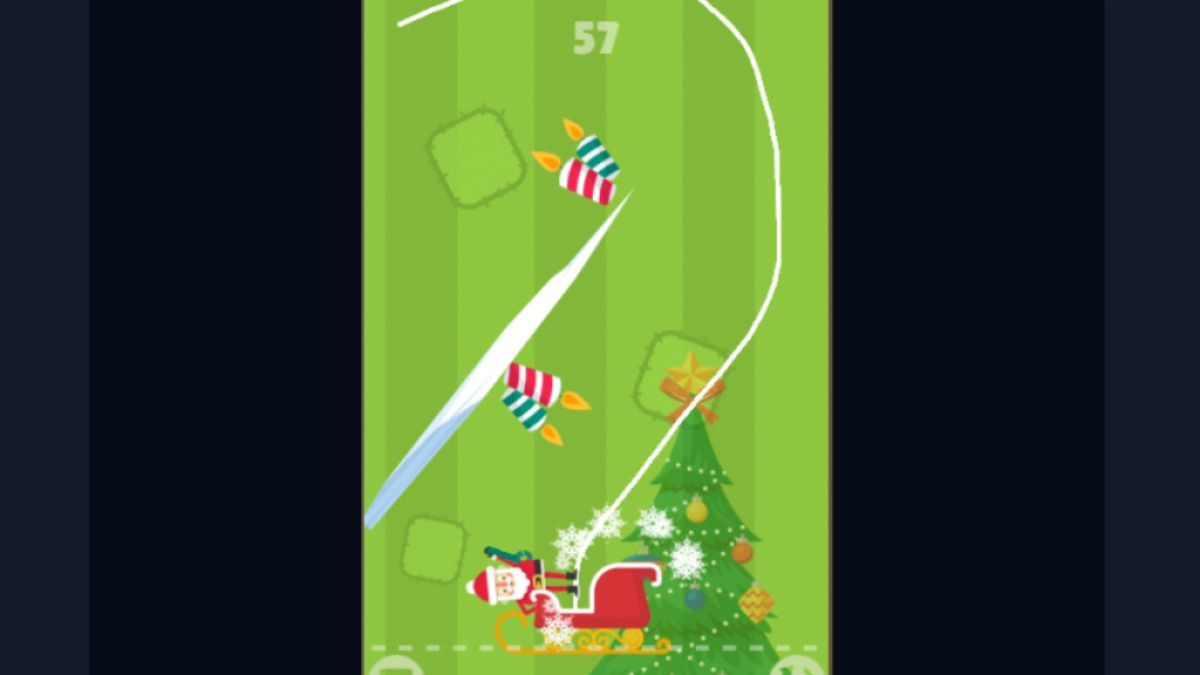
Level 57
Get Santa to go up as soon as possible . It ’s also good to let him go once he is singe all the way to the right . Steer clear of the sharp end of the ice , and Santa should strive the sledge safely .
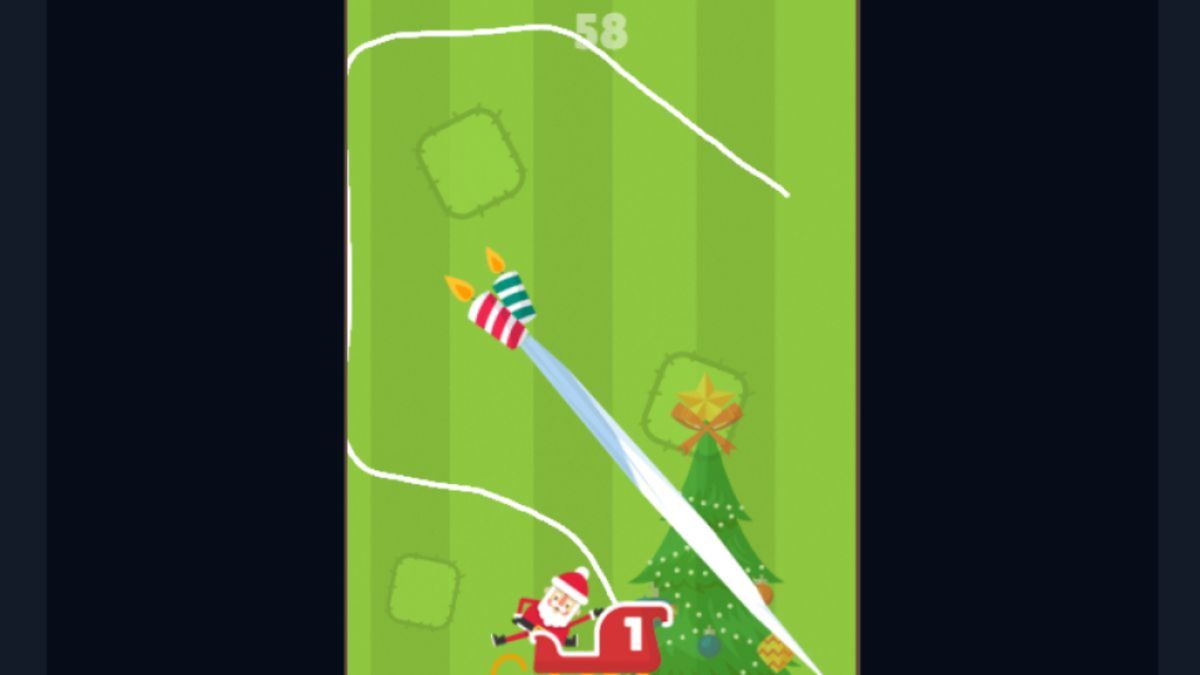
Level 58
Go up high enough to avoid hitting the top of the ice . Going down , stick close to the wall . This is risky as Santa might swing around wildly , but it should work , and you could get to the sleigh . Just ensure to draw the last line gamy enough not to miss the sleigh .
Level 59
you’re able to make it by going both left and right . If you go left , start as Santa is at the mid - point and swing to the leftfield . If you go right , come out as Santa is at the mid - point and swinging to the right . Keep the melody close to the wall so that he gets stuck on it and does not swing into the candles .
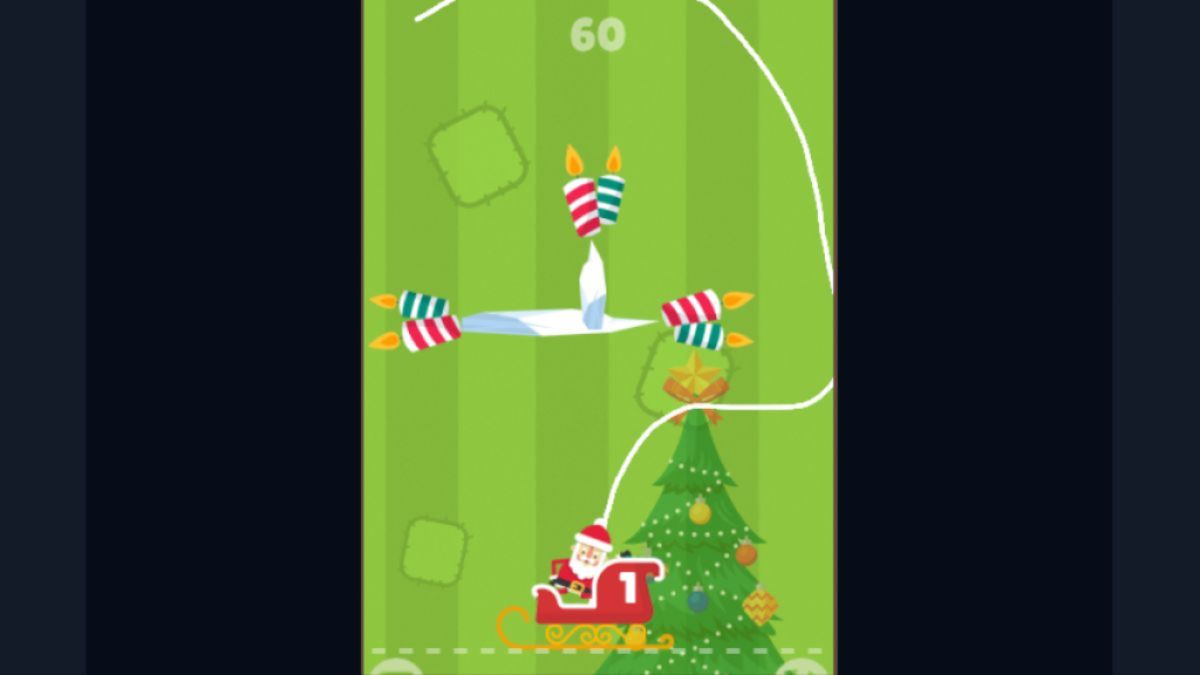
Level 60
For level 60 of Santa Go , go up as shortly as possible . Once you clear up the top candles , head down and draw the line into the paries once you make the bottom right taper . at last , give enough space at the bottom so that Santa does n’t fall into the dangerous area .
For more Cool Math Games walkthroughs , check outHow to beat Learn to Flyon Pro Game Guides .


Screenshot by Pro Game Guides
Screenshot by Pro Game Guides
Screenshot by Pro Game Guides
Screenshot by Pro Game Guides
Screenshot by Pro Game Guides
Screenshot by Pro Game Guides

Image by Pro Game Guides
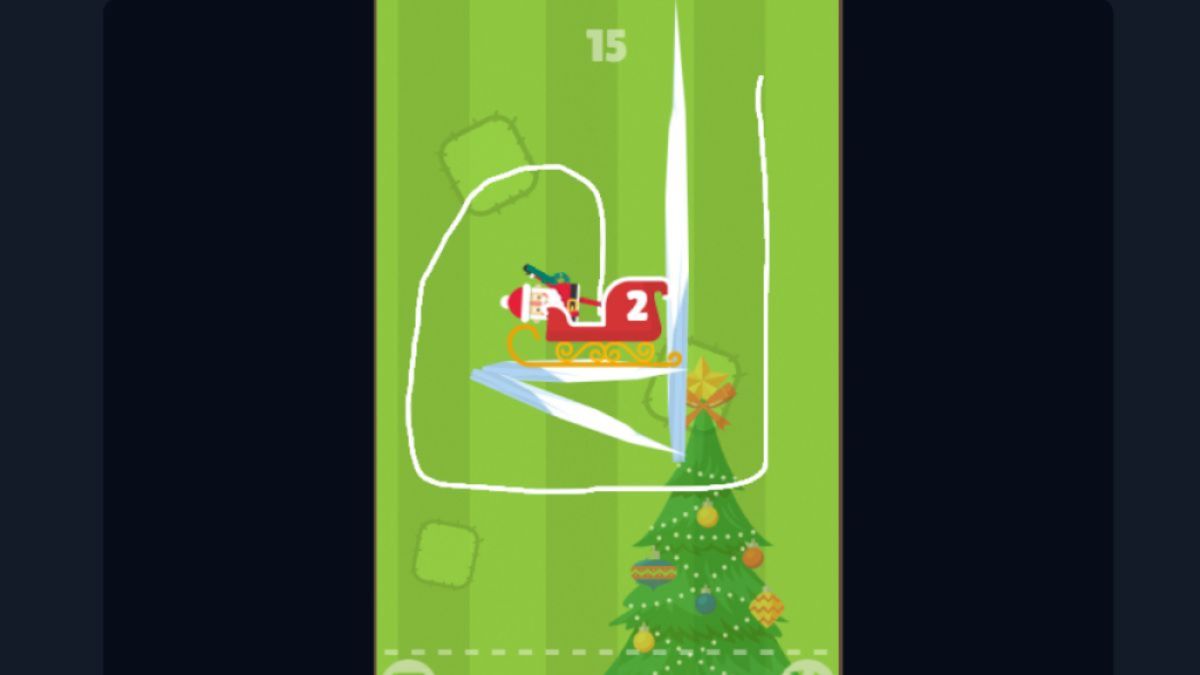
Image by Pro Game Guides

Image by Pro Game Guides

Screenshot by Pro Game Guides

Screenshot by Pro Game Guides
Screenshot by Pro Game Guides

Screenshot by Pro Game Guides
Screenshot by Pro Game Guides
Screenshot by Pro Game Guides
Screenshot by Pro Game Guides
Screenshot by Pro Game Guides

Screenshot by Pro Game Guides
Screenshot by Pro Game Guides

Screenshot by Pro Game Guides

Screenshot by Pro Game Guides
Screenshot by Pro Game Guides
Screenshot by Pro Game Guides
Screenshot by Pro Game Guides
Screenshot by Pro Game Guides
Screenshot by Pro Game Guides

Screenshot by Pro Game Guides
Screenshot by Pro Game Guides
Screenshot by Pro Game Guides
Screenshot by Pro Game Guides
Screenshot by Pro Game Guides
Screenshot by Pro Game Guides

Screenshot by Pro Game Guides
Screenshot by Pro Game Guides
Screenshot by Pro Game Guides
Screenshot by Pro Game Guides

Screenshot by Pro Game Guides
Screenshot by Pro Game Guides
Screenshot by Pro Game Guides
Screenshot by Pro Game Guides

Screenshot by Pro Game Guides

Screenshot by Pro Game Guides
Screenshot by Pro Game Guides
Screenshot by Pro Game Guides

Screenshot by Pro Game Guides
Screenshot by Pro Game Guides
Screenshot by Pro Game Guides
Screenshot by Pro Game Guides
Screenshot by Pro Game Guides
Screenshot by Pro Game Guides
Screenshot by Pro Game Guides
Screenshot by Pro Game Guide

Screenshot by Pro Game Guides
Screenshot by Pro Game Guides
