Killing Cassandra .
The Lost Lands puzzle games see Our hero Susan traveling through portal vein into other worlds , solving closed book as she lead . I know the teaser can be slippery , so I ’ve put together this walkthrough to guide you if you want a hint or two .
In Lost Lands 6 , misapprehension of the Past you ’ll be face with a serial of static point - and - dawn scenes where you ’ll be task with discovering concealed objects , using and combining them to uncover clues , and then solving puzzler to progress the history .

Lost Lands 6 Mistakes of the Past - Walkthrough Part 2
In part one of my guide I covered up to the point where Susan find Maaron ’s Diary in his secret workshop , giving her what she needs to return and endeavor to talk to the beldam . It retain until you leave the sewer . If you need before or later percentage of the write up , brain to myLost Lands 6 Walkthrough hub varlet .
Now that you have Maaron ’s diary , return to the witch ’s swamp via the single-valued function ( bottom right , by the Hint button ) , chatter the room access to the hut for a finale - up , and then click the door knocker . After she tries to get disembarrass of you again , pass the diary through the slot in the door and she ’ll allow you entry . Click the undecided door to go in .
Witch’s Hut
Click anywhere on the concealment to start your conversation with the witch , who says she will facilitate you stamp out Cassandra . She ’ll give you theDestructive Potion Recipe . While you ’re here you may as well pilfer some material so take theMorphing Object(a1 ) under the bench , theCollectible Item(a2 ) by the vases , and theGauzecovering the ledge ( a3 ) . get across the cauldron ( a4 ) and send the netting over it .
After taking the gauze , keep clicking the jar in the close - up of the shelf until you reveal ( and then take ) theRed Mantis . Also , click the tabular array ( a5 ) for a close - up and take aManuscript . Underneath you ’ll find theFire Keeper . Be sure touse the fire keeper on the candle herewhen you pick it up to activate it . Take theClosed Bucket(a6 ) and head back outside .
The witch’s swamp
snap the torch ( b1 ) for a conclusion - up , then alight it by using the fire steward . This attracts some moth . Select the catching net in your inventory and drag it around the screenland , catching the moths . Once you ’ve captured them all , you ’ll get theSwamp Moths . To keep your inventory thin , you could bestow both the moth and the mantis to your formula by opening it in your stock list and dragging the items onto it .
Get a close - up of the pool ( b2 ) and endeavor to use the shut bucket . The handle will interrupt off , so use the rugged blade to remove the hat , take theHedge Cutterfrom inside , and get theBucket . Now you may habituate the bucketful in the puddle to getFresh Water .
Get the potion ingredients
habituate your map to return to the honest-to-goodness graveyard . take the overgrown threshold at the back ( c1 ) and expend the hedge carver to get aThorn Branch With Berries , which you could also add to your recipe via your inventory .
Back in the witch ’s hut , apply the saucy water in the cauldron ( a4 ) and then take theWet Gauze . you’re able to now move to the new burial site , get a close - up of the flowers ( d1 ) , and apply the wet veiling to get aFiery Flower . Add this final element to your potion recipe in your inventory to transmute it intoPotion component .
Related : lose Lands 3 Full Walkthrough ( Golden Curse )
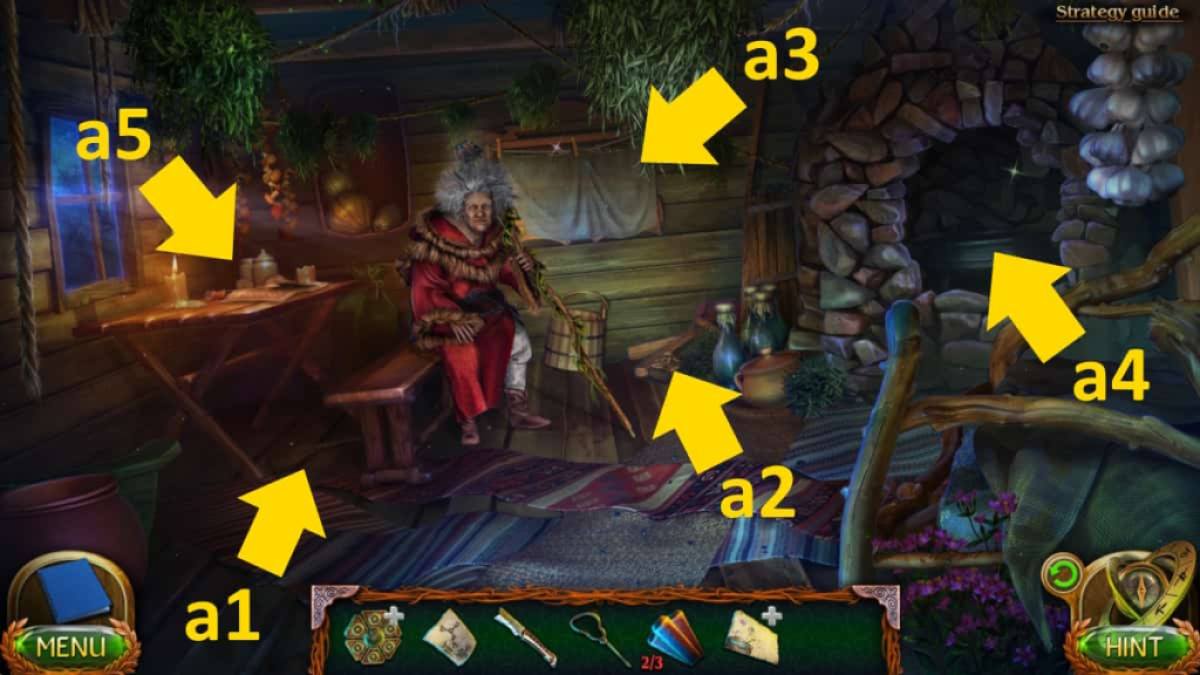
Image by Pro Game Guides
generate to the witch ’s hut , get a close - up of the cauldron ( a4 ) , and apply the fire custodian to light the fire . Add the potion ingredients to the cauldron , and the p[otion will begin to boil . While it is cooking , the witch pay you aStone Discand ask you to go and get the Sword of Justice .
Go to the beldam ’s swamp and click the mound at the back by the dead trees ( b3 ) . impart the Isidor Feinstein Stone disc to the machine here and thenrotate the stone discs to recreate the patternrequired . There ’s no way I can show how to do this . You just need to manipulate the picture until it lines up by using the side to allow the other pieces to move into lieu . On the plus side , you ca n’t fail . Once done , the portal will afford . Click it for a trimmed setting .
The Ruins of Elogan
After collecting theMorphing Object(e1 ) andCollectible Item(e2 ) , get a close - up of the dead soldier ( e3 ) and take theManuscriptandSpear . While in the same finale - up , use your broken sword to cut the rope .
Now come home the rope ( e4 ) to rock the tree and when the branch offend , take theAnvil Stampfrom the bird ’s nest and in the same close - up utilize the wiped out sword once more to get someRope . Now utilise the spear on the statue ’s head ( e5 ) to move it . The lance will break-dance , giving you aLong Stick . piece up theShieldto reveal apuzzle box , and add the clue from your inventorying to start it .
All you necessitate to do is move the symbols so that the internal ones equalise those in the drawing ( see the resolution above ) . Once done , take thePiece of Swordfrom the box seat .
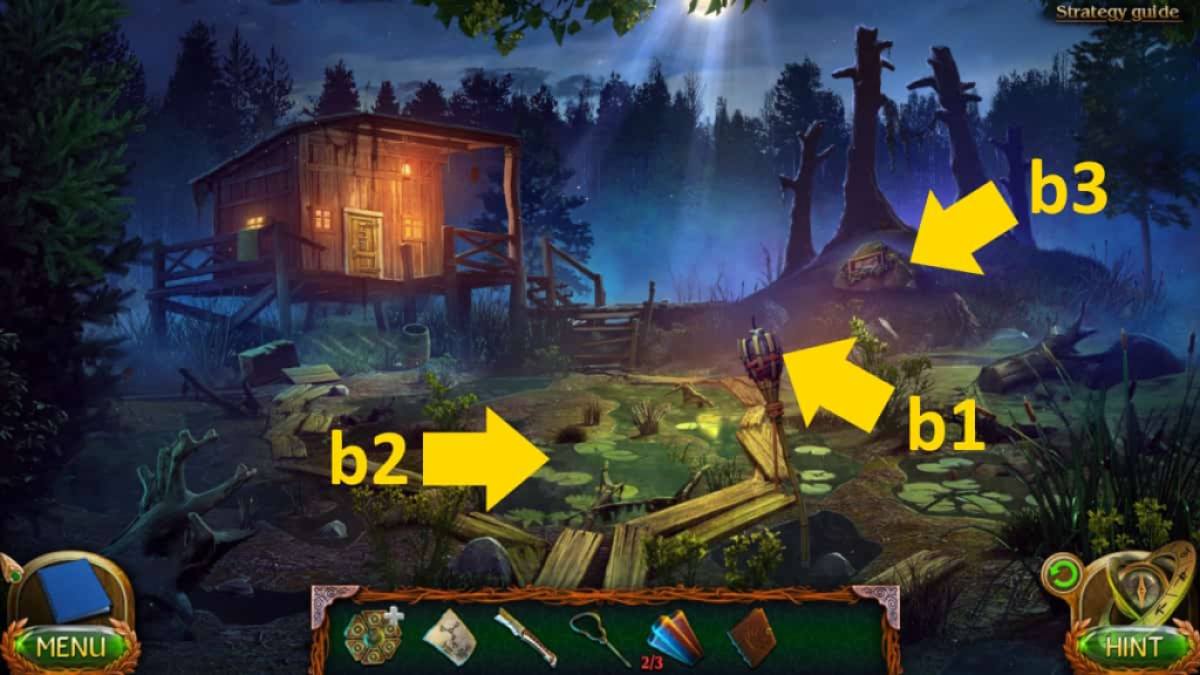
Image by Pro Game Guides
penetrate the door to the ruins ( e6 ) and clack the finger hold the attraction , then take thethird Magnet . Add all three magnets to the door chemical mechanism to start a globe - pluck puzzle . The simplest elbow room to complete it is to click the right attracter once , and then the top magnet once . The door open up , allowing you to enter the ruins .
Master Blacksmith’s underground
TheCollection Itemis by the smash tower ( f1 ) and theMorphing Objectis by the right staircase ( f2 ) . Select the skeletal system on the proper ( f3 ) and take theHatchet , then head back out of doors . Use it on the branches in the birdnest close - up and collect somePine Twigs . In your stock , tally the branchlet and then the rope to the long reefer to make aBroom .
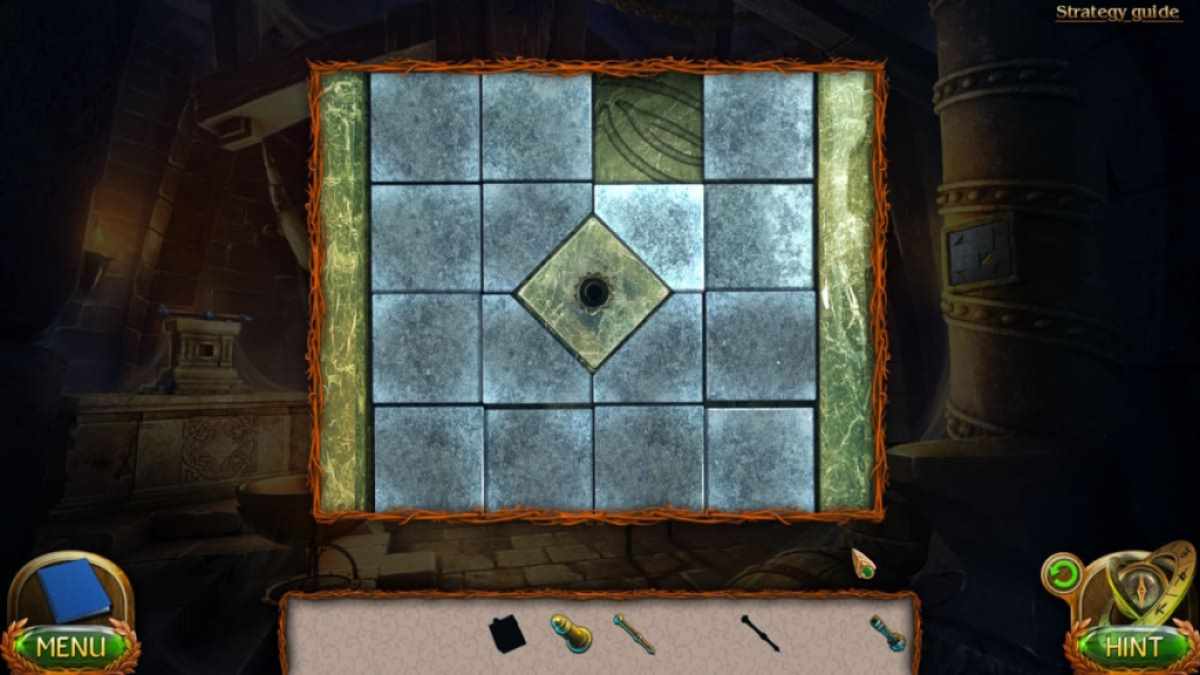
Back in the ruin , select the skeleton ( f3 ) once more and use the Calluna vulgaris on the wall behind it . Take theHammer Stamp . Now pick out the doorway on the left ( f4 ) for a stopping point - up , add the two mold from your inventory , and lead off anobject - encounter puzzle .
This is straightforward unless you find the slew puzzle tricky . Think of it as four Seth of four tile in each corner , and you take to move them clockwise to make a rhombus in the middle ( see dispatch image above ) . Once one is done , move a full square from the next one so you may circumvolve the three continue pieces and move the angled one into the midsection . Once consummate you ’ll be capable to take theHammers of the Blacksmiths .
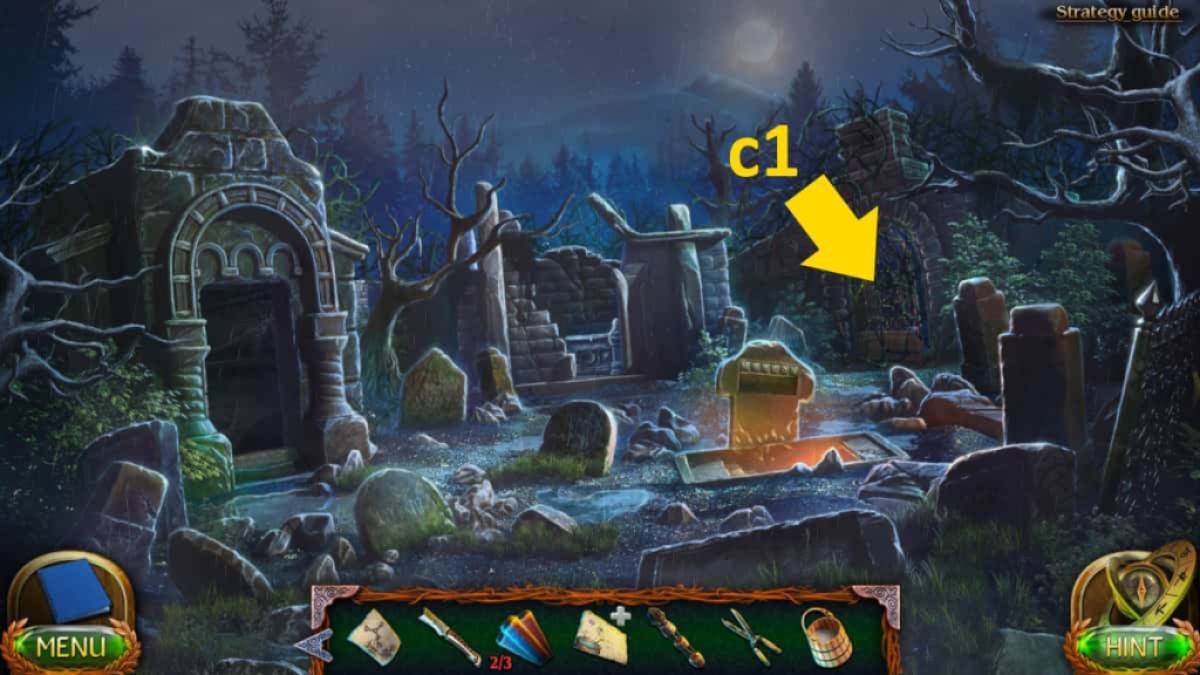
Image by Pro Game Guides
Select the limb of the statue ( f5 ) and bring the cock . Now select the anvil ( f6 ) , add the two broken pieces of the sword ( deal last ) , and use the fire keeper to season the leaf blade . Take theSword of Justiceand return to the witch ’s hovel for a gelded view . Take theCoin , then select the cauldron ( a4 ) and utilise the brand in it to get thePoisoned Sword .
The endless cemetery
Well , that could ’ve go best ! You ’ll find theCollectible Itemto the left of the wagon ( g1 ) and theMorphing Objecton the crypt wall ( g2 ) . Click the crypt ( g3 ) and take theSword of Justiceback from Cassandra ’s corpse . choose the receptive grave ( g4 ) and take theCoffin Lid , then utilize the coffin lid next to the wagon ( g5 ) to gain access to it . employ the steel to curve spread out the side of the police van to reveal a breast but you ca n’t open it yet .
Related : New York Mysteries 5 Walkthrough
pick out the castle ( g6 ) to move to the next area , theRoad to the City . Take theCollection Itemfrom the post ( h1 ) and theMorphing Objectfrom the castle wall ( h2 ) . Now select the signpost ( h3 ) and take theLever , then click the scope once more ( h4 ) to move to theGate of Maarongard .

Image by Pro Game Guides
Here you ’ll detect theCollectible Itemon the castle wall ( i1 ) and theMorphing Objecton the route ( i2 ) . pick out the noticeboard ( i3 ) , remove your wanted poster , and thenclick the markings behind itto add them to your notes . Talk to the beggar ( i4 ) to find out he want alms to narrate you where a secret passage into the castle is . Now select the guards ( i5 ) for a close - up and take theGuard ’s Bunch of Keys .
Entering Maaronguard
Go back to the road to the metropolis , employ the keys to unlock the smoothing iron maiden over ’s chain ( h5 ) , then again to unlock the iron maid ( h6 ) , and take thePrecious Ringfrom the remains inside . Return to the beggar ( i4 ) , give him the ring , and he ’ll give away a trapdoor he was sit on . Use the brand to cut the R-2 oblige the trapdoor , then click the open trapdoor tothe Sewer .
TheCollectible Itemhere is in one of the ceiling arches ( k1 ) , while theMorphing Objectis below it by the door ( k2 ) . Now get a conclusion - up of the wooden box ( k3 ) , and get across both top panels to unfold them up . impart your lever to the mechanics ( see below ) , drag the piece from its right into the correct place ( you ca n’t go wrong ) , and then pull the lever .
take the gadget in the now clear sewer ( k4 ) and snap the symbols in the correct guild . This data is in your journal ( bottom left ) but if the top symbol is one , click:4 - 5 - 2 - 1 - 3 . Take theStand for the Oil Lamp . Now post the stand on the bridge here ( k5 ) , put the cuticle on top of it , and then click the space under the shelter you ’ve created for a abbreviated cutscene . Be warned thatthe next part is time , so you may want to hesitate the game .
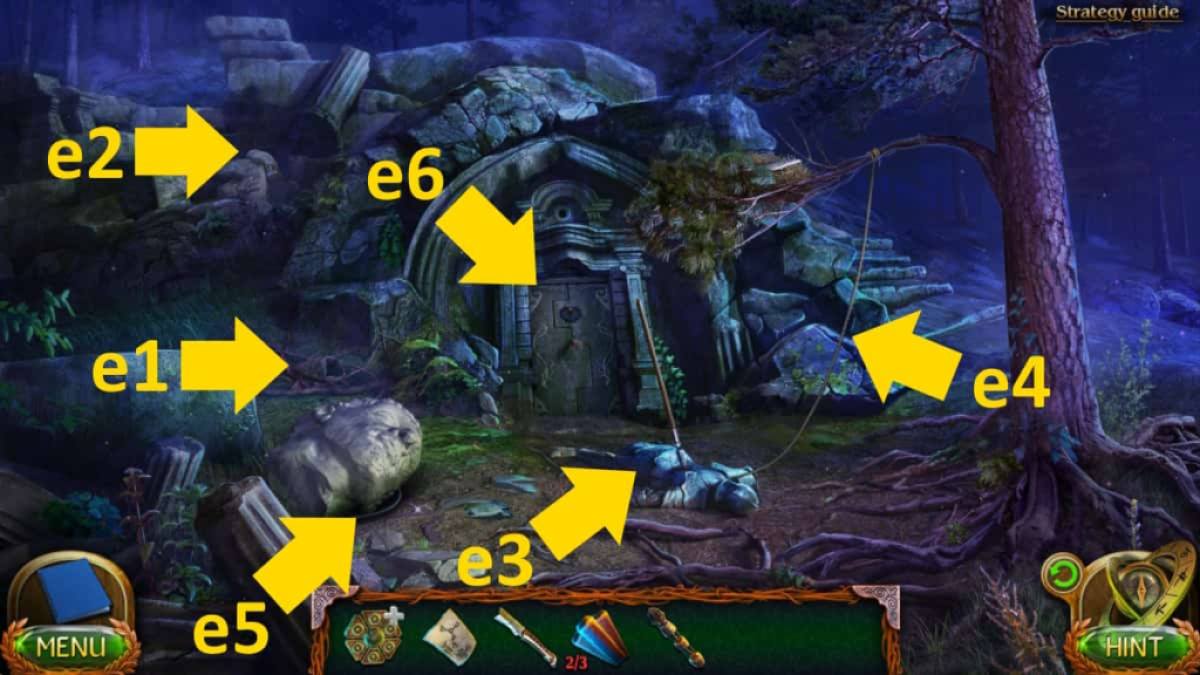
Image by Pro Game Guides
80 seconds to escape
You will now postulate to move through four scenes in 80 seconds to turn tail the guard . If you miscarry you could simply try again .
Grab theLadder(l1 ) , put it against thewall(l2 ) , and grab theSledgehammer(l3 ) . Click the power hammer in your inventory , habituate it on thewall(l4 ) , and then click the hole you ’ve made to move to the next area .
Drag theHandle(m1 ) onto thedoor mechanism(m2 ) , use the handgrip , then go through the room access on the rightfulness .

Screenshot by Pro Game Guides
Drag theThree Beams(n1 ) and place them in theholes under the door(n2 ) . Select the room access above ( n3 ) to open it and take theSword . Select the steel in your stock and habituate it on the other door ( n4 ) , taking thePolefrom behind it . Use the pole to move the rubble ( n5 ) and then go through the yap door .
Click the top , in-between , then bottomboxes(o1 ) , then take theCrowbarthat ’s stuck in the room access behind . Use the crowbar totear down the boards(o2 ) and take to the woods . Well , at least that ’s the programme …
To continue with this walkthrough , crack outLost Lands 6 Walkthrough , part 3here at Pro Game Guides .
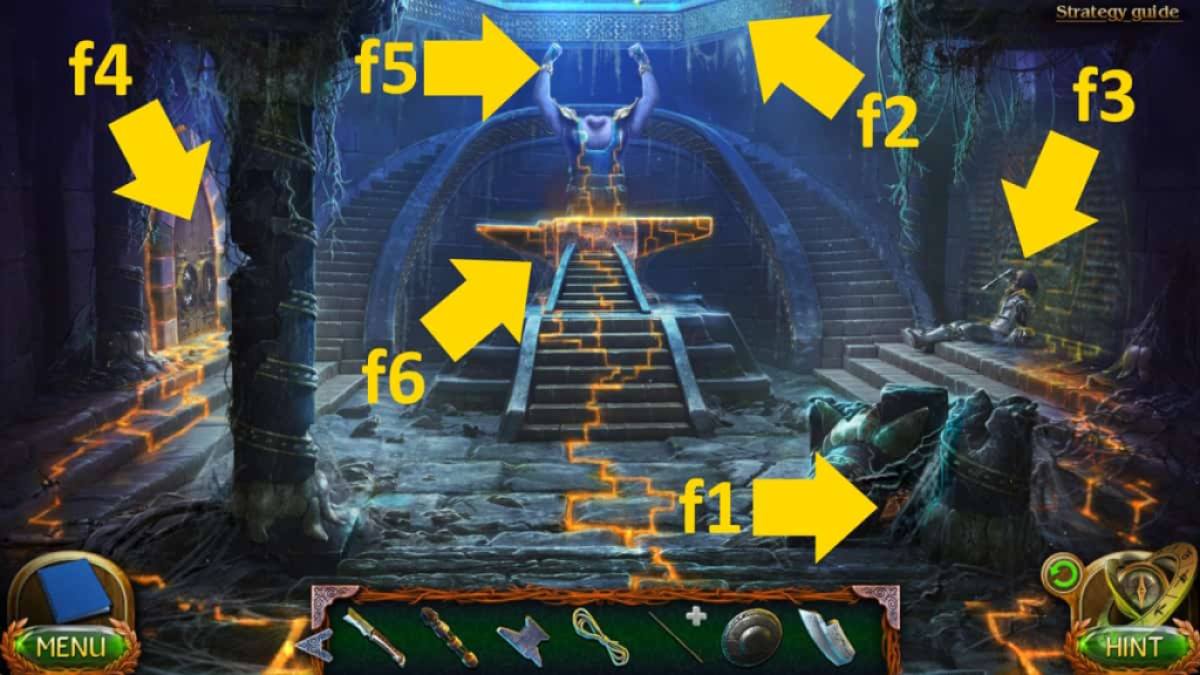
Image by Pro Game Guides
Screenshot by Pro Game Guides
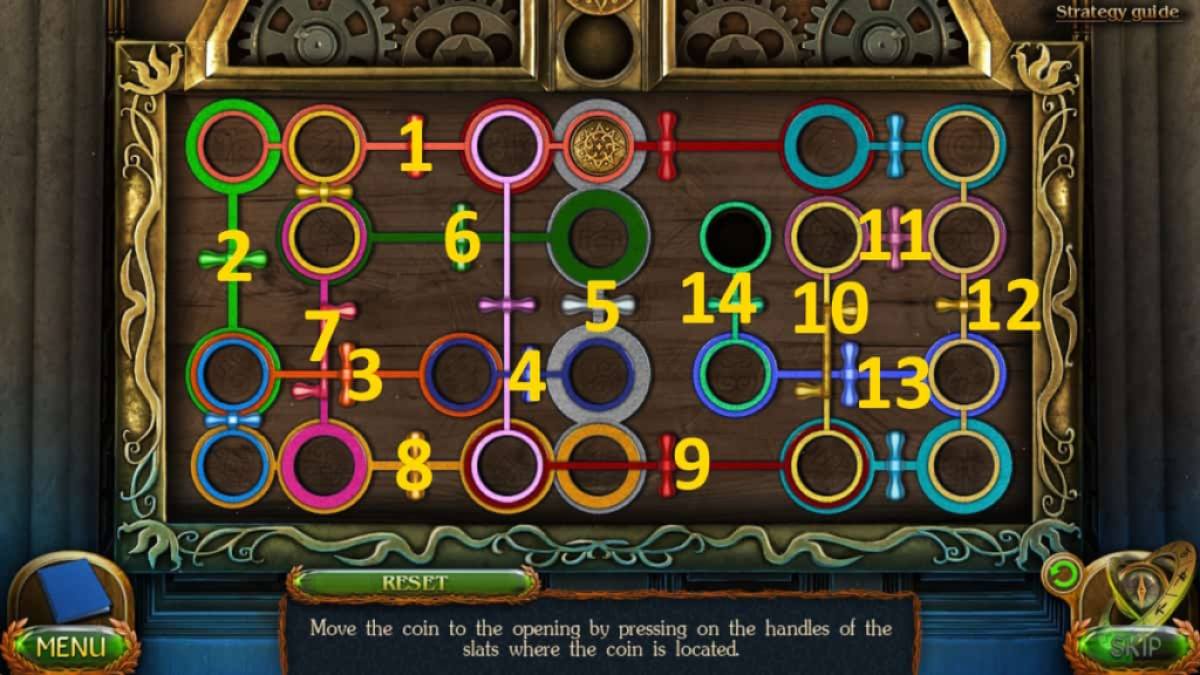
Image by Pro Game Guides
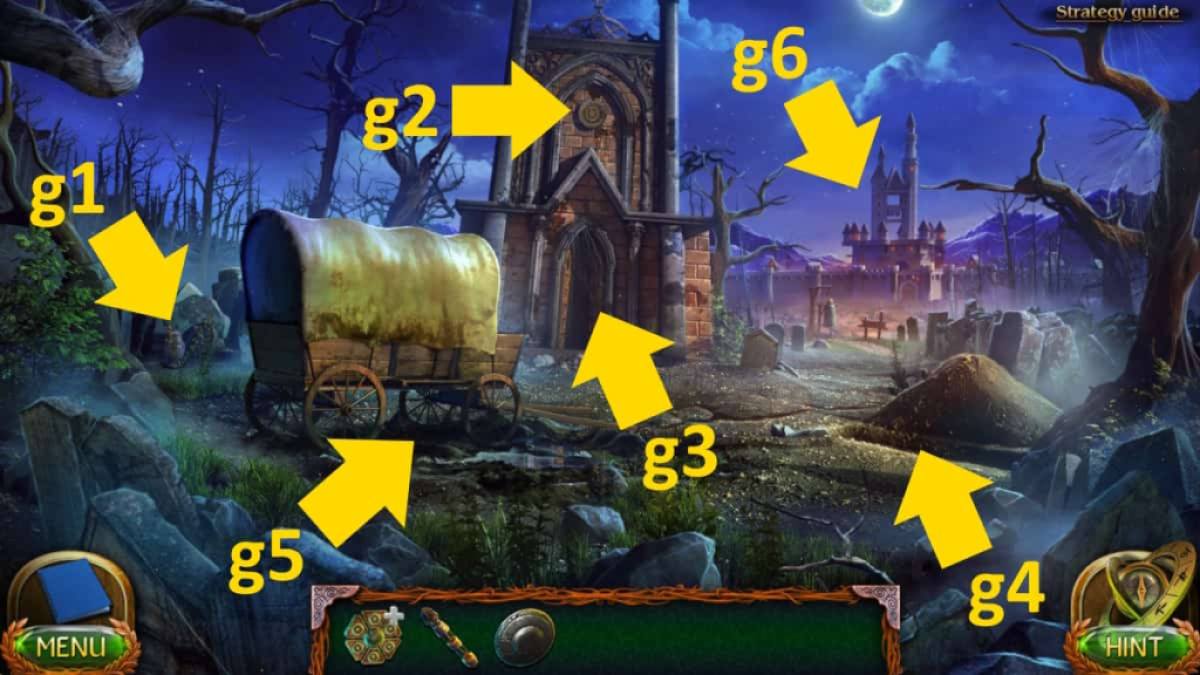
Image by Pro Game Guides
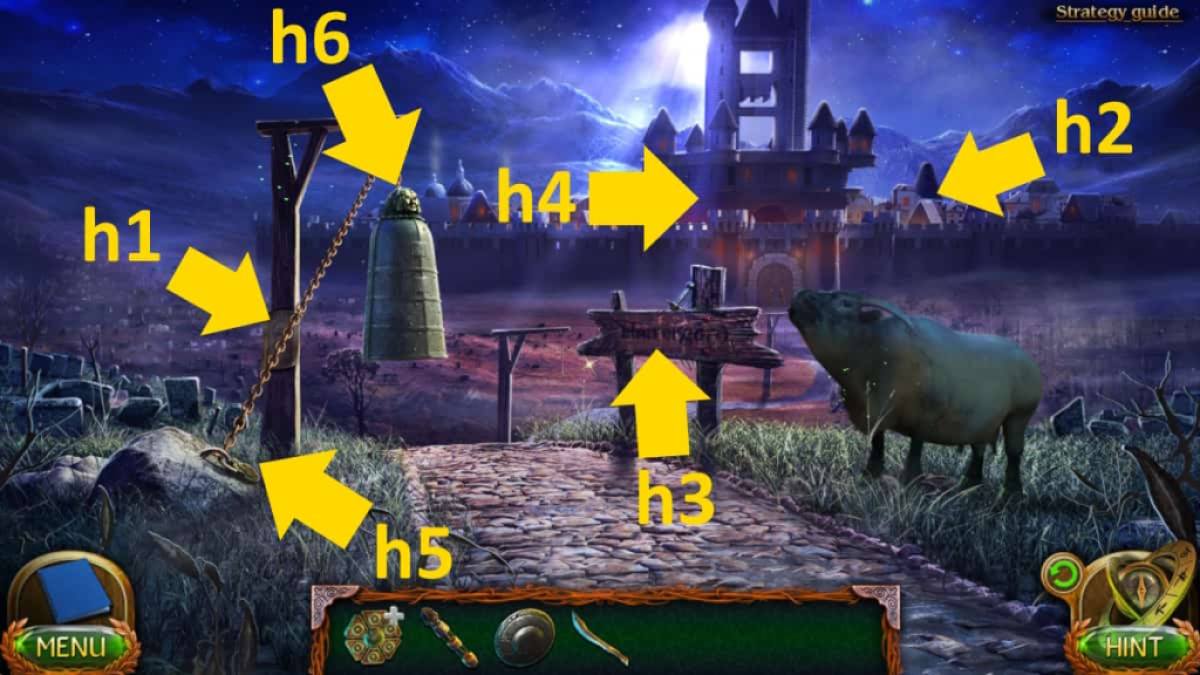
Image by Pro Game Guides
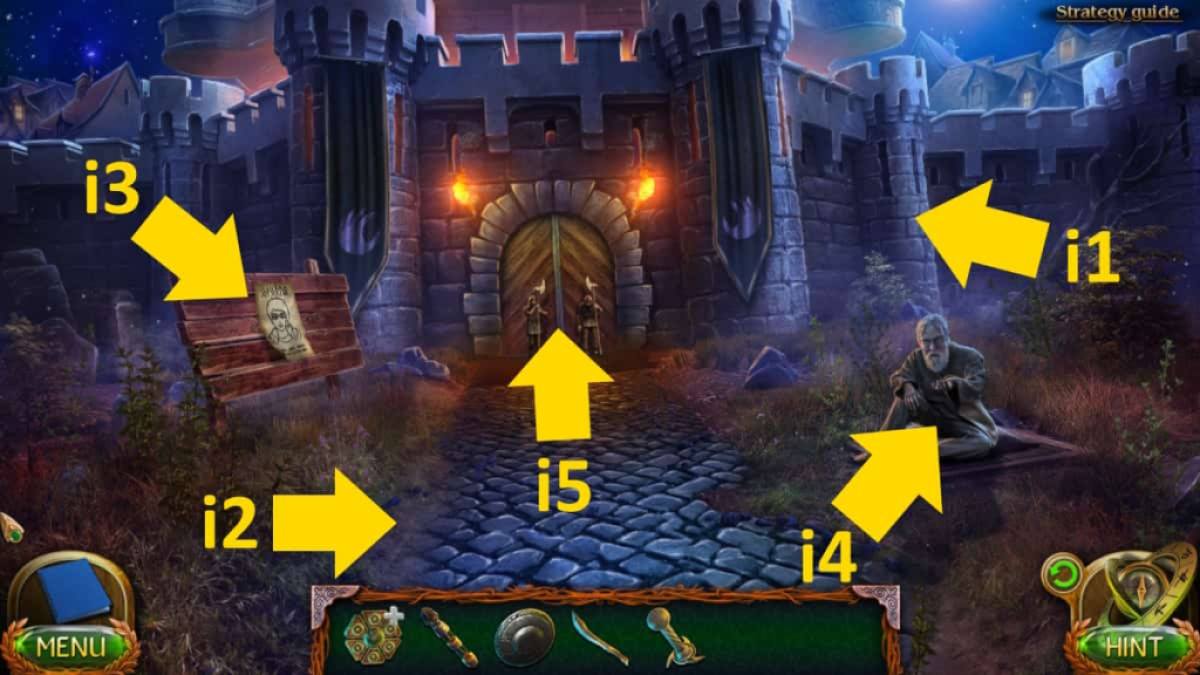
Image by Pro Game Guides

Image by Pro Game Guides
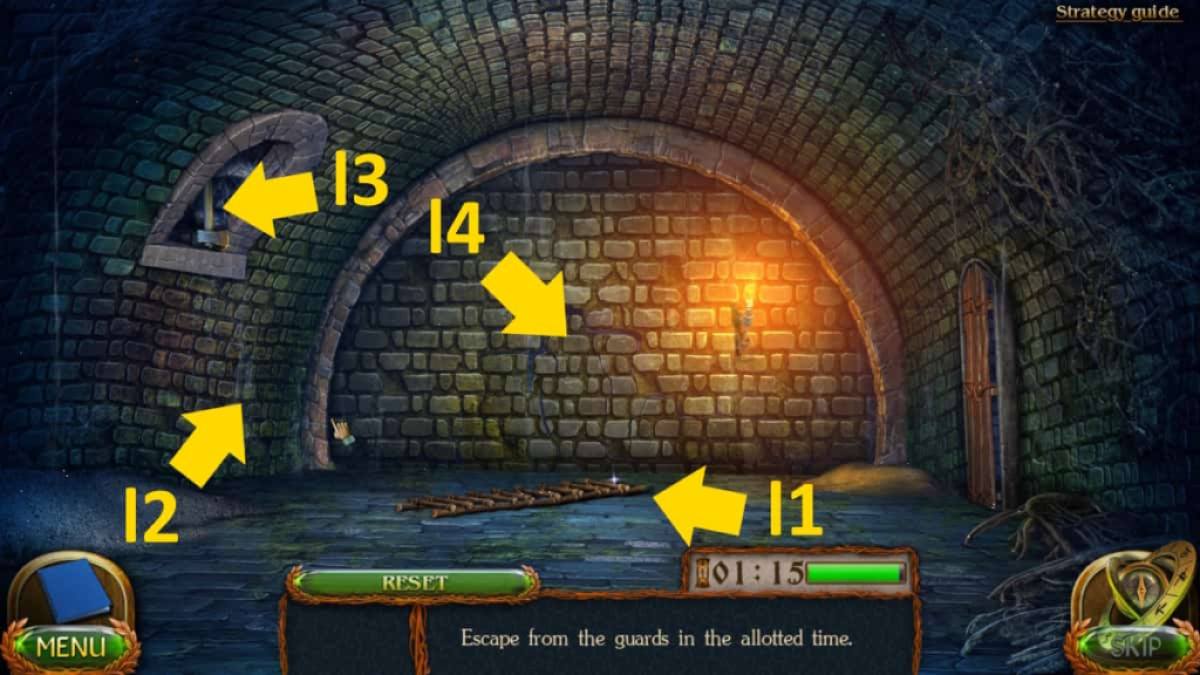
Image by Pro Game Guides
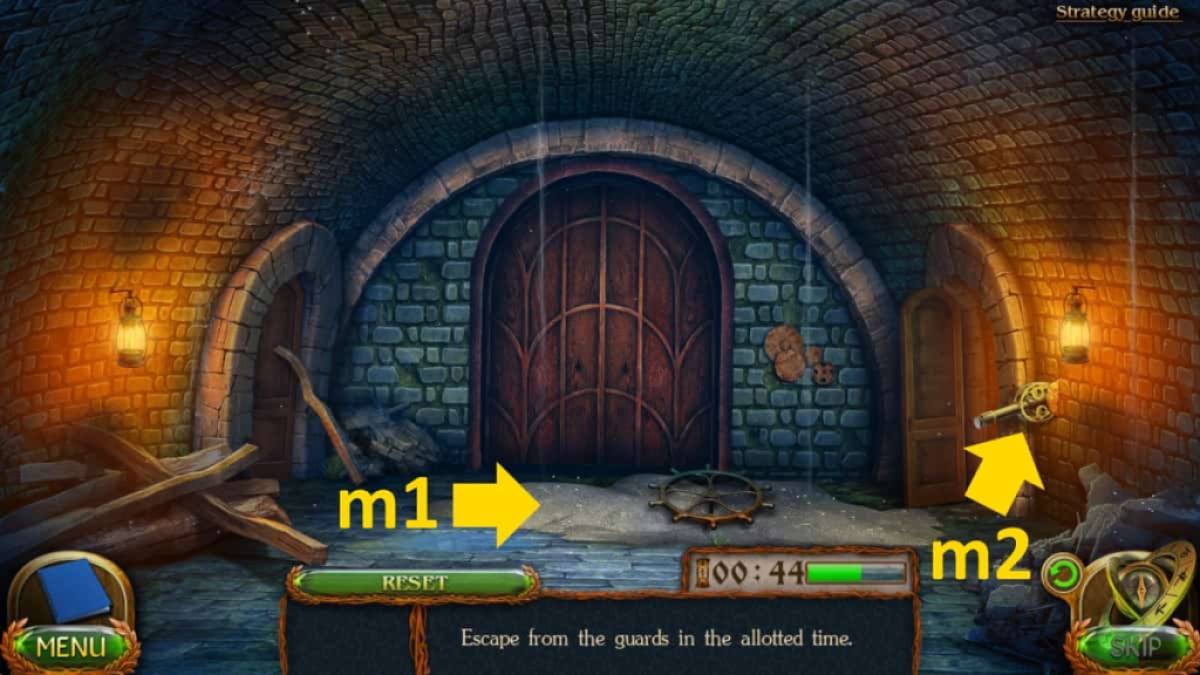
Image by Pro Game Guides
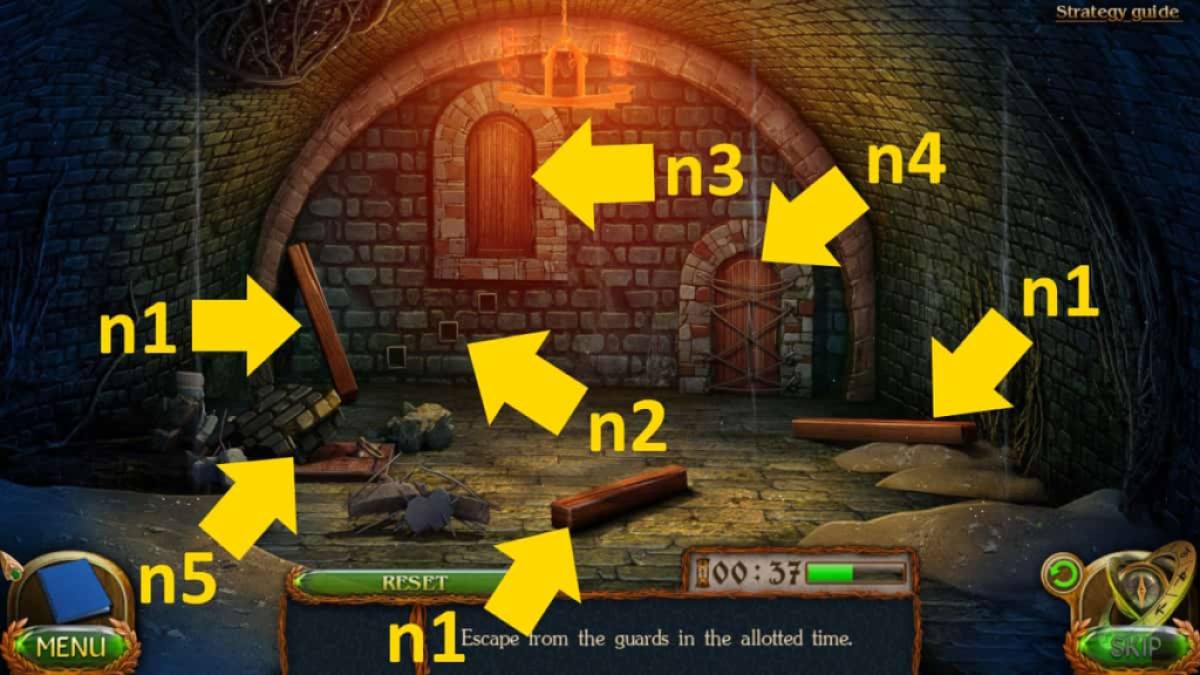
Image by Pro Game Guides
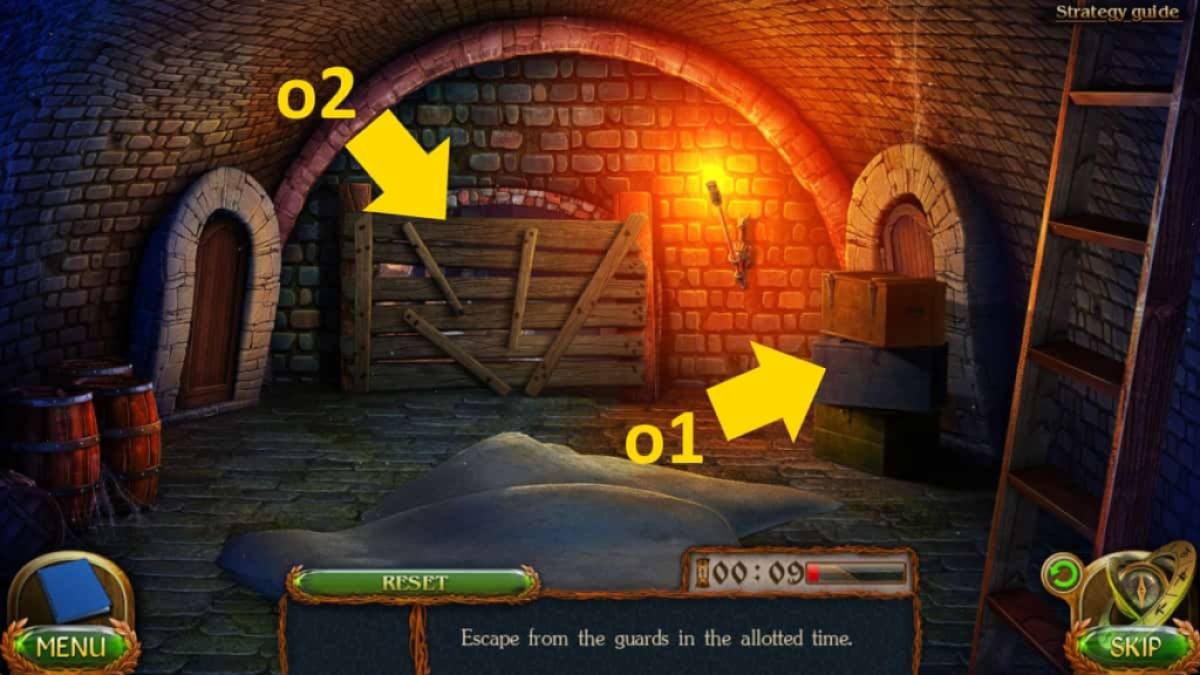
Image by Pro Game Guides
