Meeting the resistance .
Point - and - get through object finding and puzzle game do n’t come much better than the Lost Lands series . I hump how they also include smashing RPG story element with some wondrous options and characters . Below you ’ll line up Part 3 of my walkthrough .
In Lost Lands 6 our heroine Susan finds herself not only traveling to a different creation but also through time . Use your observational skill to spot and pile up useful items , then uncover puzzle you require to beat to build up the news report . If you stall anywhere , you’re able to find the solutions here .

Lost Lands 6 Mistakes of the Past - Walkthrough Part 3
The walkthrough guide below begins just after Susan is capture in the sewers beneath Maaronguard and continues until you go into Maaronguard in disguise . If you ’re calculate for solutions connect to earlier or late parts of the story , delay myLost Lands 6 Walkthrough hub varlet .
Casemate and prison
After a turn out conniption with Maaron , you ’ll find theCollectibleon the back bulwark ( a1 ) while theMorphing Objectis on the right-hand wall ( a2 ) . Get a stopping point - up of the board bottom ( a3 ) and take theCrumb , then use it to tempt the scum bag out of the hole ( a4 ) . Once it moves get theSharp Piece of Metalfrom the hole and apply it to unscrew and then cull up thePlank Bed . cluck the concatenation that has since been lowered to you and mount up .
Once in the prison , get a last - up of the door ( b1 ) and habituate the board bed to immobilise it . There ’s aMorphing Objectby the computer memory room threshold ( b2 ) , theCollectibleis on the box seat ( b3 ) , and there ’s also aManuscriptto collect ( b4 ) . snaffle theHammer(b5 ) and theAdditional Chain(b6 ) , then get to the backpack ( b7 ) to read the escape plan while take theHacksawandDynamite .
Select the downed soldier ( b8 ) for a close - up and fall into place his pouch to take theLockandKey . practice the key to unlock the storage room threshold ( b9 ) , starting amissing object puzzle .
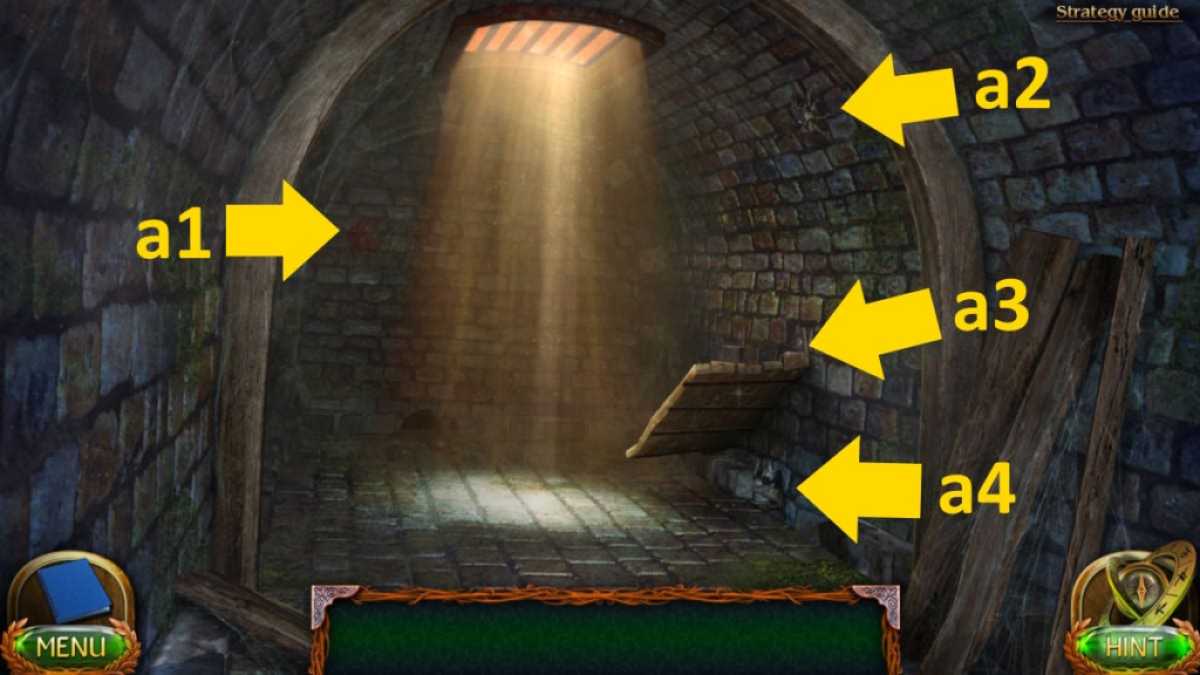
Image by Pro Game Guides
The escape
You need to hang up the lantern on the crotchet ( top right ) and put the candle in it to get started . To get thecorrect amount of urine , fill the little jug and rain cats and dogs it into the heavy one . Do the same again , at which point the big jug will be full and the little one will have 1 unit . Empty the large jug back into the bucket , pour the one unit of measurement from the modest jug to the tumid , then sate the small one again . rain buckets the 3 unit of measurement in the lowly jugful into the 1 in the large and you ’ll have your 4 units . Once done , you ’ll get back theSword of JusticeandFire Keeper .
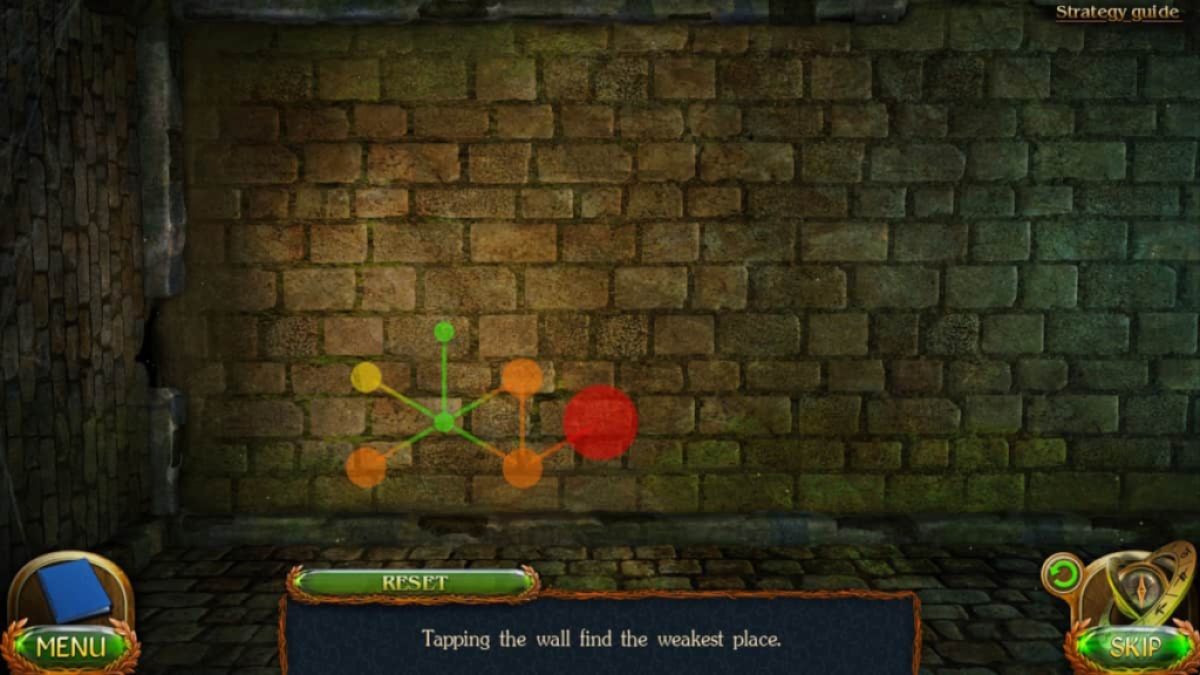
Go back down into the casemate cell . Attach the lock chamber to the string you climbed up and impound the additional range to it . Once done , click the end of the chain to get a close - up of the back wall , anduse your hammer on the bulwark to start a sound puzzle . I ’ve marked the right spot ( red ) above .
Once you have it , choose the dynamite in your inventory and click the spot . Back out on the chief image , go up into the prison , and use your fervor keeper on the remnant of the electrical fuse . Kaboom . Go back down into the casemate , then penetrate the hole you ’ve made in the floor for a abbreviated cutscene .
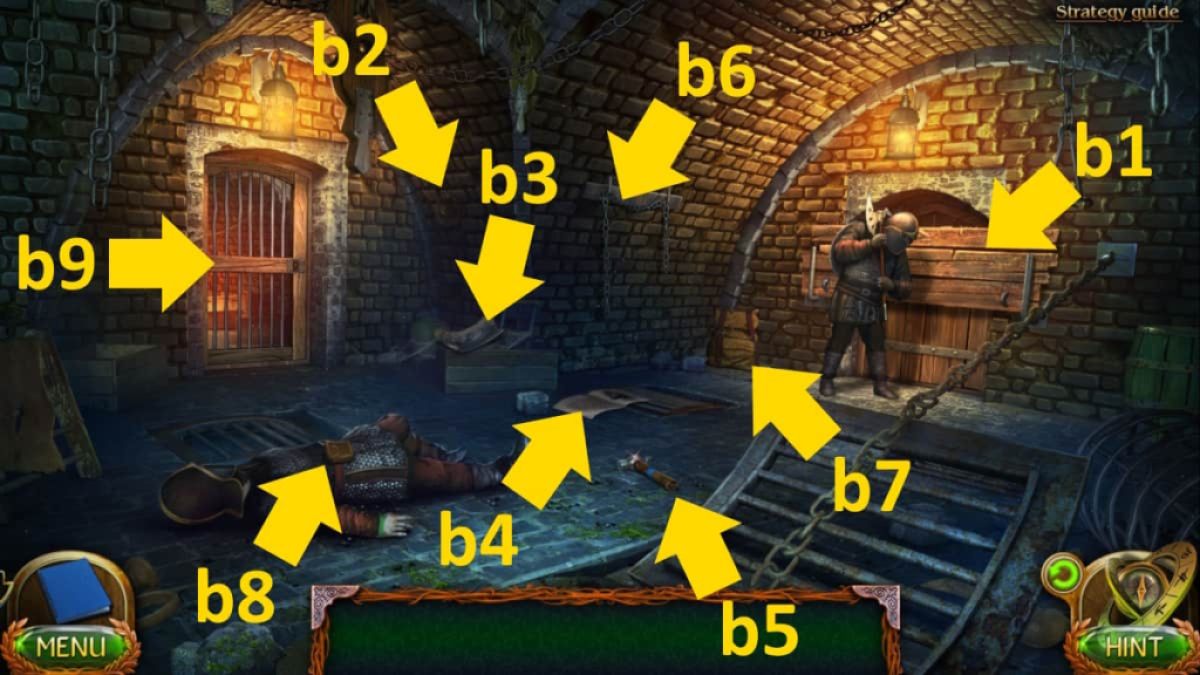
Image by Pro Game Guides
Related : lose Lands 3 Full Walkthrough ( Golden Curse )
Click the hole ( in the closelipped - up ) once more to lower the mountain chain , then once more to set down down into the gravy boat . Be warnedthough . In the boat , you ’ll move along the sewer and have tododge obstacle . To dodge , flick the left and right paddlesto move in that charge . If you last 60 second gear , you ’re salutary . If not , you ’ll have to try again .
The sewer
choose the humiliated sauceboat ( c1 ) for a end - up , then click the board until you reveal and find fault up theKey to the Passage . Use the hacksaw on the gate ( c2 ) and head on through .
In theabandoned branchyou’ll determine theMorphing Objecton the right wall ( d1 ) and theCollectibleon the rubble ( d2 ) . Get a close - up of the area above the detritus ( d3 ) and employ the fervidness custodian to burn the cobwebs , illume up the area .
Select the yap above the rouble once more , this time takingHalf a Wheeland aPipefrom at heart . Use the piping to bash the grating ( e1 ) , swinging it open and put down down some debris . Keep clicking where the junk falls ( e2 ) until you get theGlass Cutter . eventually , click the back bulwark ( e3 ) for a closing curtain - up and use the tonality to the passage in the diamond - influence inset to reveal the secret staircase .
Screenshot by Pro Game Guides
The central collector
TheCollectibleis under the table ( f1 ) and theMorphing Objectis on the professorship ( f2 ) . Take theChips for the Puzzlefrom the table ( f3 ) , choose the middle door ( f4 ) , and add the chips in the close - up to start anextra - tile puzzle .
snap each roofing tile differentiate above to move it to the empty roofing tile on the right . Once in , that roofing tile will move to the center . Click tile 2 ( the circular sprocket ) once more to make out the puzzle , then snap the door ( f4 ) and go at bottom .
Once inside theprophetess ’ chamber , come home the curtain for a trimmed view . Afterward , you may pull in theMorphing Object(g1 ) , theCollectible(g2 ) , and aManuscript(g3 ) . snap the table ( g4 ) and take theFuel Oil , then click the lectern ( g5 ) and search at the book . When you shut down the script you may then collect theOil Lampin the same close - up . Click the Koran once more to shut it and get hold theRecipe for the Poisonous Powderas well as aKey .
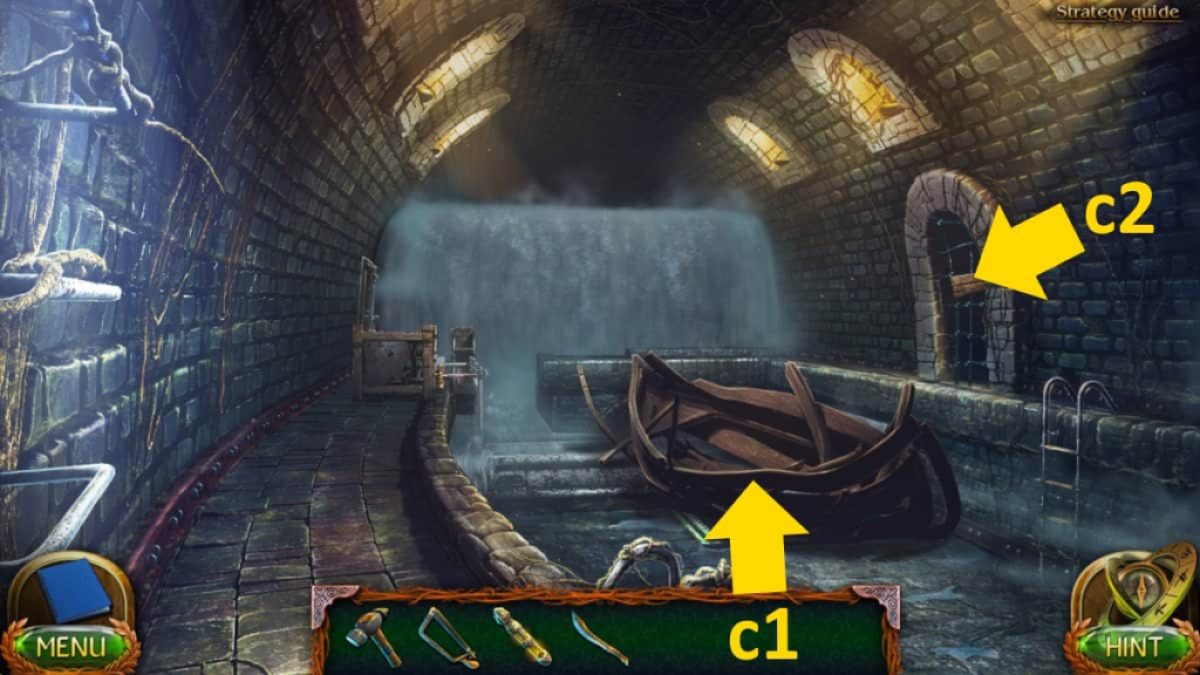
Image by Pro Game Guides
take the table ( g4 ) once more , contribute the formula , and then habituate the scales , weight , and bowls to make the powder . See the image above for which pot to bestow each clock time . Each bullet full stop below presumes thescales are empty when you go it .
As long as you ’ve done this correctly , the quietus will complete itself . Take thePoisonous Powderand then head back out to the primal aggregator . Click the barracks door ( f5 ) and then use the key to open it and go inside .
The barracks
Both theCollectible(h1 ) andMorphing Object(h2 ) are on the right wall . Take theJarfrom the chest of underdrawers ( h3 ) . Click the oil color lamp in your stock , tot up the fuel to it , light the lamp with the fire keeper , and then tote up the jar . Use the chicken feed stonecutter on the jar , click the jar to take the top , then cluck the burning lamp and take theHandmade Lamp .
fall into place the chest of knickers ( h3 ) once more and put your hand-crafted lamp on it . launch the middle hooking in the same finale - up to get aBeltand the top draftsman to get the finalManuscript . Click the boxful that ’s in the same draftsman and get theKey . Now pick out the board ( h4 ) , sink in the red material in the conclusion - up , and take anApple . Go back out to the central accumulator and utilise this new key fruit to enter the other door ( f6 ) and go in .
The warehouse
snap the boxes in the center until they ’re all on the wagon . Get theCollectibleon top of the wardrobe ( i1 ) , the Morphing Object under the mannequin ( i2 ) , and the secondHalf of a Wheel(i3 ) from the floor . Select the first one-half of the wheel in your inventory , add the 2d , connect them with the rap , and take theWheel .
Related : New York Mysteries 5 - Power of Art Walkthrough
Click the Big Dipper ( i4 ) for a conclusion - up , impart the wheel , and then pick up theWooden Bar(in the same close - up ) . take the wooden ginmill in your inventory and use the brand of justice on it to make it aWooden Plug . Add the wooden plug to the wheel you just put on the wagon and use the hammer to pink it into place . Finally , click theJackscrew(again in the same close - up ) to amass it and move the wagon .
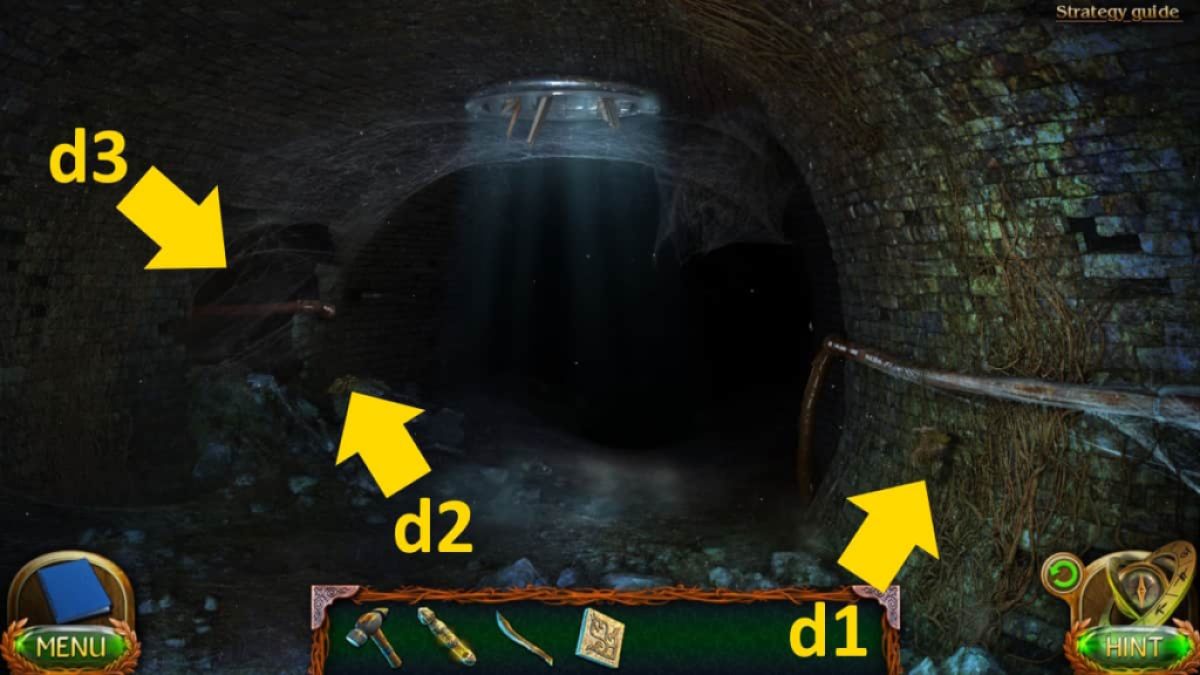
Image by Pro Game Guides
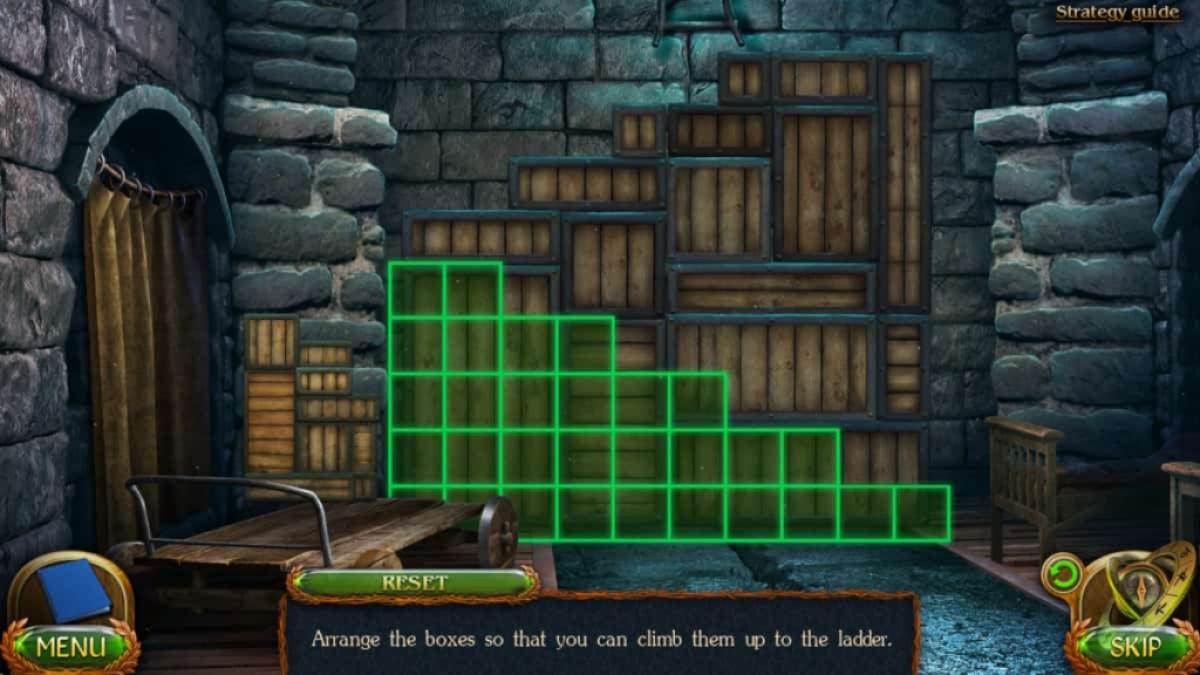
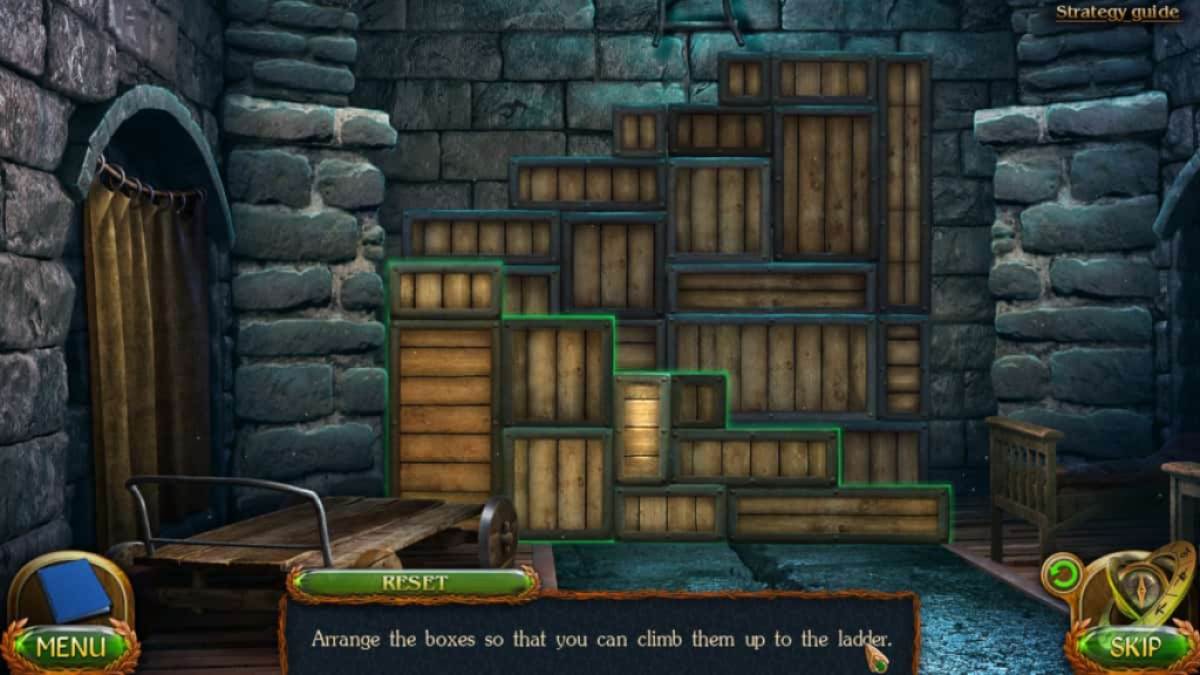
You ’ll find yourself back in the barracks . Click the wagon to start astacking teaser . This is in two layers . The first finish is pictured above , and the second is below . Once done , click the crosshatch ( h5 ) , use the jackscrew to tug it subject , and head up into the crematorium .
The crematorium
TheMorphing Objectis in the baulk ( k1 ) and theCollectibleis on the rug ( k2 ) . Take theLeg of the Stool(k3 ) , then click the windowpane ( k4 ) for a close - up , moving the flora pot to take aKeywhilenoting down the runesscratched on the windowsill .
Click the loge ( k5 ) , utilize the symbol you saw on the windowsill as the code to open it , and take theChiselandNails . Select the oven ( k6 ) and get through the Sir Henry Wood in the close - up , collecting anotherLeg of the Stoolfrom underneath . Click the dejection ( k7 ) , add up the two branch , flip the toilet and add the nails , then forge them in . you could now get theEmpty Tinand theHandwheelfrom the baulk ( k8 ) .
Add the handwheel to the oven ( k6 ) , get to the two doors , and use the handwheel to turn off the oven . apply the empty tin inside the oven to get aTin With Ashes . Return to the central aggregator sphere and penetrate anywhere for a shortened scene . You ’ll then have a close - up of the architectural plan board . Take theKey to the Cellarfrom its deoxyephedrine shelf , then click each picture in sequence ( 1 to 10 ) to observe out the plan . You ’ll also get aFalse Passafter looking at picture five .
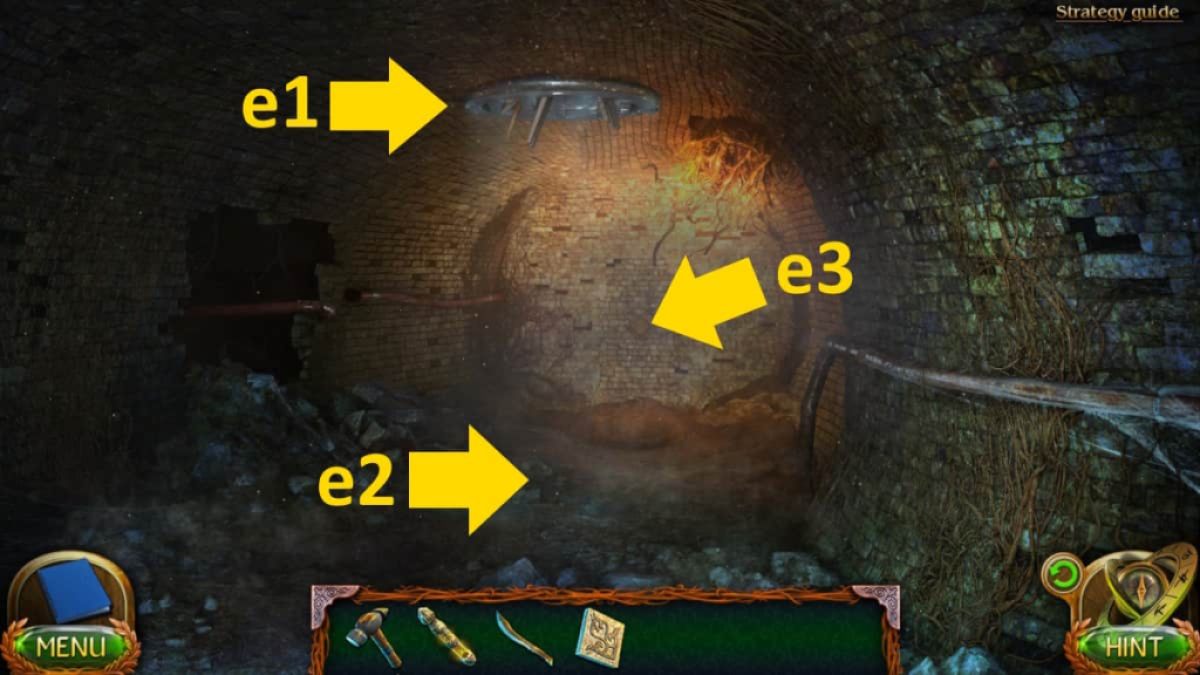
Image by Pro Game Guides
The plan
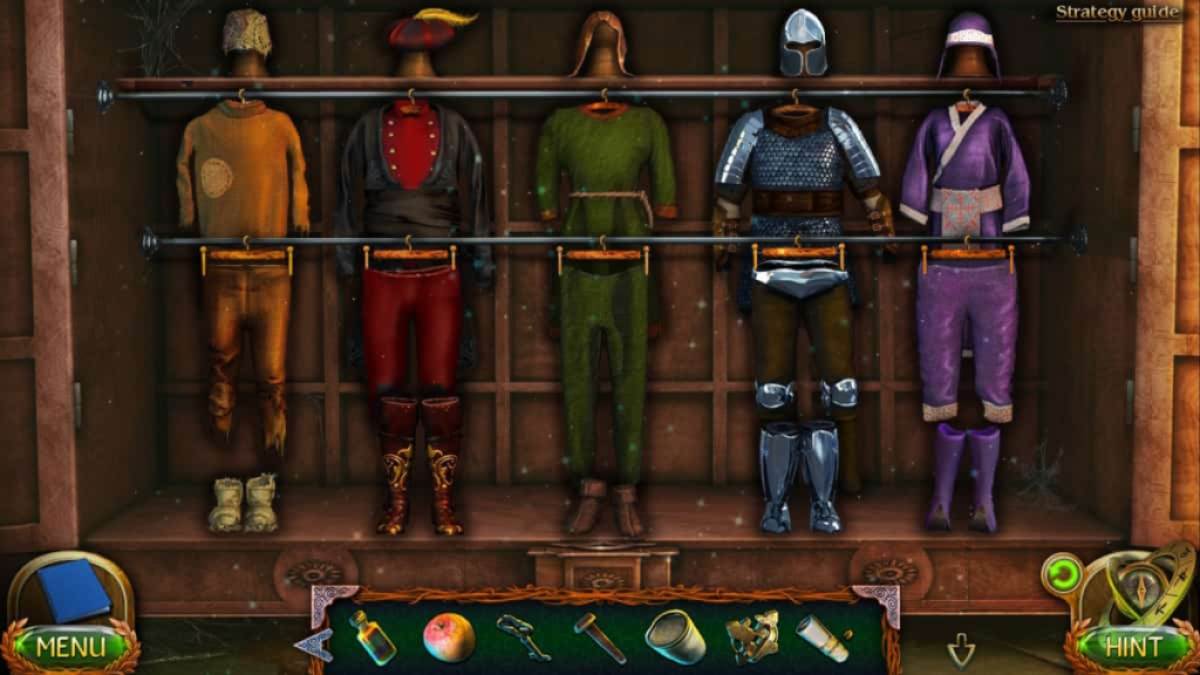
Head back into the prophetess ’s chamber , lick the bed ( g6 ) for a close - up , then click the cushion until you’re able to take theElixir of Faceless . Click the mirror ( g7 ) , and add the elixir to the bowl . After a cut shot you ’ll get theKey to the Cabinet . Move to the warehouse , practice the key to unfold the cabinet ( i5 ) , and complete theclothes - readiness puzzle(see the solution above ) .
Click the green suit of clothes afterward to finish your disguise , then pick out the trapdoor that was uncover here when you act the black Maria ( i4 ) . give it with the key to the basement , then come home it once more to start a simplemissing object puzzle . The only potentially sly morsel is the slide puzzle , but you ca n’t go wrongly and there ’s no fourth dimension limit . Once complete you ’ll get aBox With Food .
Move to theEndless Cemetery , take the cart , and start the pectus at heart with the key . Take theHarness . psyche to theRoad to the Suburbsnext and take the buffalo for a closing curtain - up . tote up the chisel to the Harlan Stone then apply the hammer to smash them , freeing its foot . apply the harness from your inventory on the buffalo , then apply the orchard apple tree to move it . Back at the endless cemetery , click the buffalo doubly to be on your way . After a brief cut tantrum give your false qualifying to the guard , then click the cart to go into Maaron ’s Castle .

Image by Pro Game Guides
To continue with this walkthrough , check outLost Lands 6 Walkthrough , part 4here at Pro Game Guides .
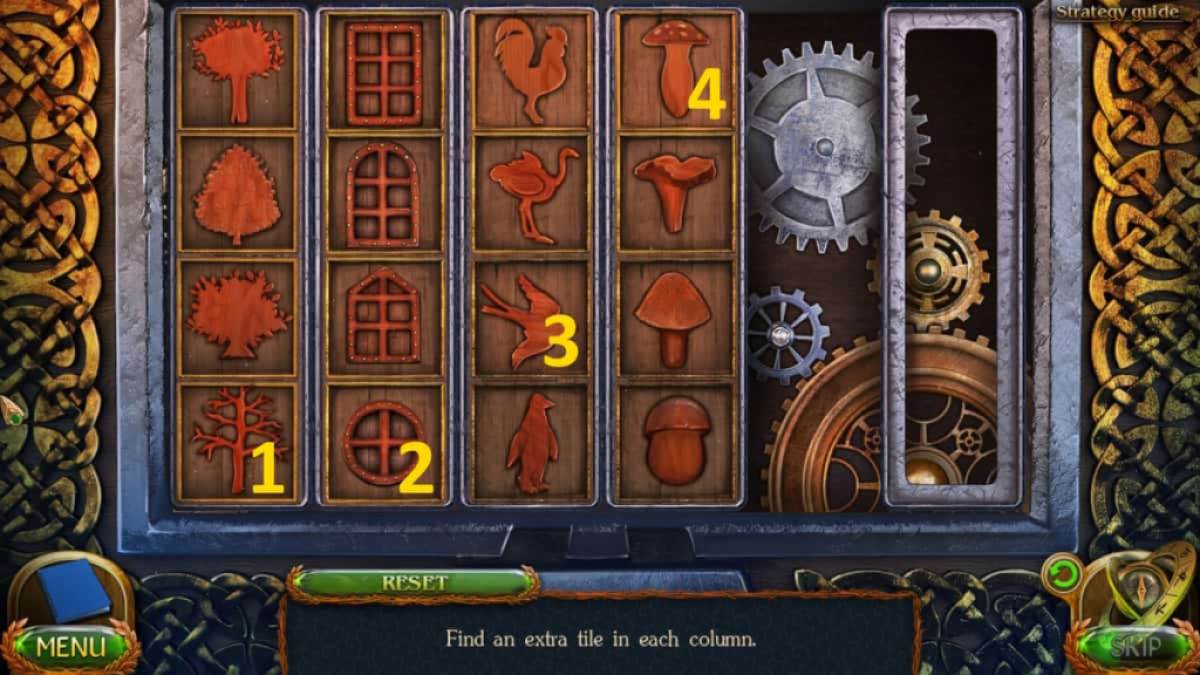
Image by Pro Game Guides

Image by Pro Game Guides
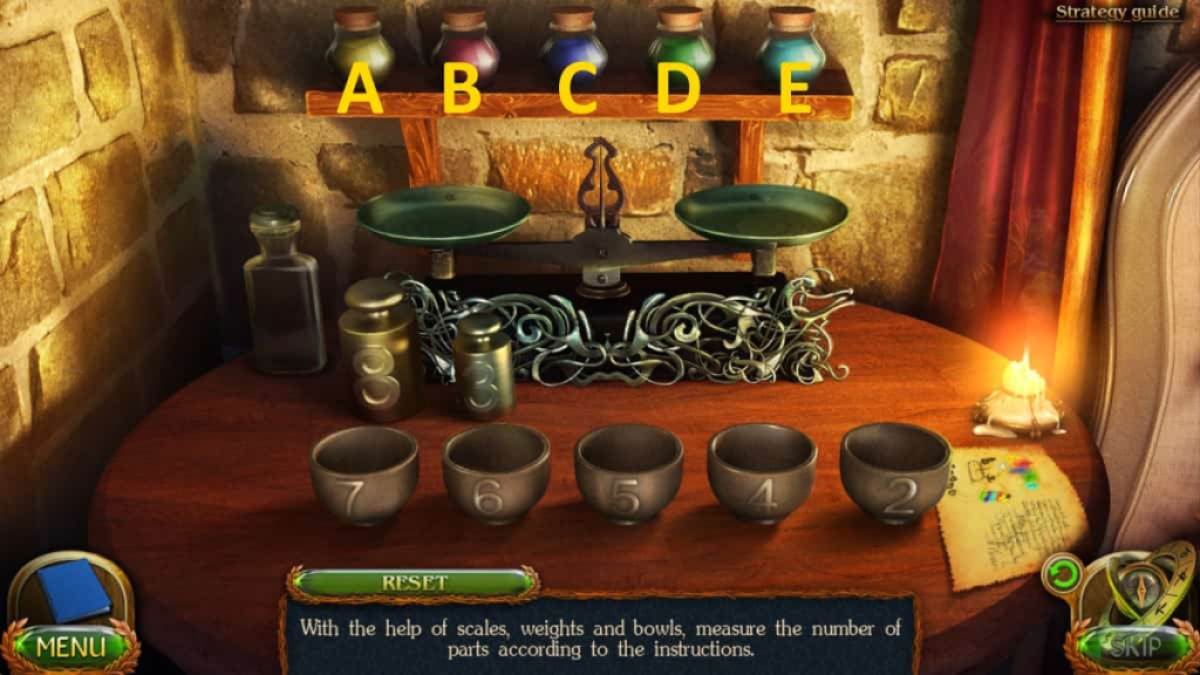
Image by Pro Game Guides
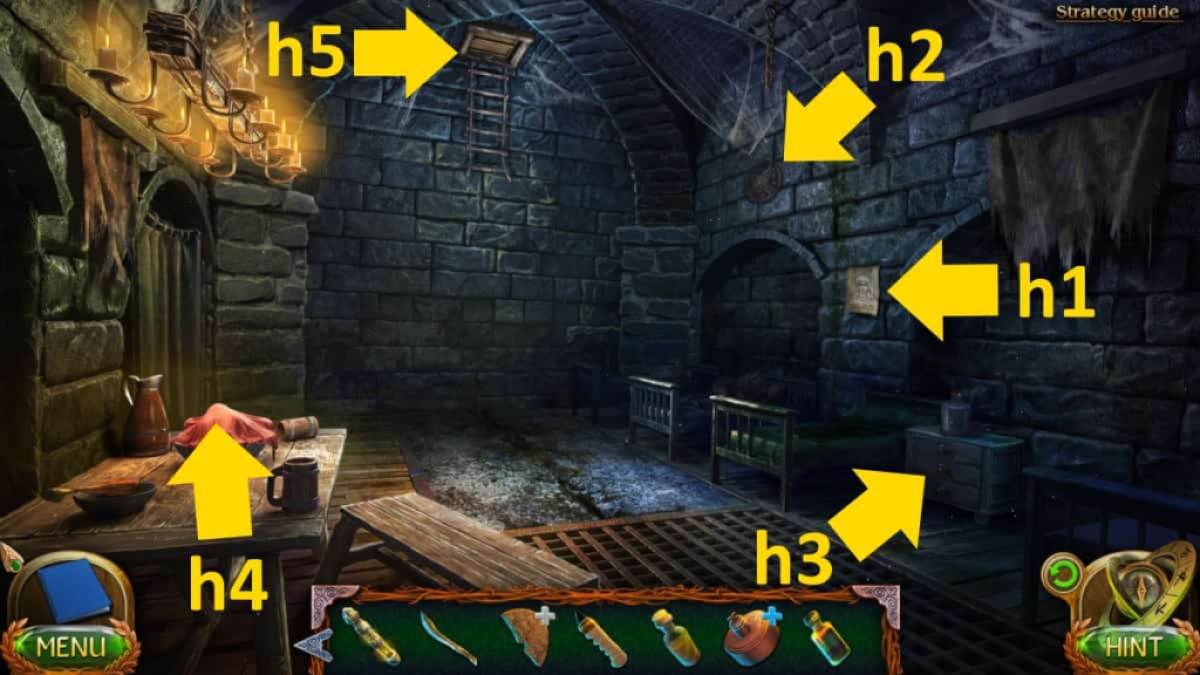
Image by Pro Game Guides

Image by Pro Game Guides
Screenshot by Pro Game Guides
Screenshot by Pro Game Guides
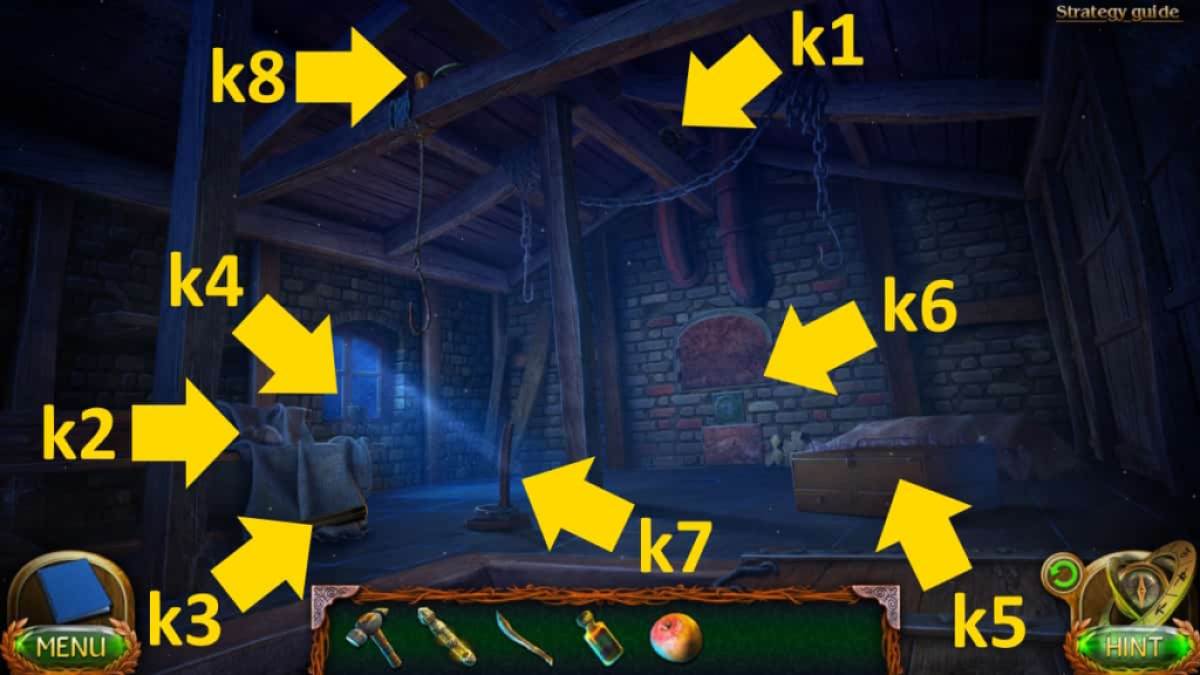
Image by Pro Game Guides
Screenshot by Pro Game Guides
