A thrilling conclusion .
There are lots of point - and - click puzzler game series out there , but I like Lost Lands more than most . Below you ’ll find the final section ( part 4 ) of my Lost Lands 6 walkthrough of the main story , include all puzzle solution .
What I like about these games is the depth of the RPG - style story and Mistakes of the Past takes thing a stone’s throw further . Not only does it re-introduce old favorite characters but there ’s also time travel as well as substitute mankind .

Lost Lands 6 Mistakes of the Past - Walkthrough Part 4
In part 4 of my Lost Lands 6 fault of the Past walkthrough , we pick up the story just as Susan has snuck into Maaronguard in disguise , trying to find the hexagon . This templet will go right to the end of the story , but if you ’re search for solutions to earlier share of the game rather cite myLost down 6 Walkthrough hub page .
The central square, garden, and kitchen
support in Maaraonguard ’s fundamental foursquare , you ’ll determine theMorphing Objectin a windowpane ( a1 ) and theCollectibleon the castle wall ( a2 ) . Select the guards ( a3 ) and the side door ’s Bill Gates ( a4 ) will open up . Before you manoeuvre through , choose the fountain ( a5 ) andnote the pattern on the carving(three leaves on the left of a leg ) .
Once in the garden , select the mat by the threshold ( b1 ) , pick up theKey , and drag it to the lock to go in the kitchen . There are no collectibles here .
Take theMorphing Objectfrom the table ( c1 ) and theCollectiblefrom the side of the work bench ( c2 ) . Click the cook ’s apron and hat ( c3 ) to dress like a cook , take theRecipe Book(c4 ) , then take theJugfrom the stove ( c5 ) andlight itin the close - up with your firekeeper . Move into the Marguerite Radclyffe Hall ( c6 ) .
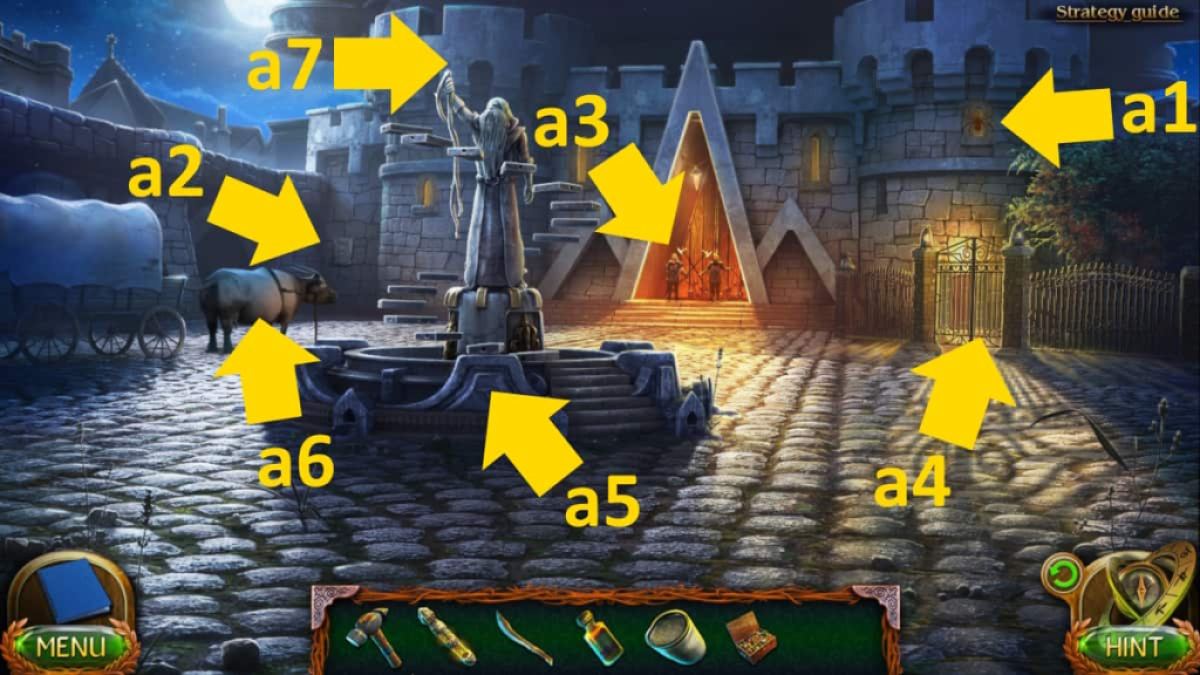
Image by Pro Game Guides
TheCollectibleis on the wall ( d1 ) , while theMorphing Objectis on the unexpended chandelier ( d2 ) . pick out the back of the room and get a close - up inside the triangle ( d3 ) to commence achip - move teaser . See below for the positioning to drag the red chip too . Once utter , this gives you access code to thethrone room . Head in .
Click anywhere for a cut scene , after which you ’ll find theCollectibleunder the table ( e1 ) and that theMorphing Objectis the right streamer ( e2 ) . Click the commode ( e3 ) for a close - up and apply the sword to wrecking bar loose and take the greenCrystal . you could also click the end of the table ( e4 ) andclick the pot ticket twiceto add it to the rope .
The recipe ingredients
Click the lectern ( d4 ) to find today ’s menu ( mushroom cloud soup ) and thePiece of Paper with Code . you may now start the recipe book ( principal courses ) to find the nine ingredients you need for the soup . Select the automobile ( d5 ) next and tally the crystal to lead off asequence - matching puzzle . The result is dissimilar each time so you ’re just going to need to pay tending ! Once complete , take theTop Part of the Fountain .
Related : How to beat Trace Escape Room - Full Walkthrough
Back in the kitchen , use the code on the paper ( 2388 ) to start the cupboard ( c7 ) . Take thePot , Basket , andHandlefrom inside . spread out the recipe leger in your inventory and then cluck the box of food . you’re able to addsalt , carrots , onions , garlic , rosemary , andpotatoesfrom here , leaving you buffalo Milk River , whitened mushrooms , and water to retrieve .
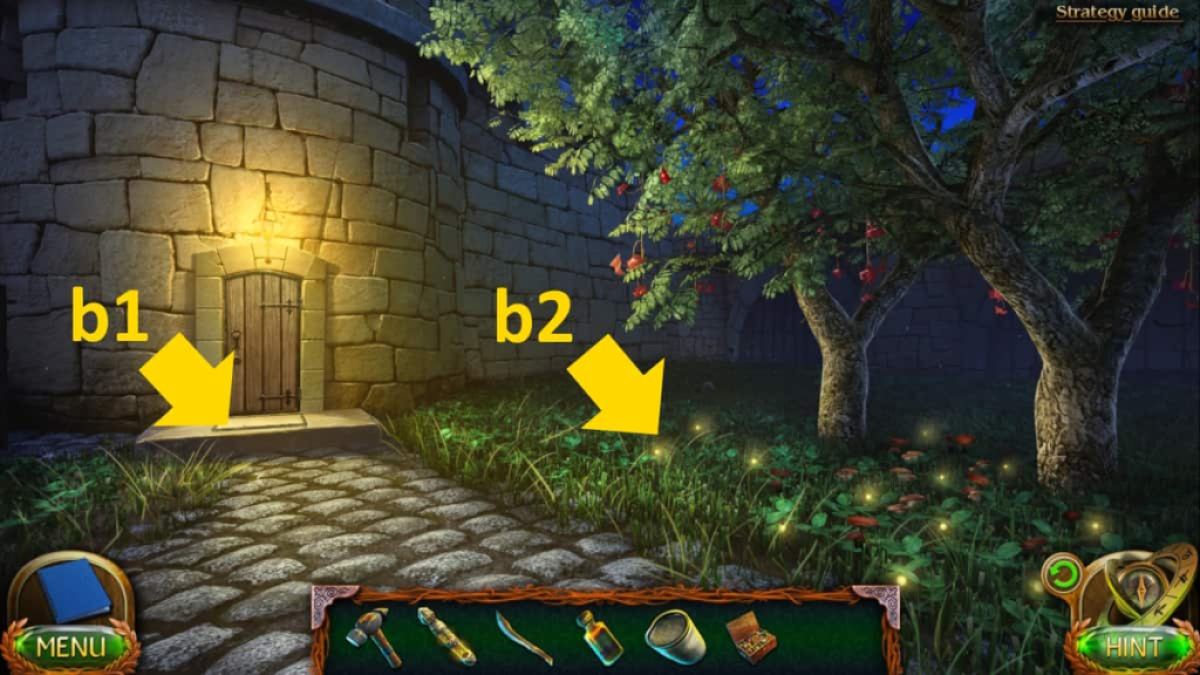
Image by Pro Game Guides
Go to the cardinal square toes , get a close - up of the buffalo ( a6 ) , and use the jug to getBuffalo Milk . pick out the top of the jet ( a7 ) next and add the top part . You then need to click the feathers so they ’re in the precise good positions ( bottom down , middle cardinal , top up ) . Once done right , the water supply will flow and you may utilise the stack at the bottom ( a5 ) to get aPot with Water .
Now move to the garden , flick on the grass ( b2 ) , and add the field goal . You ca n’t go wrong here , so just keep get across until you have all seven . Now turn back to the kitchen , and tote up the sight with pee ( c8 ) to the boiling locoweed , which will swing over the fire . Select the recipe book in your stock and add the mushrooms and milk , plus the poisonous substance powder , to get theRecipe element .
Preparing the meal
Select the door ( c8 ) , add the handle , and then get to the door . Select the ingredient item in your inventory and snap the undefended door to lead off anobject - finding puzzle . Once you ’ve made the poison soup , put it on the fix tramcar to get theTea Trolley .
Go to the throne room , select the left destruction of the table ( e5 ) , and bestow the trolley . Now keep abreast the well-lighted orbit to add each item to the table in order , pouring some wine to finish . Once all over , clack the circle at the other end of the table ( e4 ) to summon Maaron to dinner .
After the cut prospect , select Maaron ( e5 ) for a stopping point - up and take theHand . manoeuver out to the Granville Stanley Hall , use the manus to start the door ( d6 ) , and maneuver up to Maaron ’s sleeping room .
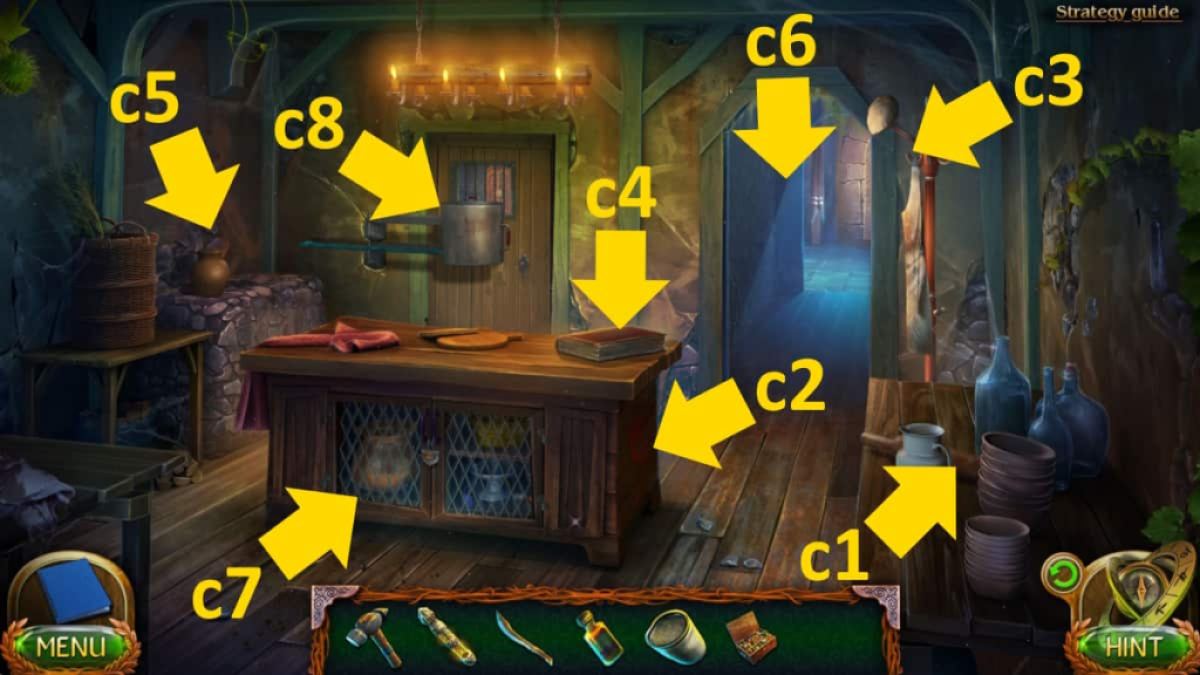
Image by Pro Game Guides
Finding the hexagon
TheCollectibleis behind the bed ( f1 ) , while theMorphing Object(f2 ) is by the bed . Select the bottom ( f3 ) , get through the pillow several fourth dimension to move them , and then take theTin Punch Cardsfrom inside the book of account .
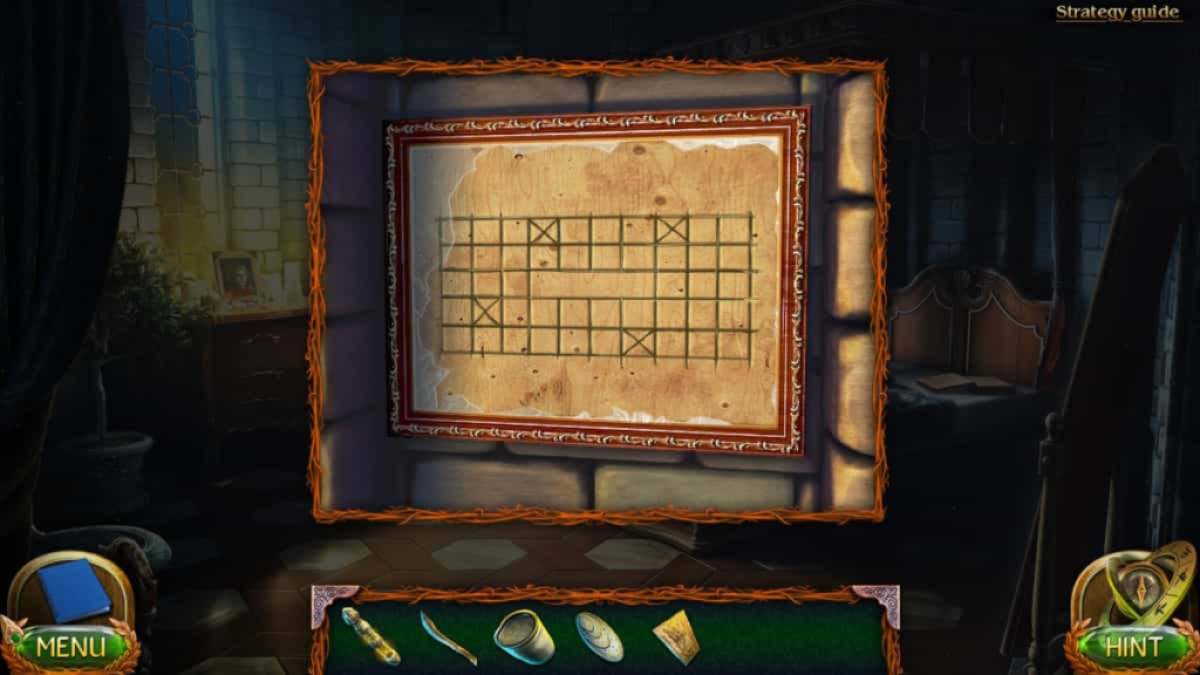
bankrupt the picture ( f4 ) with the hammer , take theHang Glider Picture , and notice the Xs marked on the frame behind . pick out the base of the drawers ( f5 ) , and copy the Xs pattern you ’ve just see ( above , the orderliness does n’t matter ) , which gives you access to thetower roof(f6 ) .
While still in Maaron ’s bedchamber , click the dresser ( f7 ) and then open up the drawer to take theCentral Part of the Patternand aScrew Hook . Move up to the roof . seize theCollectible(g1 ) andMorphing Object(g2 ) , then lend the screw sweetener to the gap in the boards ( g3 ) and take theMoon Icefrom the compartment there .
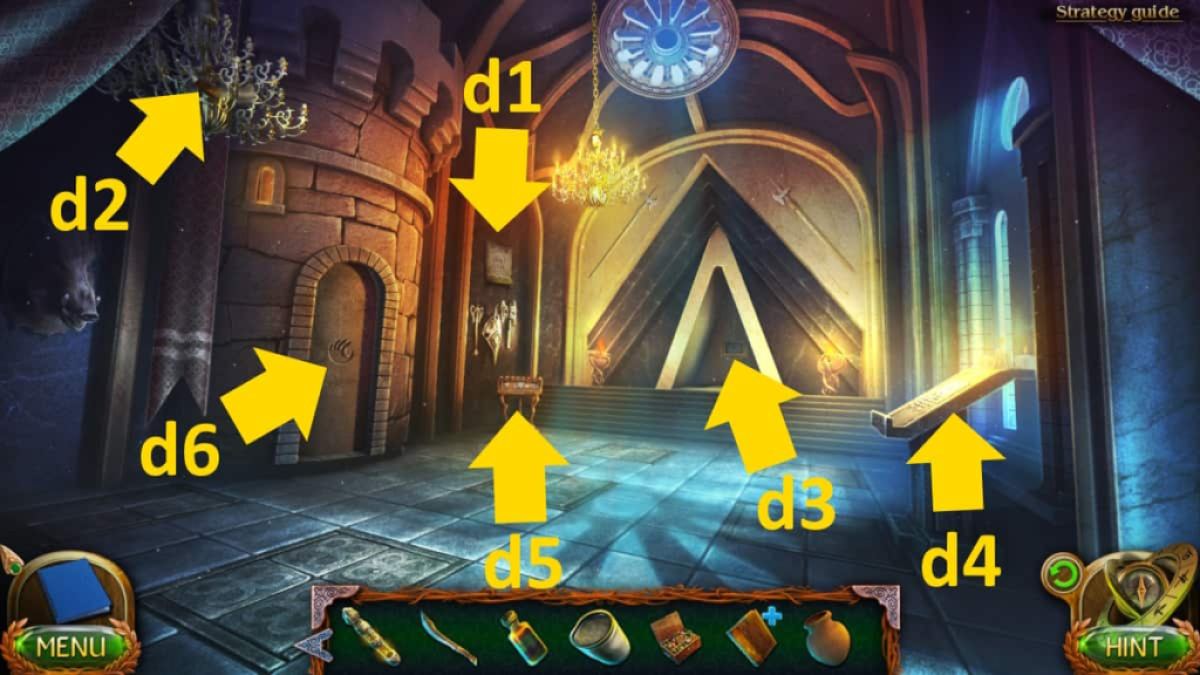
Image by Pro Game Guides
Escaping the tower
Add the synodic month ice and the tin can poke plug-in to the Eye of the Skywatcher ( g4 ) , then dawn the Eye of the Skywatcher to pop alight mystifier . You require to move each disc into place ( pop with the largest ) so you’re able to see stars through all of the fix ( see image above ) . Once staring , you ’ll get a diary update .
Move back to Maaron ’s bedroom , sink in the breast ( f8 ) for a close - up , then dawn the puzzler to expend this new knowledge to open it and get theTime HexagonandHarness Straps for the Hang Glider .
Head back to the roof and pick out the hang glider ( g5 ) . Add the bent sailplane flick , and then the harness , to make your escape . When you land , insert the tomb ( h1 ) , add up the central part of the form to the end of the sarcophagus , and takeHelma ’s Poison . Finally , add the ashes to the hexagon and move back to the present Clarence Day .
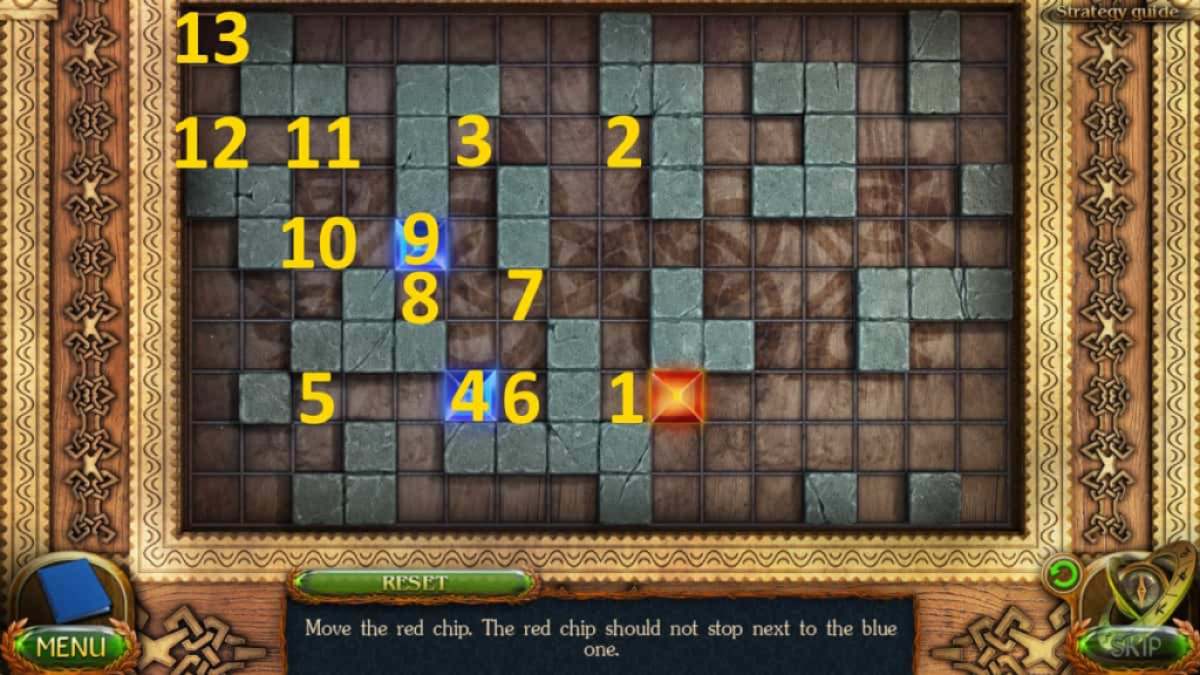
Image by Pro Game Guides
Maaron’s house
Both theCollectible(i1 ) andMorphing Object(i2 ) are on the upstairs landing place . Select Maaron ( i3 ) for a ending - up and take hisMedallion . Select the desk ( i4 ) next and note the symbol for a recovery spell ( it reckon like a hangman gallows tree ) .
Click the Scripture again to close up it , add the medallion , and then click the record again to open it once more . You ’ll find out you need peculiar feather and a magic staff made from a young tree of life .
Select the young tree diagram ( i5 ) and tailor it down with the blade of judge to get aYoung Tree Trunk . Now select the build at the top of the steps ( i6 ) to set forth amovement puzzle . You ask to move the eight pieces around the edge onto the right spots on the cardinal chemical mechanism . See the solution above and equalise the following :

Image by Pro Game Guides
verify toadd the 6 to the atomic number 5 slot last . It may take a while , but the green crystal will move around the roofy and dispatch the teaser . Once complete , the door ( i6 ) will open up to discover amissing objects teaser .
Related : Echo Bay Murders – Chapter 1 Walkthrough
The final object-matching puzzle
Grab theLadder(k1 ) , pick out it in your inventory , and fall into place the chest ( k2 ) to place the ravel . Get aMedalion Partfrom the mesa ( k3 ) and the other from the bookshelf ( k4 ) . tot up them to the book on the lectern ( k5 ) . fall into place the Good Book to open up it and take aFeather , then again to fill up it and take theBook . eventually , take theKeyfrom under where the book was .
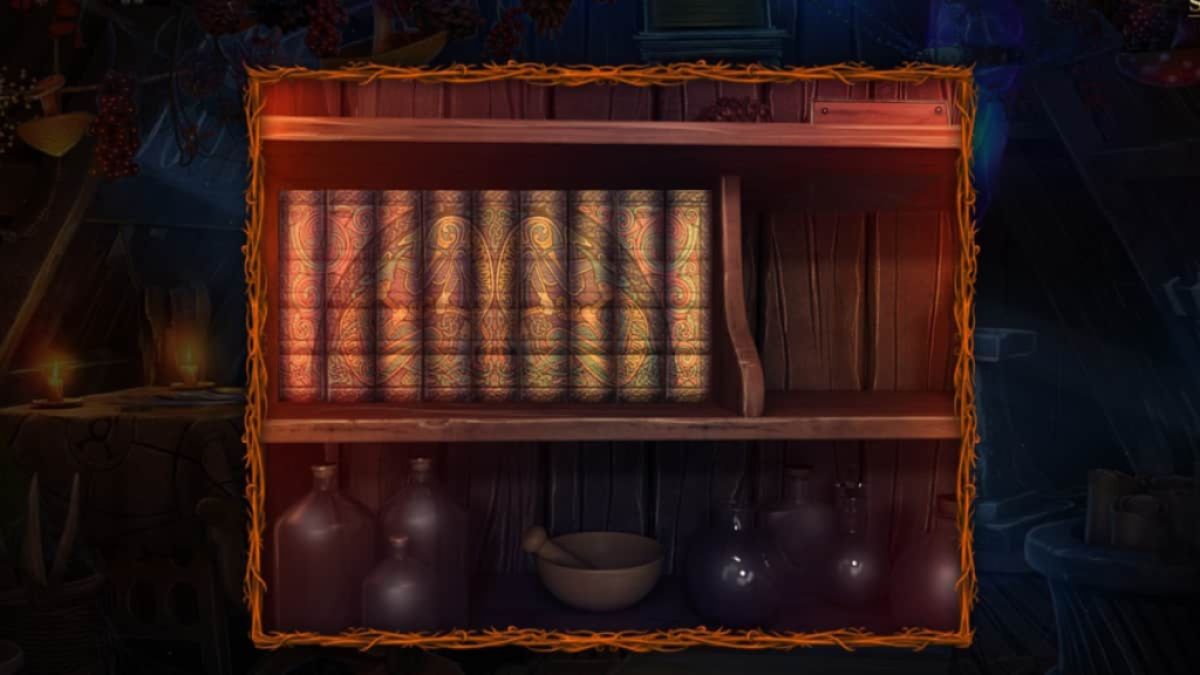
pick out the breast ( k2 ) and practice the key to begin a labyrinth puzzler . Move the circle left and right until the ball drops out of the puzzler ( you ca n’t give way ) , collecting thePotionandDrawing . lend the drawing to the mesa ( k3 ) and click the items on the tabular array until you call for anotherFeather . Add the book to the bookshelf ( k4 ) and then rearrange the Book ( see above ) . Take the finalFeather .
come home the lectern once more ( k5 ) , add the feathers in the correct place ( see above ) , add the potion , and you ’ll get theFeathers .

Image by Pro Game Guides
choose the Sir Herbert Beerbohm Tree trunk in your stock list , use the steel once more to lop it , and then add the plumage to get theMagic Staff . utilise the staff on Maaron , which add nine lights onto the screen . Draw the hangman symbolization ( above ) and Maron will be vivify . After the conversation with Maaron , give him the sword of justice and the potion to trip another cut shot .
The final scene
Take the lastCollectiblefrom the ceiling ( l1 ) and the lastMorphing Objectfrom the tree root ( l2 ) . Take the Ladle from the tree diagram trunk ( l3 ) and apply it in the crypt ( l4 ) to get aLadle With Water . Use the firekeeper to alight the candles ( l5 ) , then use the ladle to water the flowers ( l6 ) , expose the dedication on the grave . Congratulations ! You ’ve completed the primary narration of Lost Lands 6 , Mistakes of the past tense !
For more power point - and - click puzzle game walkthroughs , check outLost Lands 8 – Bonus Chapter Walkthrough & SolutionsandOn Thin Ice Walkthrough Guide ( chapter 1 - 4)here at Pro Game Guides !
Screenshot by Pro Game Guides

Image by Pro Game Guides

Screenshot by Pro Game Guides

Image by Pro Game Guides
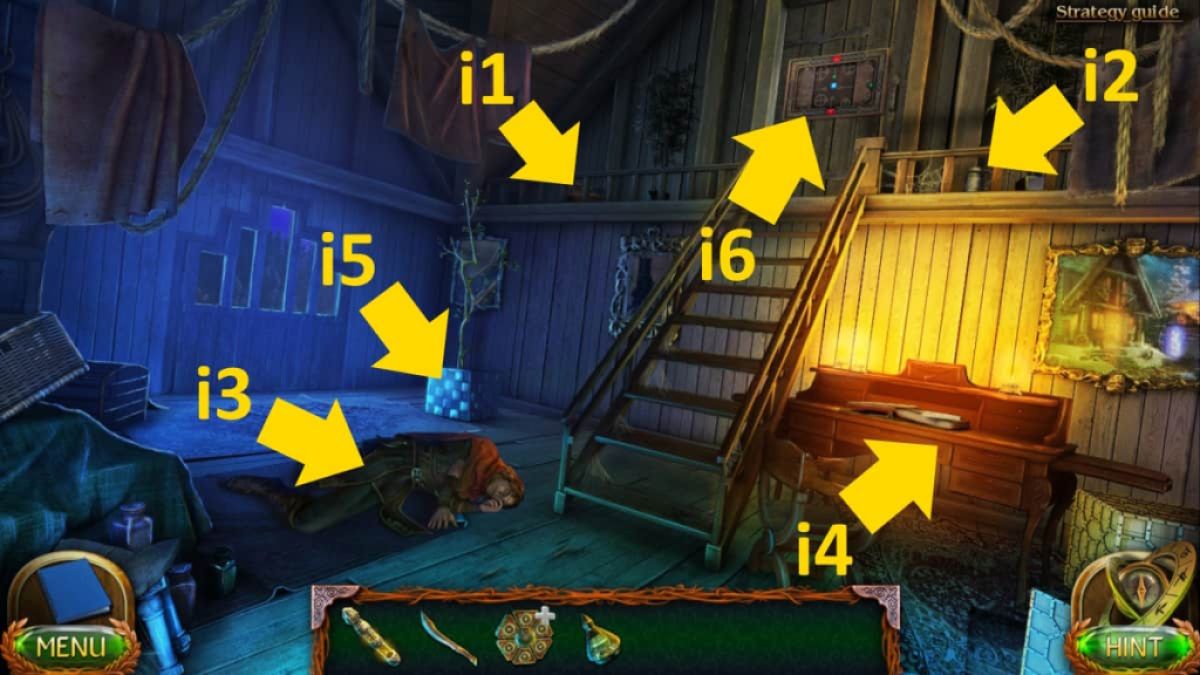
Image by Pro Game Guides
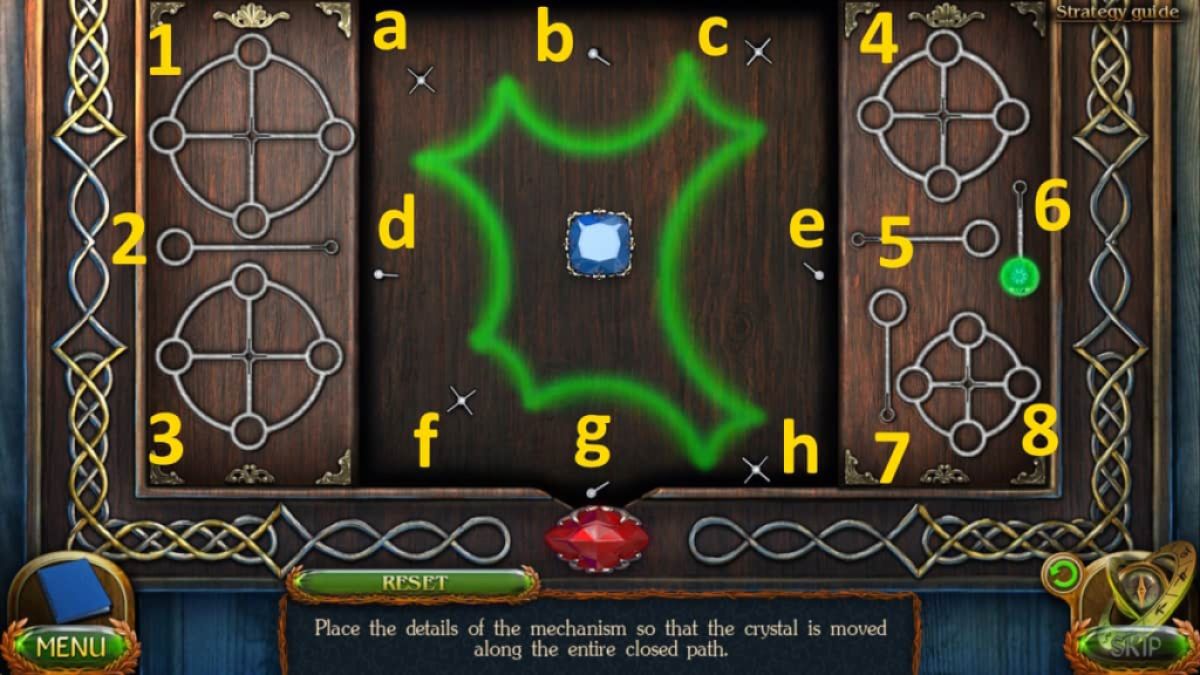
Image by Pro Game Guides
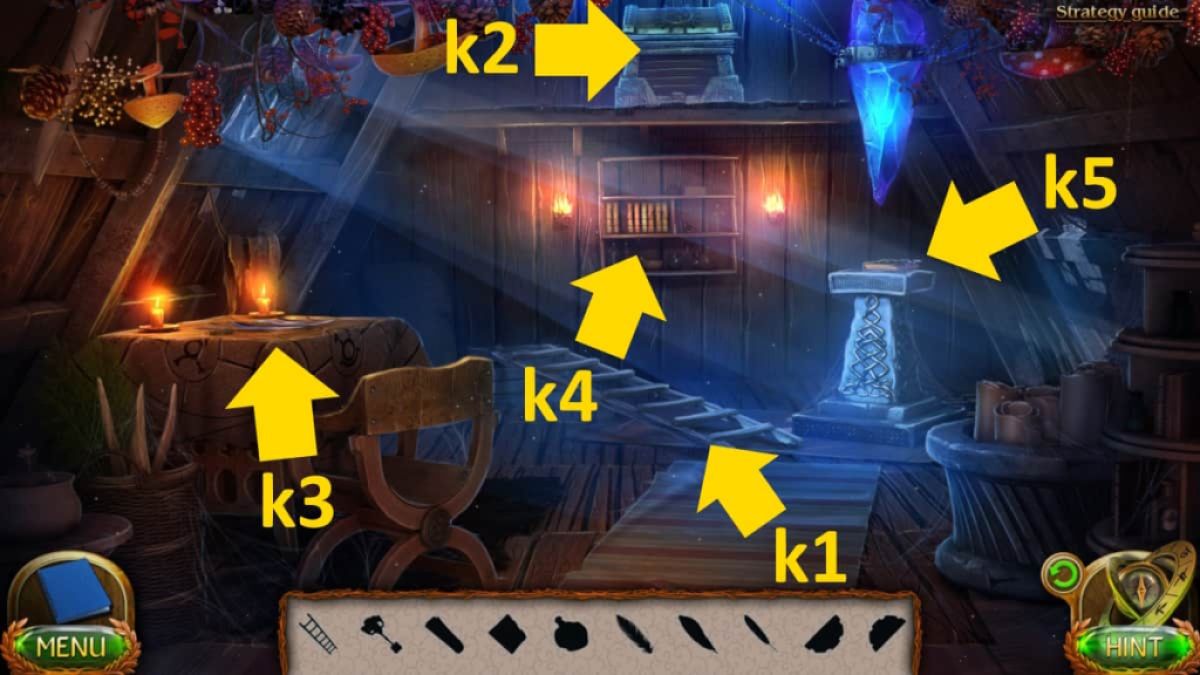
Image by Pro Game Guides
Screenshot by Pro Game Guides

Screenshot by Pro Game Guides

Image by Pro Game Guides

Image by Pro Game Guides
