More Lost Lands ? Bonus !
Lost Lands is a serial of free tec - style roving biz that combine puzzle solving and mini - games with hidden object finding ( interchangeable to theAdventure Escape Mysteries ) in a mysterious world where realness and fantasy combine . In Chapter Eight , Sand Captivity , our hero Susan call for to find an artifact that is blot out somewhere in the Lost Lands .
Once she finds it and return home , however , that is n’t the ending of the story . Completing the independent game opens up a Bonus Chapter , in which untested Kiana heads back to the disoriented world to redeem the pee masses . If you ’re having trouble with any teaser or aim in this part of the game , read on for a full Lost Lands 8 Bonus Chapter walkthrough .
How to complete Lost Lands 8 Sand Captivity Bonus Chapter
The incentive Chapter has 13 locations set across three areas , starting in The Forest . Do n’t be surprised to find markings on the images you do n’t use straight away , as you ’ll often come back to positioning later .
On the opening sieve in the forest , cluck the fruit bush in the left over - center ( 1a ) of the screen for a stopping point - up and pick up theDetailon the stone below it . Then click the bush to the left of the Sir Herbert Beerbohm Tree on the right to reveal asmoker(1b ) , go close up on it , and get a 2d Detail next to the chimney . Now click the bushes below the reveal tobacco user ( 1c ) to reveal a door , which will ask a tonality .
Related : On Thin Ice Walkthrough Guide ( chapter 1 - 4 )
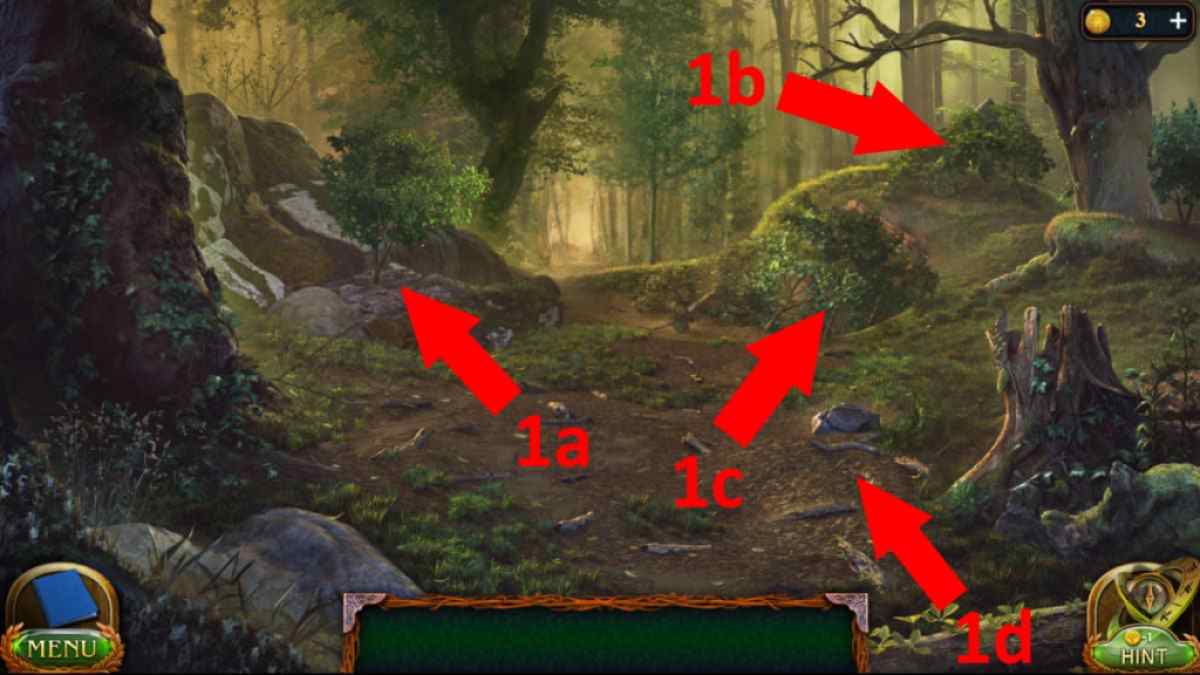
Image by Pro Game Guides
Continue by click the itinerary in the middle distance , shortly examine thebag hanging on the tree(2a ) , then move ahead again to the next screen with the fork in the route . Click the wooden sign on the Sir Herbert Beerbohm Tree in the center of the filmdom at the T - junction ( 3a ) and grab theColored Detailfrom the close - up , then flick the fencing to the left of the tree diagram ( 3b ) for a conclusion - up and accumulate theStick .
Go back to the previous concealment and use the spliff to get thebox out of the Sir Herbert Beerbohm Tree , then cluck it on the ground for a close - up . Use the three detail on the front of the box to set about a puzzle . There is no trick or timing to it . just move the pieces until they adjust as per the instructions . Once candid , take the note , then take theUnfinished Totem , Knife , andBreadfrom the box .
The stone altar
Next , tap the roofed stone Lord’s table on the diametrical side of the route ( 2b ) for a end - up and place the bread on the Lord’s table . attempt to use the knife on the Unfinished Totem in your inventory to get a subject matter propose you might be capable to complete it with a sharper knife . Go back down the path to the T - joint and click the Harlan Fiske Stone paries blocking the path to the right hand ( 3c ) . Use the knife on the sharpening stone in the wall to gain aSharp Knife , then practice it in your inventory to gain theWolf Totem .
grade the wolf totem on the altar back on the old screen , and the independent image on it will beam blue and start a mini - game . Place and move out items so that only the Nail , Horseshoe , Candle , Bread , Scroll , Walnut , Feather , Water Bowl , Wolf Totem , and Leaf are on the primal Harlan Fisk Stone . With the teaser solved , take theStorm WhirligigandRoad Signfrom inside the altar .
Go back to the T - conjugation and tie the route foretoken to the tree diagram , then snap the left footpath to move to a cave entering . penetrate the chain ’s block ( 4a ) for a close - up and take theDetailon the ground by its hold , then get across the dark cave entry to go inside . Remove the textile from thewooden chest(5a ) and snap it for a stopping point - up , then apply the item on the front gore of the chest to set out the next puzzle .
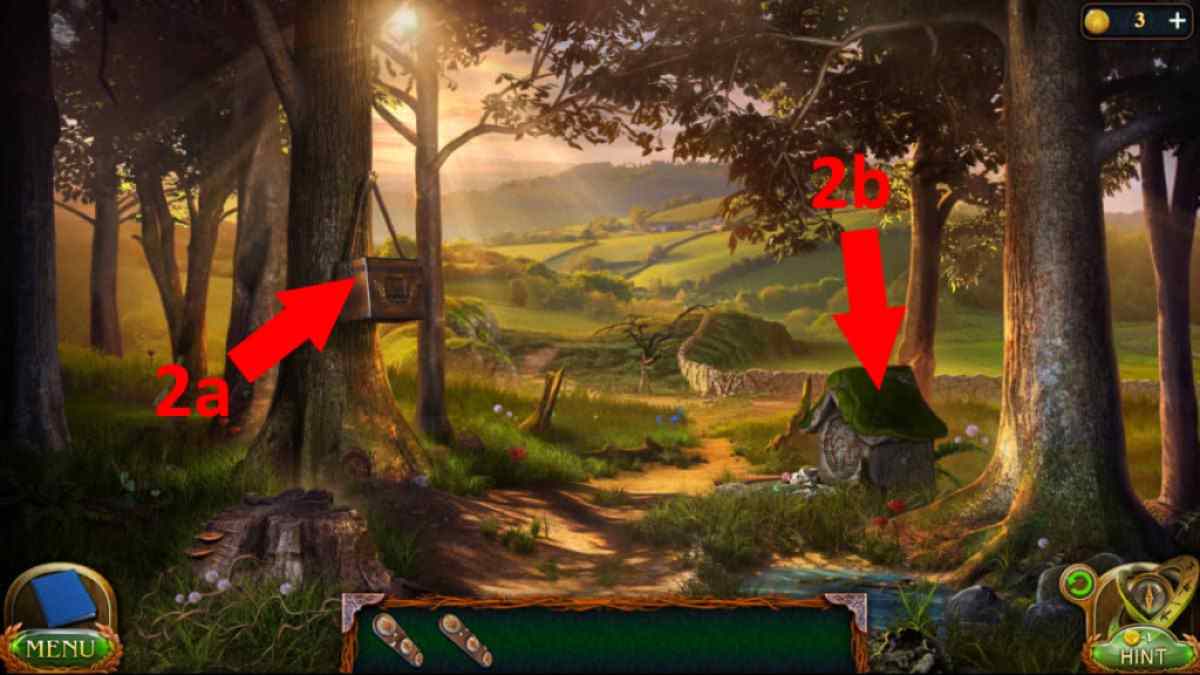
Image by Pro Game Guides
splay the circle by click the button on its left field and right . To complete the puzzler , click : left , right , left , correct , leftover , right , right , left . Take theTrowelfrom the now - open chest .
The Bucket in the hole
tap thestrawpiled on the rightfield of the cave ( 5b ) , thenclick on the ropeon the hay until you reveal , and then heart-to-heart , an entrance to a hole in the solid ground . press the cakehole to find that you need a light germ . Click back to the wooden chest of drawers and get a Mirror Shard from inwardly . habituate the shard on the dark hole in the straw to see a bucket at the bottom .
Get a close - up of the large cauldron in the midsection of the cave ( 5c ) , and get theScoopon the bottom right of it . Examine the light come from the back of the cave , and use the Georgia home boy to collect theProsthesis with Hookthat is just through the gap . Use the hook on the Mexican valium in the close - up of the dark hole , then clack the roofy again to raise the bucket . Get theKeyandGuide Discfrom inside the bucket , then take theBucketitself . apply the bucketful in the caldron to get piss , which gets you capture by Toto the trolling .
pertain : How to toy Escape Simulator

Image by Pro Game Guides
discharge the simple-minded matching token puzzle to escape from the cage and also find the twoCorrect Platesfor the road sign . Take the bucket , which is on the base next to the cauldron , and this sentence use it successfully to get aBucket of Water . Go back outside the cave and use the pail of water on the Pulley System ( 4a ) to clean it . Use the pulley to drop the cage , which you’re able to unlock with your key .
Take theTraveller ’s Diary Pageand thePickfrom the corpse in the cage , then go back to the signpost at the T - junction . put back the round ’s signs with the correct one to open up a stash in the tree , from which you’re able to take aWeathervane . Now , utilise the pick on the wall to the rightfulness of the T - junction ( 3c ) and head that way over the bridge .
Gateway to Pumpkinton
Take theStained Glass Piecefrom the Pumpkinton sign ( 6a ) , then tap the ladder on the floor ( 6b ) . apply the knife on the rope on the ladder , seize a secondStained Glass Piecefrom the floor in the close - up , then press the run once more to stand it up against the rampart . Click the top of the column next to the run ( 6c ) and get anotherGuide Disc , before adding the weather vane to the pillar .
Select the storm whirligig in your stocktaking and press the vane you just place toactivate the two pillars . To manoeuver the push from the pillars into the logic gate , you take touse one of the Guide Discs on each pillar . Once placed , sink in the way arrow : right , right , right , unexpended ( it is the same for both pillars ) . Now you may complete the weak puzzle ( see above ) on the gate to open it .
Go through the gate and ascertain the cut scene . Now collect threeStained Glass Pieces(7a , b , and c ) from the screen with the well and carthorse . Click thegateat the back of the area ( 7d ) and go through .
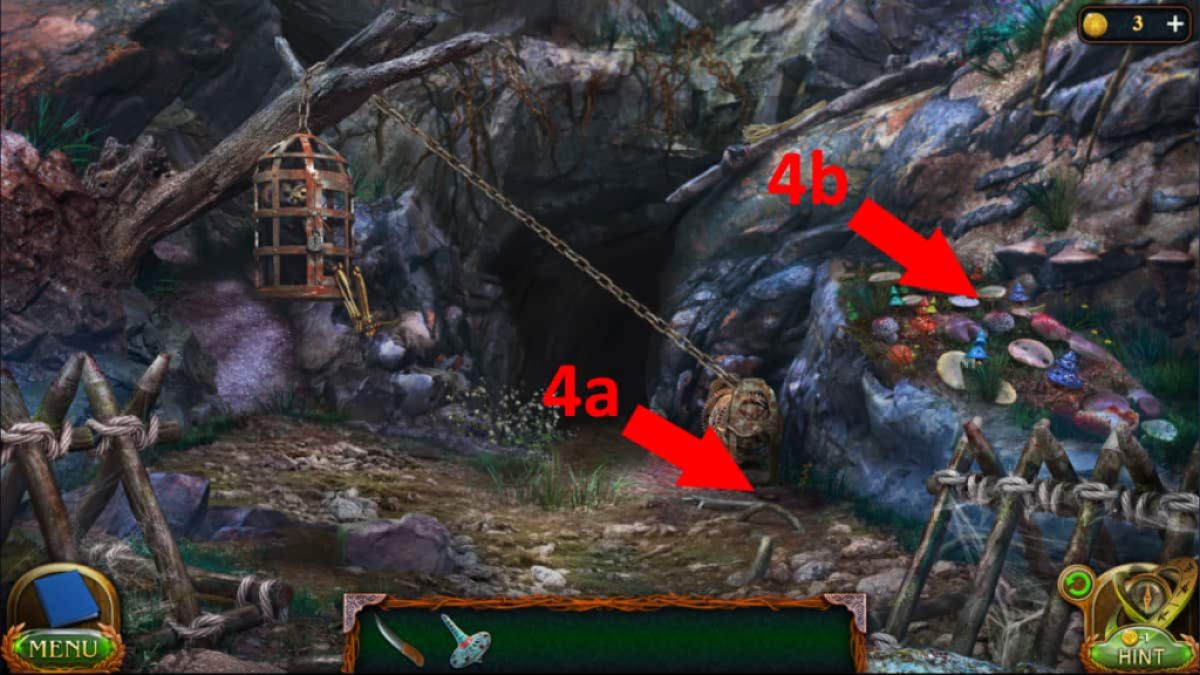
Image by Pro Game Guides
After verbalise to the son and looking at the window ( 8a ) he will give you aStained Glass Piece , but you need four more to complete the window . Click the pumpkin patch ( 8b ) until you find one ( and alsoPart of the Pattern ) , plus the woodpile ( 8c ) and the garden cart ( 8d ) . The final small-arm is on the chairman ( 8e ) . Use the pieces on the window and complete the jigsaw to gain theKeyto undefended the front doorway ( there ’s a pic of the complete reciprocating saw at the very bottom of this templet if you ’re clamber with it ) .
Inside the secretary’s house
Click the green carpet to roll it back and let on a hole door . Click the trapdoor to see the hamster hole and see something inside you need . Now click the cabinet ( 9a ) to open it . And the door inside it , to get the Sunflower . Head back to the wells and carthorse blind , take someGrainfrom the go-cart ( 7c ) , then add the Sunflower disc to the cover of the well ( 7b ) to let on a puzzle . To dispatch it , habituate the image below and click the follow sprocket the precise number of time in this sequence:3xB,3xH,3xF,3xE,3xD,3xC,3xA,2xB,3xE,3xA. When the lid opens , take the secondPart of the Pattern .
Related : How to beat Trace Escape Room - Full Walkthrough
Back inside the Secretary ’s home , flick on the fireplace ( 9b ) , and in the finis - up , employ the grain on the hamster hole . Once the hamster is eating it , go back to the other hamster hole by the bunker door and take a thirdPart of the Pattern . Get a close - up of the cabinet on the rightfulness of the elbow room ( 9c ) and use the three parts of the figure to complete the circuit and afford it .
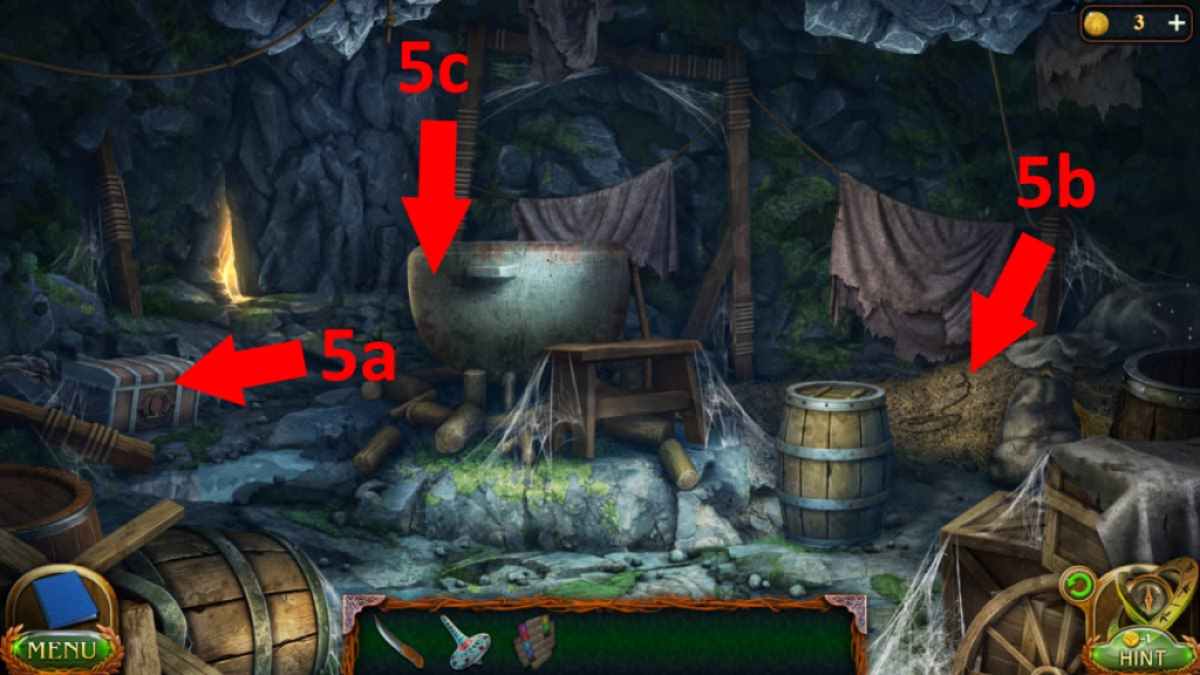
Image by Pro Game Guides
Once open , take theWorkpiece , Paper , andKey , then click the pile of paper so one is ready to depict on . The tonality opens the trapdoor into the root cellar , which amount to another uncomplicated item - matching puzzle . Once completed , you ’ll come out with theAxe . Go outdoors and employ the axe on the stump ( 8c ) to getFirewoodand position it ( along with the newspaper publisher ) in the hearth ( 9b ) .
The hobbit’s home
Go right back to the first screen in the forest and expend the trowel by the Sir Herbert Beerbohm Tree rostrum ( 1d ) . You ’ll find aMagic Lighterburied here . Use it to light the fire in the Secretary ’s House , use the workpiece in the attack to make then collect aDrawing Coal , then use the coal on the paper in the locker ( 9c ) to cast the simulacrum you need . After a retentive cut view , you get anotherKey .
Go back once more to the opening screen in the forest and utilise the key to open up the door to the hobbit home ( 1c ) . Get thePotion Recipefrom the box at the back of the room ( 10a ) and launch the boxful to get theTubeandEmpty Flask . Then click the longer boxwood next to it ( 10b ) for your next puzzle ( root below , note the cardinal quad is clicked double ) . With the box open air , discover the 15 board gameChipsinside .
While in the hobbit trap , tick the skin on the bed twice ( 10c ) to reveal the game loge and tote up the 15 chips to claim theBoard Game . In the same finale - up , click the purple cloth under the bed to reveal theJigsaw . Now click the cooking area on the other side of the way ( 10d ) . Grab theScrewdriverfrom inside the stove , dawn theWoodnext to the range to put it within , and practice your Magic Lighter to set off the firing in the stove .
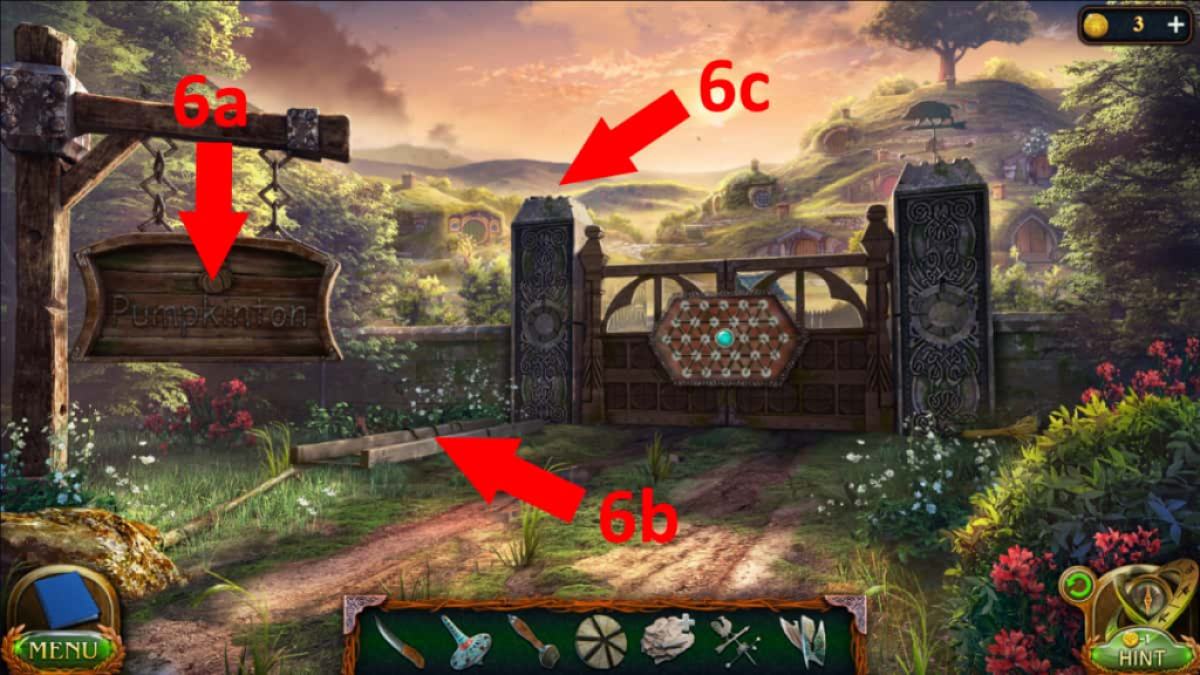
Image by Pro Game Guides
Making the potion
Use the Jigsaw on the Tube to get aSharp Tubethen head outdoors and apply the screwdriver on the chimney to hit the chapeau . come home the top of the chimney to find it forget . sink in back to the yield tree ( 1a ) and get someLeprechaun Eyesberries from it , then go north to the altar ( 2b ) and collect theShell . Go north to the T - junction and use the acute pin on the conifer tree diagram ( 3d ) , then use the axe on the pipe , and the flask on the pipe , to make theConiferous Juice . At the cave entry , grab theBucket(4a ) and use the knife to get somePyramid Mushrooms(4b ) .
associate : Best Switch teaser game
Now head outside the Secretary ’s House and use the knife on the plant in the lawn cart ( 8d ) to getBellflowers . question to the south to the well and get aDry Fishfrom the line ( 7e ) , and some pee from the well ( 7b ) to earn aBucket with Water . enter the potion formula Good Book , and utilize the item pictured on it : bucket , bellflower , mushrooms , fish , berries , plate , and juice , to get theIngredientsitem .
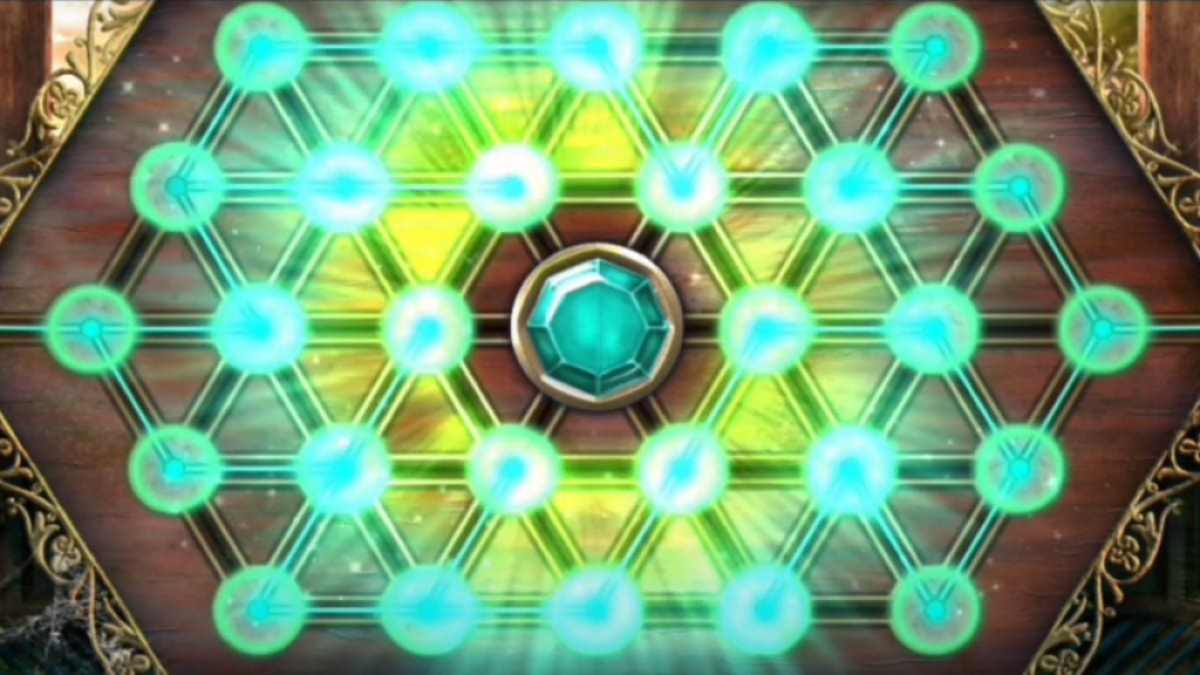
Image by Pro Game Guides
Go back to the hobbit ’s open fireplace ( 10d ) , grab theFireplace Pokerby the oven door , then go outside and use it on the chimney to clear it . Back inside , put the component on the preparation parry ( 10d ) and follow the formula by get across the Good Book on the worktop . You now have thePotion .
Beating Toto the troll
Go back to the troll ’s cave and spill the beans to Toto , beat him at the miniskirt - game ( you ca n’t lose ) , then exit the cave through the openhanded new trap in the back wall to the funicular . Click the incoming to the automobile twice to get a close - up ( 11a ) , click the pulley to find it is n’t mold , and grab theLidand aWheelfrom the floor in spite of appearance . break up up aWheelfrom the rocks ( 11b ) , and another from the box seat holding the car on the wire ( 11c ) . habituate your magic light on the stuck mechanism ( 11d ) , which cauterise aside the grass .
Click the stuck mechanism which releases your fourthWheel , then seek the now burn grass ( 11e ) for two more . employ the Axe on the wooden crate ( 11f ) to get the seventhWheel , and your knife on the satchel in the car ( 11a ) to get the finalWheel , theChain , and theScheme .
Use the wheels and the scheme on the metallic element box ( 11c ) to start a very unsubdivided puzzle , where you simply follow the diagram ’s instructions . Now use the chain and the lid on the metal loge , go into the car ( 11a ) , click the brake manage on the right wing , then the pulley lever to go down in the funicular .
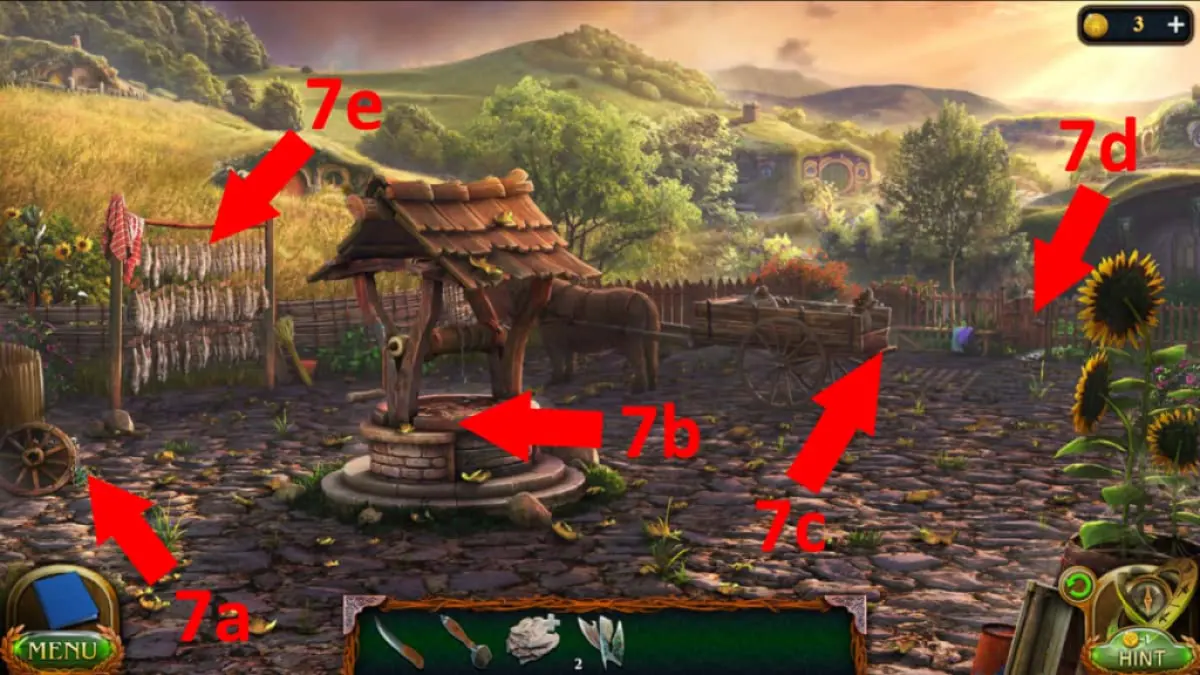
Image by Pro Game Guides
On the next screen , use the potion on the water ( to the left of the gravy holder ) to get to the final undercut fit . Congratulations !
Do you make out mystery puzzle game ? Then do n’t miss ourAbandoned Walkthrough & Puzzle SolutionsandAbandoned 2 Walkthrough and Puzzle Solutionshere at Pro Game Guides !
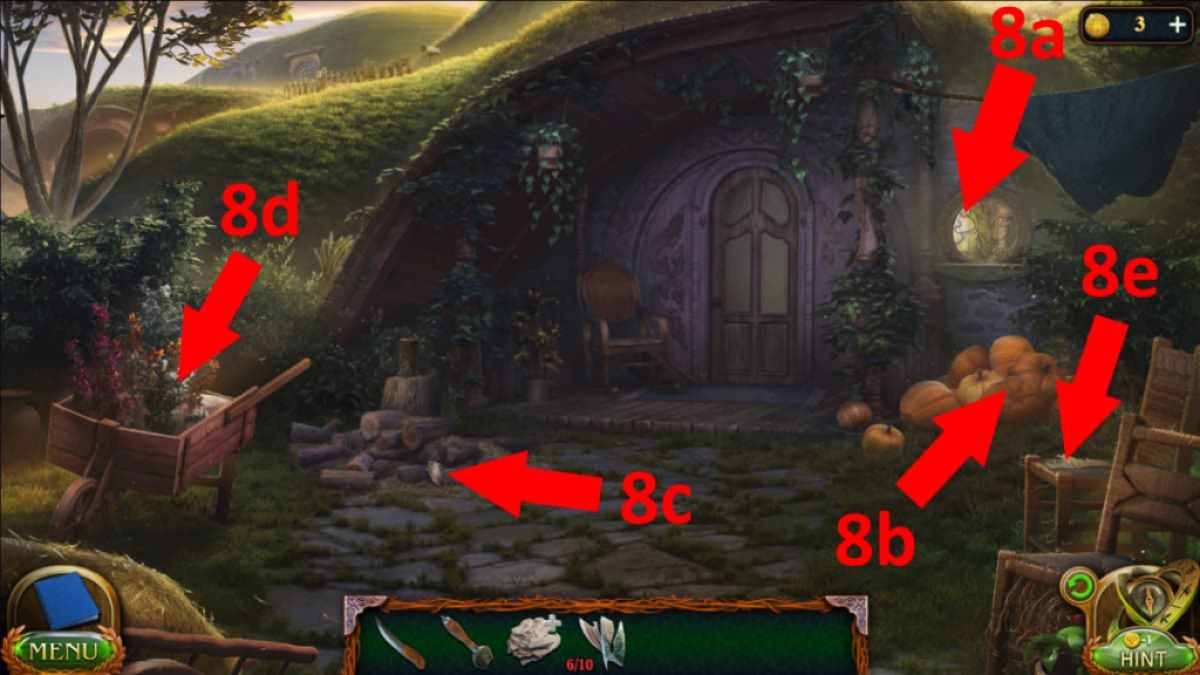
Image by Pro Game Guides
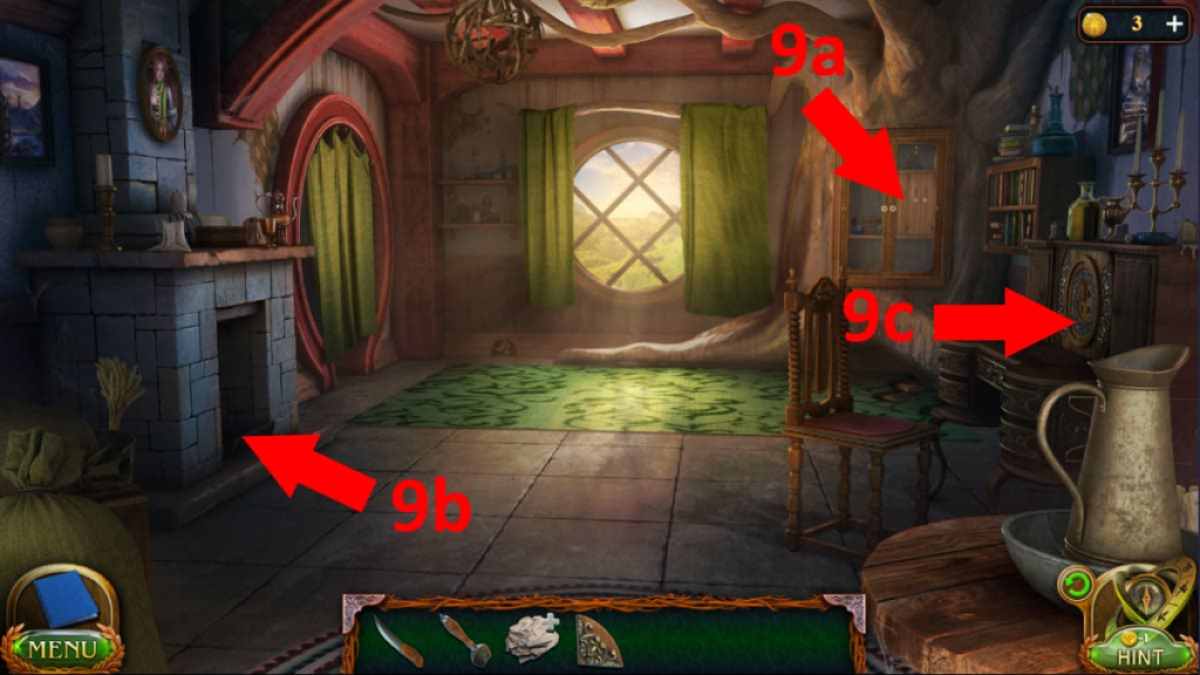
Image by Pro Game Guides
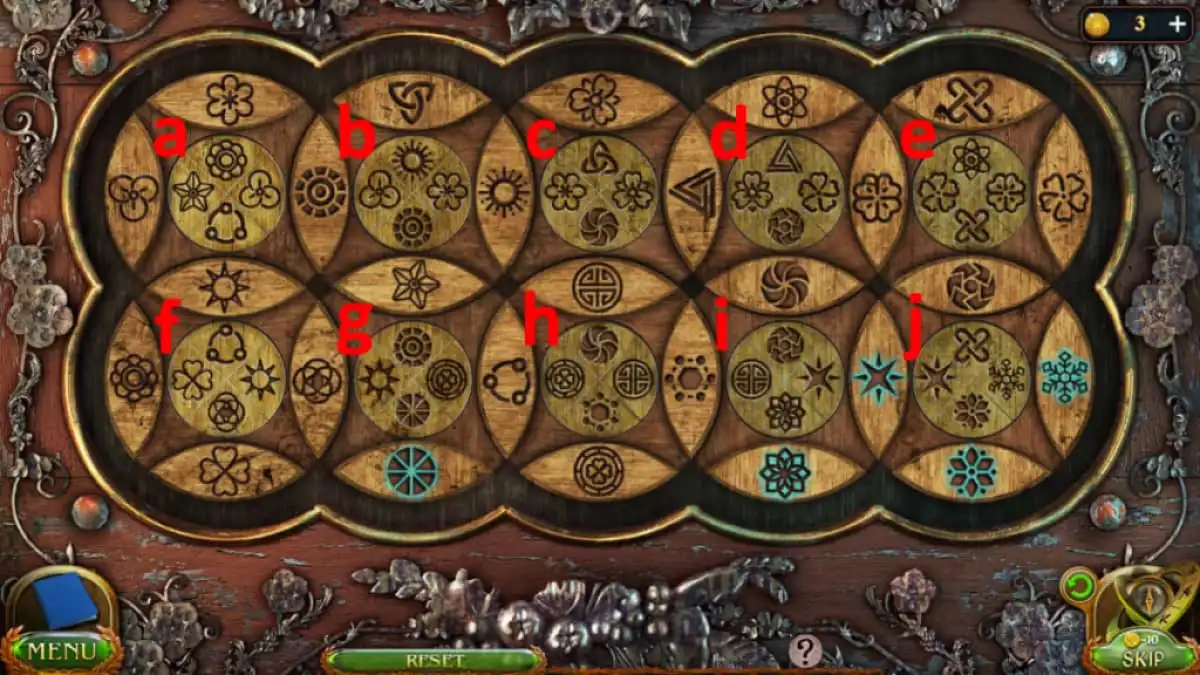
Image by Pro Game Guides
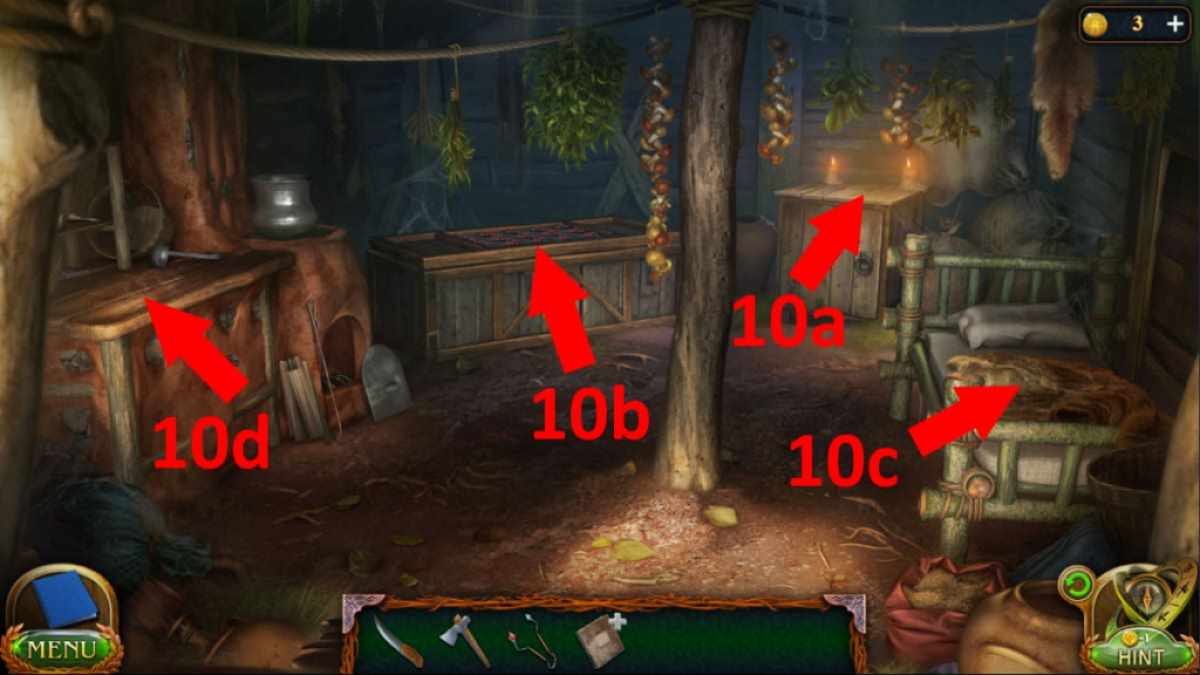
Image by Pro Game Guides
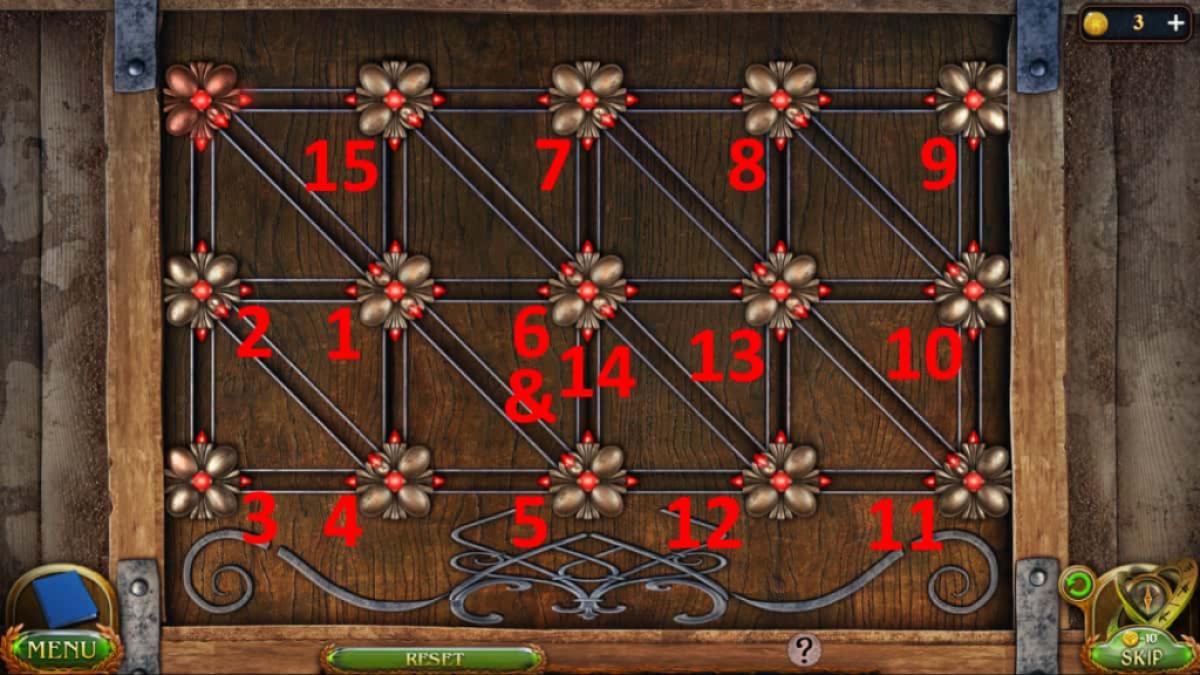
Image by Pro Game Guides

Image by Pro Game Guides
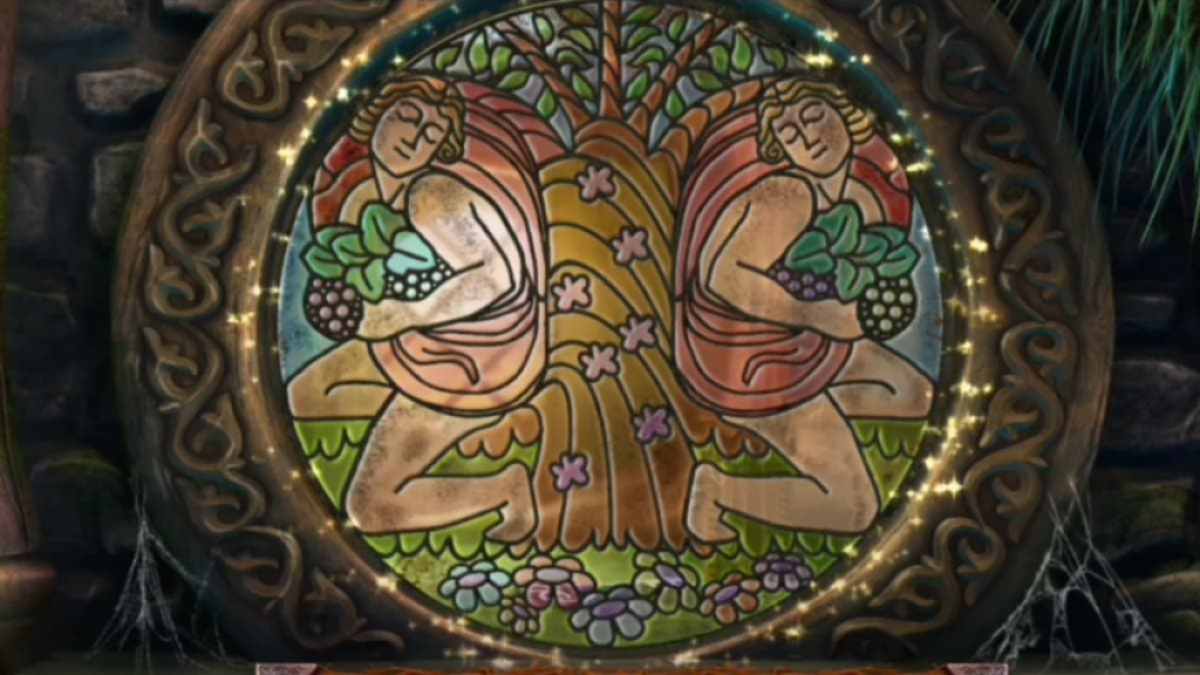
Image by Pro Game Guides
