Learn to use Redstone to create ways to automate some of your farming !
OurMinecraft Redstone Guide to Farmingwill teach you how to construct widget that will help you well conglomerate food and material . We have someRedstone Farm Ideaswith stone’s throw - by - whole tone tutorial that should help oneself you with your own Redstone initiation !
Best Minecraft Redstone Farm Ideas Guide
Minecraftis all about construction , exploration , and survival , but a big part of the survival is grinding for nutrient and material . Most root for a cylinder block of water surrounded by tilled soil and slow crop development . This is great and all , but most of the time we end up pass away out to “ tip ” some cow . However , a log Z’s - on feature ( and one most the great unwashed shy away from ) is Redstone . Redstone can be intimidate to both new and experienced players , but it open up a existence of opportunity and automation .
In this guide , I will be teaching you ways to automatize some of your farms through Redstone Contraptions . I will try my right to explicate how they are built and how they run throughout the guide . My goal is for you to gain the putz needed to comprise Redstone in all of your builds rather than carbon paper - copying work up from Youtube . This template is intended for Redstone beginners and intermediates , but you may find some use from this regardless of your skill level .
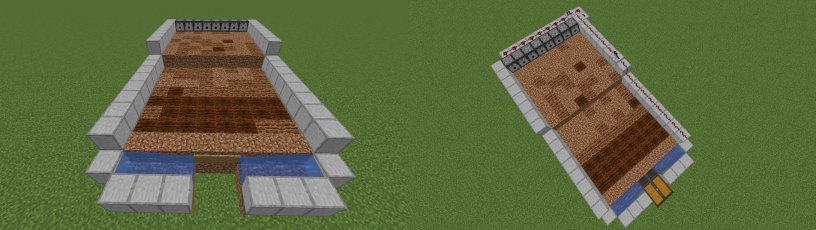
Tiny Crop Farm
Investing enceinte block - space in a farm to your well - decorated home can be both an eyesore and a sentence - wastrel . Thanks toRedStone Expert MumboJumbo’ssleek and not - so - wide-eyed conception , we can maximize our crop output while derogate the optical impact it has on your foundation . The only downside to this blueprint is its reliance on bone repast , but we will offset this in a later clause when it ’s time to build a Spooky , Scary Skeleton Grinder .
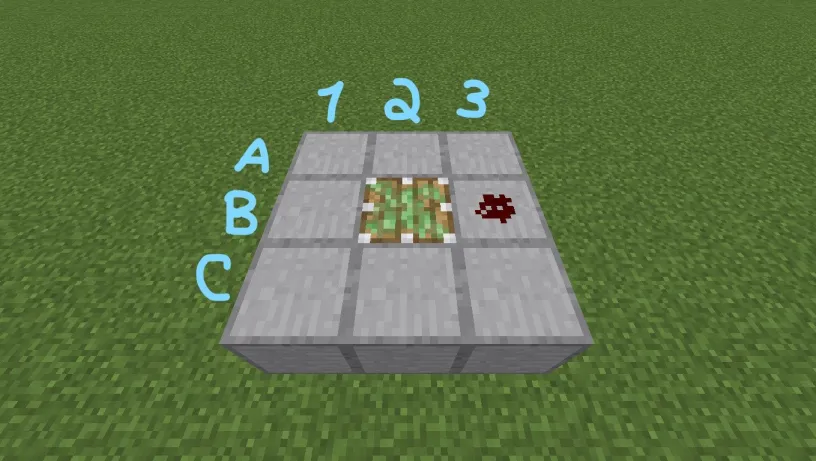
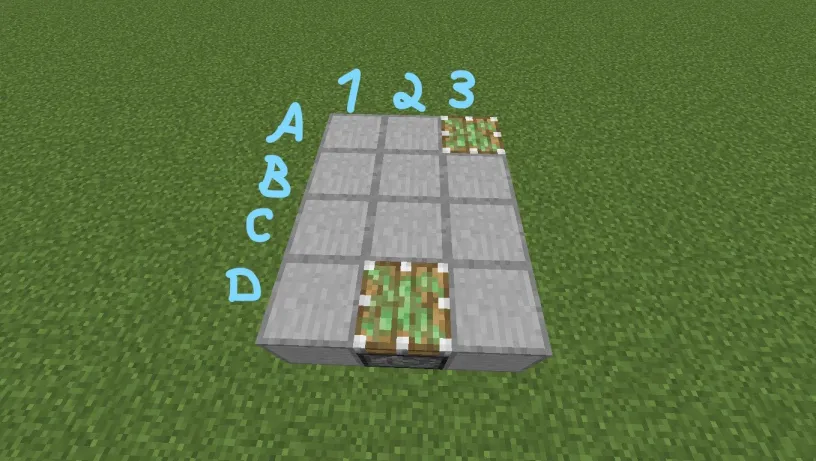
Step 1 : Create a 3x4 area with sticky piston ( A1 to D3 ) . The Sticky piston at D2 will be pushing and pulling the farmland you will use .
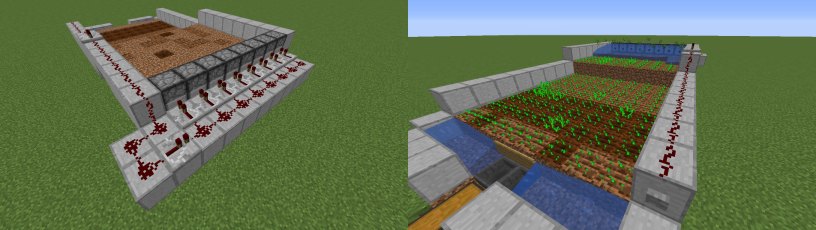
Step 2 : Place dirt on D2 . Then place two grasshopper confront each other on A2 and B2 . Place any object at heart and you will observe the object electrical switch between the two grounder . The grounder should look how they do in the fourth screenshot . This is what is know as a Redstone Clock , which output a signal of one redstone tick per transfer ( or approximately 0.1 minute time interval ) . Place any solid stop on C1 and seize a lever tumbler to it to stop the Redstone Clock from ticking . Then , identify a Redstone Comparator on A2 facing another unanimous block on A3 . The comparator pulls the sign from the clock and transfers it into the solid block . Place a Redstone Repeater , set to two ticks ( right chatter it once after placing ) which delay the signaling by 1 redstone tick . This is important to keep the simple machine running at the right speed . If it ’s too quick or too slow , your Pistons wo n’t work out properly . come in another solid block on C3 and attach a Redstone Torch on the opposite side of the repeating firearm , face up D3 . This blowtorch is what secure that the Sticky Piston on D2 gets power . You ’ll notice Redstone Dust on the one of the hopper , but this only makes stacking a block above it easier and serves no functional purpose for this appliance .

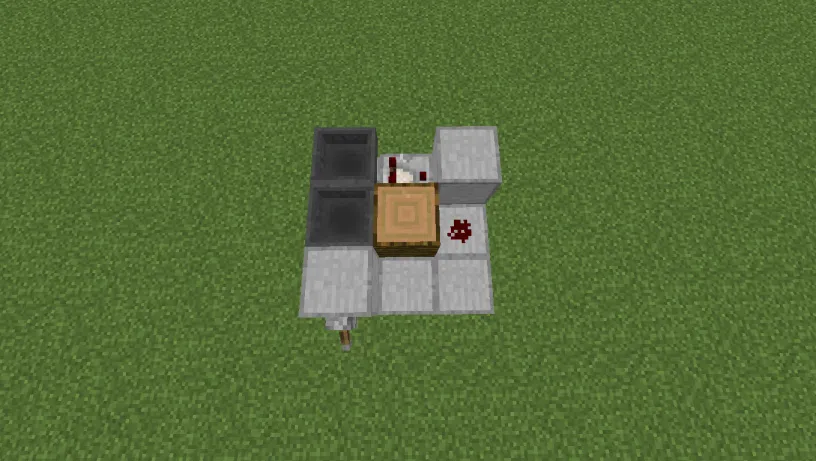
Step 3 : Place an Observer facing the Redstone Repeater ( small brass should be toward the repeater while the uncanny teethy hole faces aside ) on A2 . Place solid block on the same level as the Observer at C1 and B2 . lay another unanimous blockage over the Redstone Dust at B1 . Place Redstone Dust over the Observer at A2 and the solid pulley-block on B2 .
Step 4 : Place Dispensers at C2 , D1 , D2 , and D3 , all facing the lengthy dirt pulley block . This is where you will locate all of the Bone Meal that will make all the instant crop magic bump . Place Redstone Dust on top of each of the Dispensers at C2 , D1 , D2 , and D3 . It should mechanically be connected to the observer at this point .
Final Step : Place two solid blocks on the area marked in the screenshot . This will incorporate the urine we will be placing as our finishing tinge . Till the soil if you have not already done so and you will acknowledge a tiny slit between the Dispenser and the territory . cautiously direct your cursor in that slit and place the water . And that ’s it . You ’re done !

How it works : Once you fill the dispensers with bone meal and you have the cum you require to automate , switch the Redstone Clock back on with the lever tumbler and you will notice the territory rapidly being lifted and lowered by the Sticky Piston . The Observer block comment a change of country in the closure it is observe ( the Redstone Repeater ) and will output a sign through its crack and to the Dispensers via Redstone Dust . The Redstone Repeater takes the signal from the block that is powered by the Redstone Comparator to power the block attached to the Redstone Torch , disabling and re - enabling the torch for each tick . That redstone torch power the Sticky Piston next to it . When the Dirt is root for and pushed , the water breaks whatever crop it touches . Since the Dispensers are instantly growing the works while the water simultaneously fail it , your harvest production is limitless . All you require to do is hold right click over the stain to plant the seeds automatically . Just grow the machine back off with the lever when you are done .
Tiny Cocoa Bean Farm
A very similar build to the Tiny Crop Farm , the lilliputian Cocoa Bean Farm will do all your instant cocoa needs . Whether you may make a Brobdingnagian profit on a server by mass - producing drinking chocolate , want to dye thing dark-brown to hide those mysterious stain , or you are a connoisseur of baked good , drinking chocolate can impart you bang-up joy in - game as much as a hot cup of cocoa would in the middle of a rough winter in real life . recognition goes to MumboJumbo again for making this the simplest design possible . Here ’s how to make it happen :
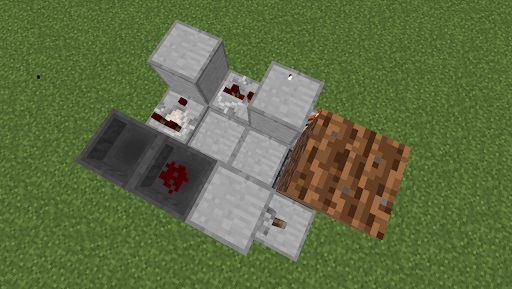
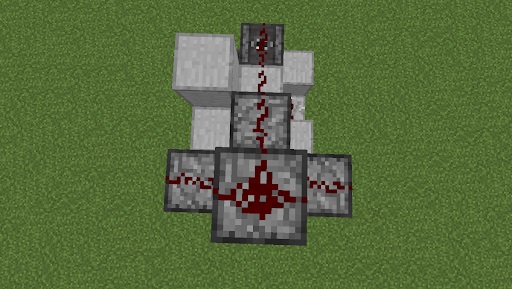
stride 1 : Start with a 3x3 region , put 8 satisfying pulley block surrounding a Sticky Piston . Place Redstone Dust to the right wing of the Sticky Piston ( B3 ) .
Step 2 : station a Jungle enter the midpoint ( B2 ) and two solid blocks on A3 and B1 . Then , place two hoppers facing each other as previously illustrated with an point inside to form another Redstone Clock . blank space a lever on the solid block at C1 to arrest the clock while you work on the rest of the build . Place a Redstone Comparator on A2 facing toward D3 .
Final Step : Place an Observer on B3 facing the Redstone Dust ( face down , crack up as some would say ) . Place firm block on A1 , A2 , A3 , and B1 . Then , place Dispensers on C1 and C3 face each other . These will be deal out osseous tissue meal similarly to the previous build . Lastly , rank Redstone Dust around the top of each block on A1 , A2 , A3 , B1 , B3 , C1 , and C3 .
That ’s it ! This one ’s a fair simple build .
How it work : When you change the lever back on , the Redstone Comparator receive a small sign from the Redstone Clock , which soft powers the block in front , hard - powering the Redstone Dust , which power the Sticky Piston . The percipient picks up the modification of state in the Redstone Dust and outputs a sign through its crack to power the Dispensers . It all works simultaneously , and all you have to do is hold correct penetrate on the log with cocoa seeds in your mitt .
Medium Crop Farm
A must - have for any casual or hard-core player , this efficient and dim-witted design is both easy to build and incredibly efficient . It capitalizes on automated harvest home and aggregation . The only downside to this is replant , which you wo n’t be investing too much metre into each cycle . This is a very unsubdivided build that may be conversant with ex-serviceman players . Here ’s how to build it :
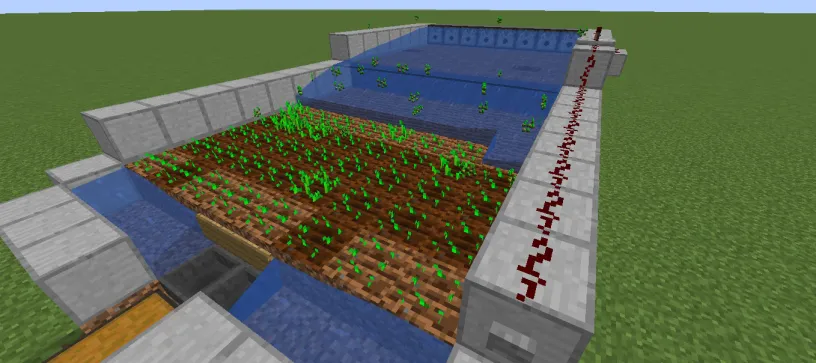
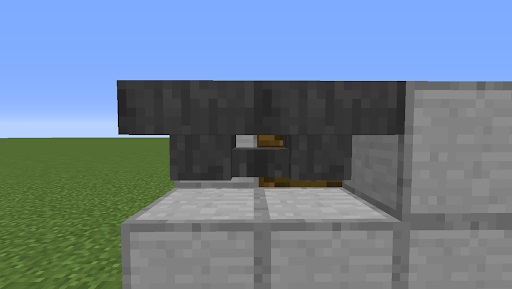
Step 1 : Make certain you have plenty of room to start with . situation dirt in an 8x8 establishment and fence it with build city block to keep the water we will be using from spreading . nominate it any smaller will make overflow since water travels down 8 space from the generator . you may tally another 8x7 for each layer you want to add to make the farm as long as you require . you may also spread the farm as wide as 18 blocks , but doing so will take up a lot of quad .
Step 2 : gratis course in front of all the dirt and place two signs in the middle . Then , place a pail of water on each side as illustrated in the screenshot . Dig a 2x3 hole underneath and in front of the signs , one block below the water degree , so that the crops will be carried the hoppers you are about to come in . Then , come in two large pectus as illustrated in the second screenshot and bond hoppers to them .
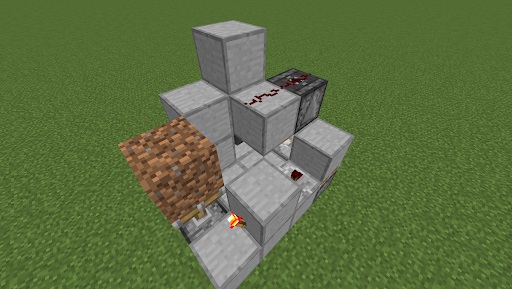
last Step : Place 8 Dispensers on top of building block a stratum above the dirt and place a pail of piss in each . Run Redstone Dust along the side of the physique , adding a Redstone Repeater about midway through ( 9 engine block away is pretty dependable ) . Place Redstone repeaters behind each of the Dispensers and run Redstone Dust behind each of those . Then , associate a Redstone Repeater to the Redstone wire as depicted in the third screenshot . Finally , place a push or lever ( whichever you choose ) , plant some seminal fluid , and watch those beautiful crops fall directly to you .
incentive : Put glass over the structure for a stylish way to keep those isolated crops from landing on the sides , or just progress the wall in high spirits . This is your build and you have the originative exemption to make it your own !
How it crop : This build is very simple . Once the button is pushed , a sign is send to each recidivist , which repeats the base sign strength of 15 each meter . This , in turn , power the dispenser to push water over the crops and into your small storage system .
Bonus: Tiny Mob Farm
If you ’re stressing about skeleton , I have a very bare solvent . Yet another small and unnoticeable build , you could pretty much spawn most hostile gang with this . I will be underwrite a full automatise gang farm for each passive and hostile mob in the future . This tiny shape is mean to swear out you in a pinch in case you do n’t want to invest elbow room for a massive mob farm .
What you necessitate : Solid construction occlusion x26 , Slab x6
Block Space Needed:5x3x5 ( Must be 24 blocks away from the player to spawn crime syndicate )
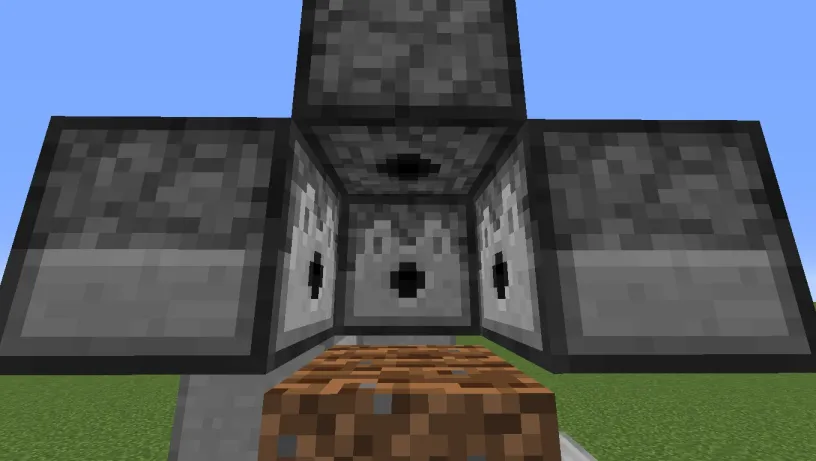
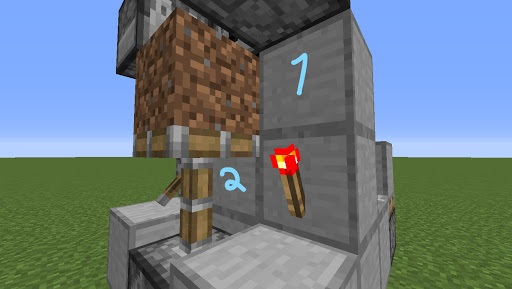
Step 1 : Build a vertical 5x5 structure with a six stop kettle of fish as depicted in the first screenshot . post three slab at the bottom to stand on and wack the Skelley - boy as they breed .
Step 2 : Cover the back of the kettle of fish with strong construction block and place slab on the top half of the third block from the ground .
Final stone’s throw : Cover the top of the slab with any solid building block you care and the upshot should be a pitch black inside .
As long as you are at least 24 blocks away , mobs will engender . This bodily structure can be made as blanket as you want and can be made to embark from both sides . This is idealistic for Skyblock human race or sphere that are well lit up .