Can you save the final dupe ?
It was no surprise to me to detect the New York Mysteries series near the top of the mystifier RPG popularity lists .
If you ’ve completed the primary storyline and open up the supererogatory capacity , read on for my New York Mysteries 2 High Voltage Bonus Chapter Walkthrough .

New York Mysteries 2 High Voltage Bonus Chapter Walkthrough
As is often the cause with incentive chapters , this one send us deep into the account before the primary quest we ’ve completed . Rather than taking on the use of Laura , we ’re alternatively playing the orca ’s sire Samuel . His son has been arrested , but if we can ascertain his last victim ( who may still be alive ) , he may get a reduced sentence . Note this bonus chapter does not include any collectible .
refer : New York Mysteries 5 - Power of Art Walkthrough
If you ’ve arrived at this guide but areworking your fashion through the main escapade , click through to myNew York Mysteries 2 High Voltage walkthrough hub pagefor consummate guides to all the other share of the game . I wo n’t talk abouthow to get between locationsbelow , as all you need to do is use the map ocean in the bottom - right of the blind to use the first-class debauched - travel system ( location names below will match the in - biz map ) .
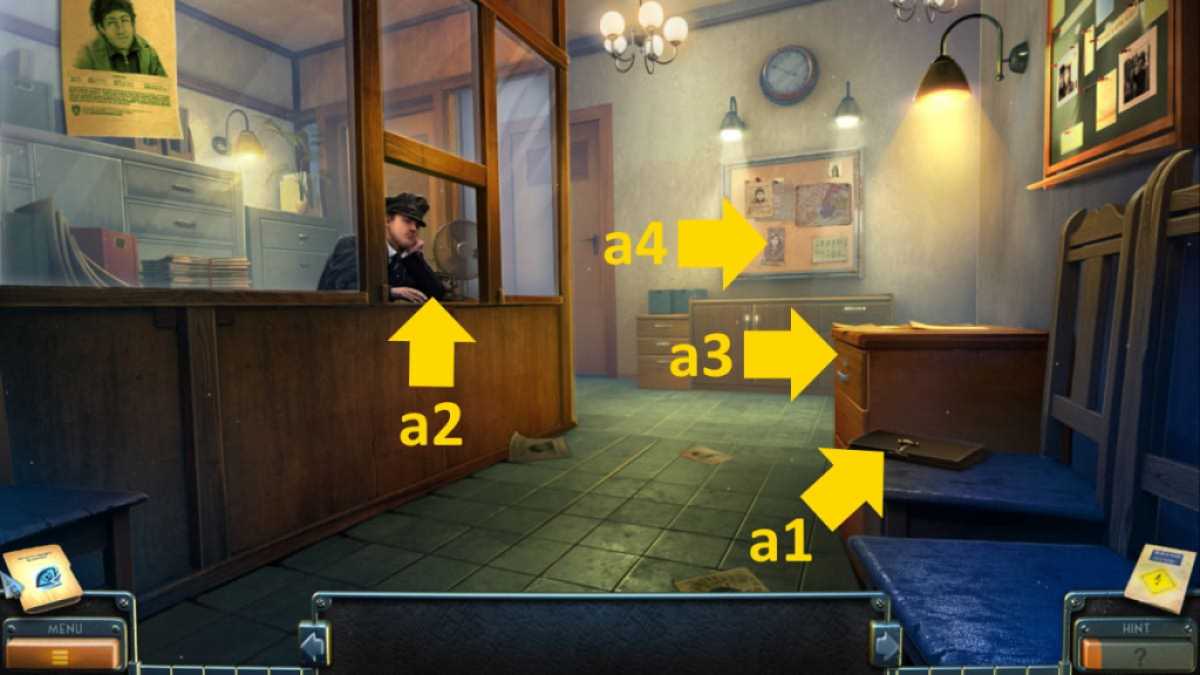
Image by Pro Game Guides
The police station
verbalise to the Policeman , he tells you they want an alibi for you so that you ’re not accused of being part of the crimes . Click the wallet on the chairperson ( a1 ) , and click the money until you see ( and collect ) aReceiptunderneath . Give the receipt to the Policeman as your alibi , and he will leave the room .
Click where he was sitting ( a2 ) for a ending - up and take thePaper Clip , then use it on the desk drawer ( a3 ) to start a valve lock teaser . To complete it , you need to press the valves in the right order of magnitude ( 3 - 5 - 4 - 1 - 2 ) . Once done , take theKnifefrom inside . Now you may choose the phellem display panel ( a4 ) and utilize the knife to get aPiece of the Victim ’s Photo . Next , use the map to go to At Samuel ’s House .
At Samuel’s house
Select the burn chalk in front of the door ( b1 ) for a close - up and take theBat , then move to Chinatown . habituate the bat on the emergency firebox ( c1 ) and take theHosefrom within . you’re able to also take thePlanetfrom the ending - up of the locked gates ( c2 ) and click the back of the simulacrum to bring in access to the Cafe . For now , though , move back to At Samuel ’s House .
take the fire hydrant ( b2 ) and attach the hose , clicking the image until it is attached and the water supply is on . Now you could snap the shabu fire ( b1 ) once more and put out the fire . This gives you access code to the vestibule , so head deep down . choose the planet model ( d1 ) and take theShoehorn(you may also add the planet to get it out of your inventorying ) . Now click the upstairs room access ( d2 ) and get into Hugo ’s room .
Hugo’s room
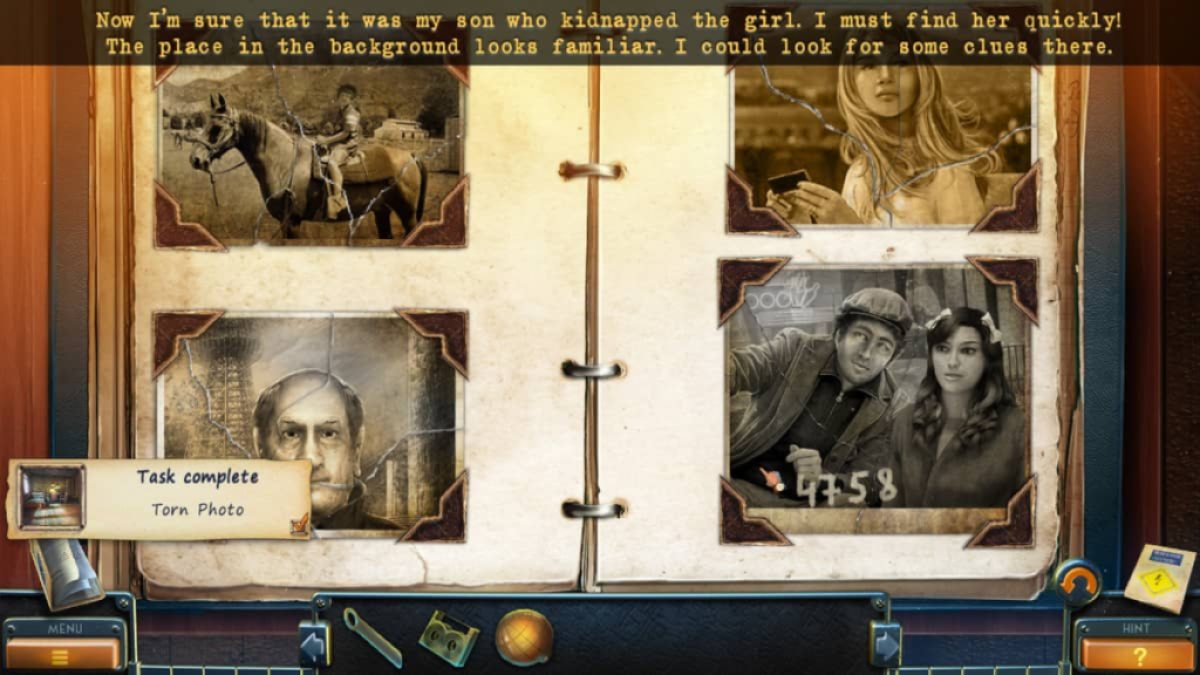
dawn the bear ( e1 ) , then dawn the head in the close - up to remove it and take theTapefrom inside . Also , take asecond Planetfrom the windowsill ( e2 ) while also come home the window to bodge on it and reveal a symbol . pick out the lamp next ( e3 ) for a close - up of the photo wall . Add the photo piece you have ( bottom right ) and then drag the other picture musical composition to create gross picture . Note the code4 - 7 - 5 - 8on the bottom correct photo .
Back in the anteroom , bestow your 2d satellite to the mannikin ( d1 ) , then take the bookshelves ( d3 ) and add the tapeline to the tape musician . Listen to the transcription , then get a close - up of the stairs ( d4 ) and employ the shoehorn to start the compartment in the conclusion - up , taking thethird Planet(add that too ) andreading the notethat leads you onto the old bowling skittle alley under the bridge .
The bowling alley
After the guy with the shovel gives you aBow , pile the boxes ( f1 ) and then snap the fire evasion ( f2 ) to get aCrowbar . habituate the crowbar on the planks on the door ( f3 ) , then enter the bowling alley . Grab thePliers(g1 ) , then head back alfresco and use them to cut the ropes ( f4 ) . In the tight - up , take theDissolventand go back inside the bowling bowling alley . Use the dissolvent on the panel ( g2 ) , open it , then click the switch to turn the lights on .
Related : lose Lands 3 Full Walkthrough ( Golden Curse )
Select the storage locker ( h1 ) and take theHammerin the close - up . Now click the door ( h2 ) and use the code on the exposure earlier ( 4758 ) to unlock it ( do n’t leave to press enter , the bottom right key , and then clack the handle to open up the doorway . This set forth a leave out object puzzler .
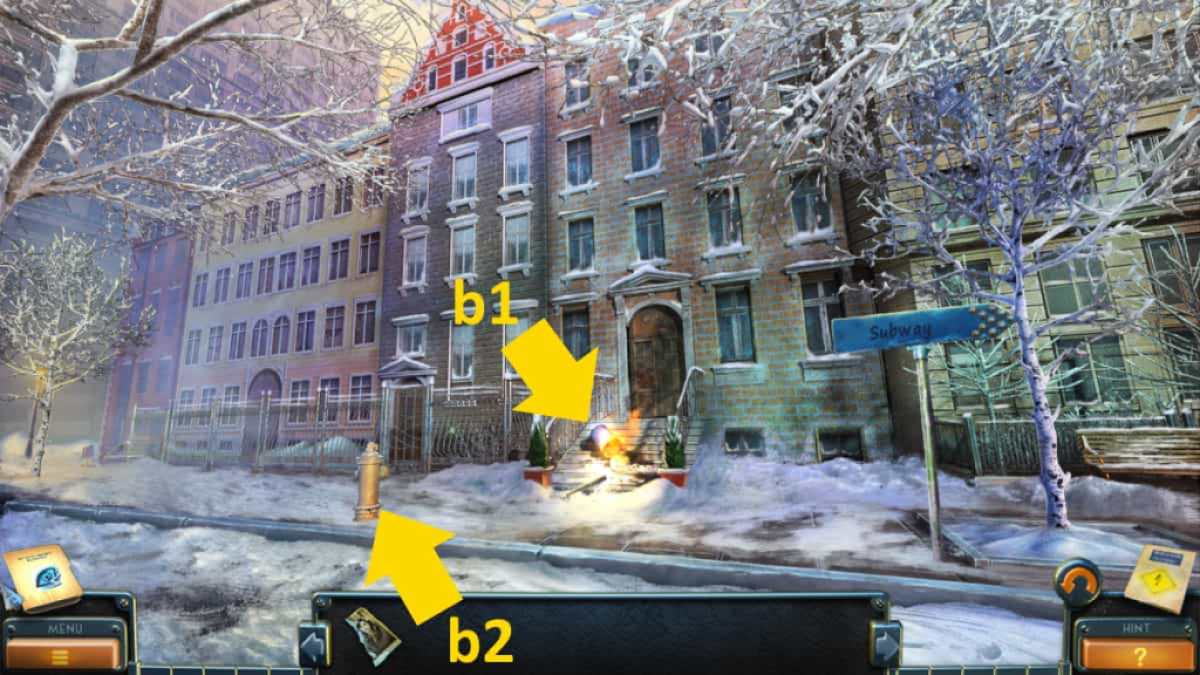
Image by Pro Game Guides
The bowling alley puzzle
Get theSphere(i1 ) , then thePowderby clicking around in the skittle box ( i2 ) . Also , take asecond Sphere(i3 ) , theOilcan(i4),Crosswrench(i5 ) , aPlank(i6 ) , plus theCurtain(i7 ) . Add the board to the box ( i8 ) to get the code5 - 9 - 2 , then select the good ( i9 ) . go into 592 , add the fruitcake , oil it with the can , then enter the safe to get theGear .
Add the curtain to the window ( i10 ) then click it again to shut the pall , notice the normal . Add the two sphere to the shelf ( i11 ) and move the bowling balls around to match the pattern . This opens a small compartment , from which you could take aLever .
Use the powder on the hard cash registry ( i12 ) , click the four buttons that show fingerprint , and then apply the lever tumbler to spread the drawer and take theHandle . Click the box ( i13 ) for a close - up and add the Gear , then the handle . Take theBowling Ball .
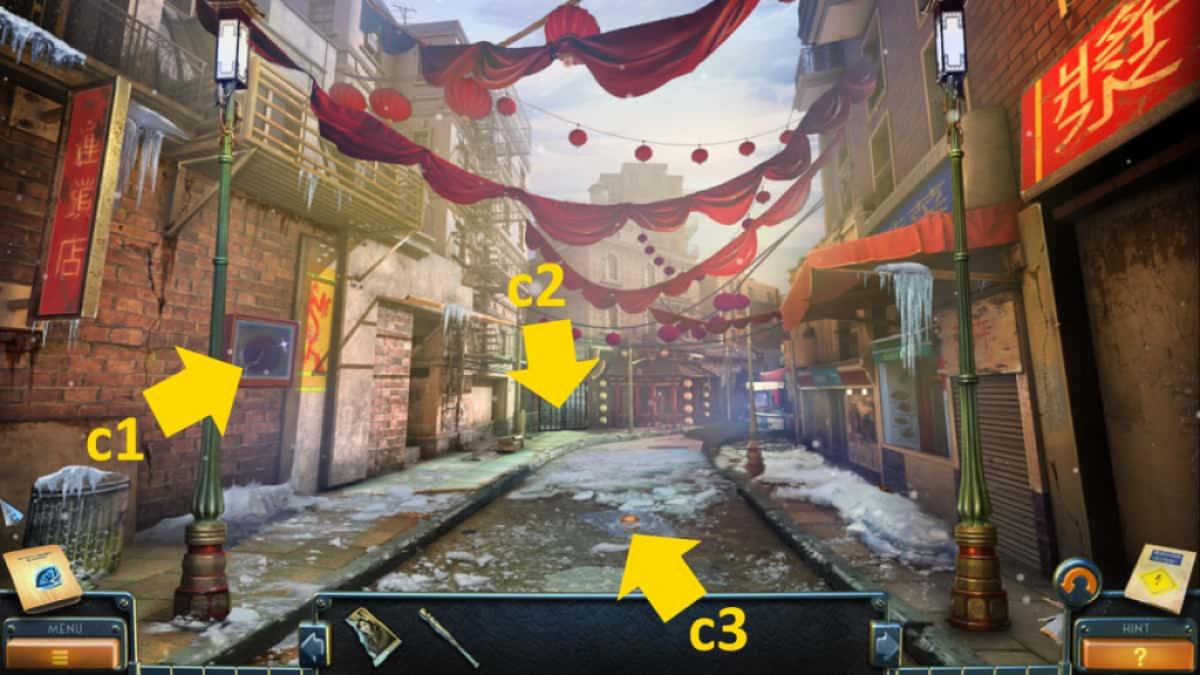
Image by Pro Game Guides
In the main bowling alley picture , cluck the lanes ( h3 ) for a close - up of a bowling mystifier and add the bowling ball . All you need to do is pick up the Lucille Ball by clicking it , then click the middle lane three time with the ball in hand . This will knock down the peg and finally refund a puritanical bowling ball . Click it to unfold it up and take theKey . Select the lockers once more ( h1 ) and use the key to open up locker 12 , reading your next hint and take theToken . Now click the jukebox ( h4 ) , use the token on it , and take theNails . You now have memory access to the crossing , so move there .
The boarding school
Get theSignpost Partfrom the stilt of snow ( j1 ) and the one consist on the solid ground ( j2 ) , then add them to the broken signpost ( j3 ) . tally the nails , and use the hammer to gear up the sign . you may now get at the Boarding School Yard , so move there .
Talk to the man outside the boarding school and he ’ll give you aCoin . Once the conversation terminate , he ’ll leave and you ’ll also have approach to the Hunter ’s Lodge . Before you go , also pluck up theShovel(k1 ) . Return to the crossing and use the power shovel to dig up ( j1 ) theGaffing Hook . Back outside the school , use the claw on the ice in the pool ( k2 ) to dig out thePigeon , adding that to the statue of the boy ( k3 ) . This opens the school gates . apply the hammering on the door ( k4 ) to get somePlankswhile also gaining access to the Corridor and the Backyard when the door now undefendable .
In the corridor , click the jam in the balcony ( l1 ) and take theStick , then habituate the planks on the gap to pull ahead access to the Children ’s Bedroom . Move into the backyard and use theSnowballs(m1 ) on the hanging plank ( m2 ) by dragging them until you knock down ( and then pluck up ) yourfourth Planet . Use the peg on the pinata ( m3 ) and collect theSwitch .
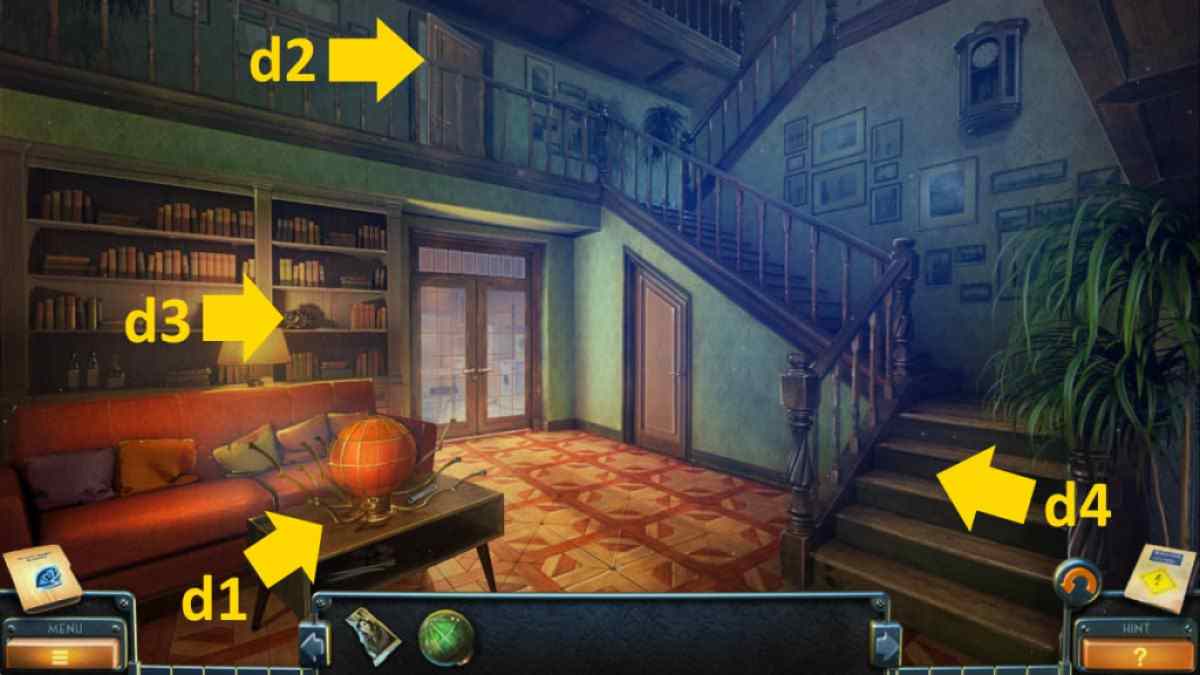
Image by Pro Game Guides
Back in the corridor , add the electric switch to the fusebox ( l4 ) and click the switches in the right rescript ( 4 - 1 - 5 - 2 - 3 ) to move around off the office and gain access to the final area on the single-valued function , the Teacher ’s Room . Go inside and snap the carpet to move it back and get yourfifth Planet . Move to the hunting watch ’s inn .
The children’s bedroom
get across the tree ( n1 ) and take theShuriken , then use it to start the boxwood ( n2 ) and get theDrill Bit . Use the drill chip on the ice ( n3 ) and take yoursixth Planet . Move to the cafe and employ the coin to buy aCup of Tea(o1 ) . Now go to Chinatown and utilize the tea on the puddle ( c3 ) to get aseventh Planet . Move to the children ’s sleeping accommodation .
You want to find and collect 13 leave-taking . You ’ll find 1 - 3 on the puzzle box ( p1 ) , 4 - 5 on the left layer ( p2 ) , 6 on the windowsill ( p3 ) , and 7 on the middle bottom ( p4 ) , where you’re able to also pick up theBroom . 8 - 10 are on the floor ( p5 ) , 11 on the curtain ( p6 ) , and 12 on the lamp ( p7 ) .
Move back to the corridor and use the broom on the storage locker ( l2 ) to clean house them and start out a oppose miniature puzzle ( see image below for solution ) . When complete , you ’ll get aRope with Rock . Move back to the crossing , use the rope with rock on the Sir Herbert Beerbohm Tree ( j4 ) , then pull it in by clicking the circle to get theSpring .
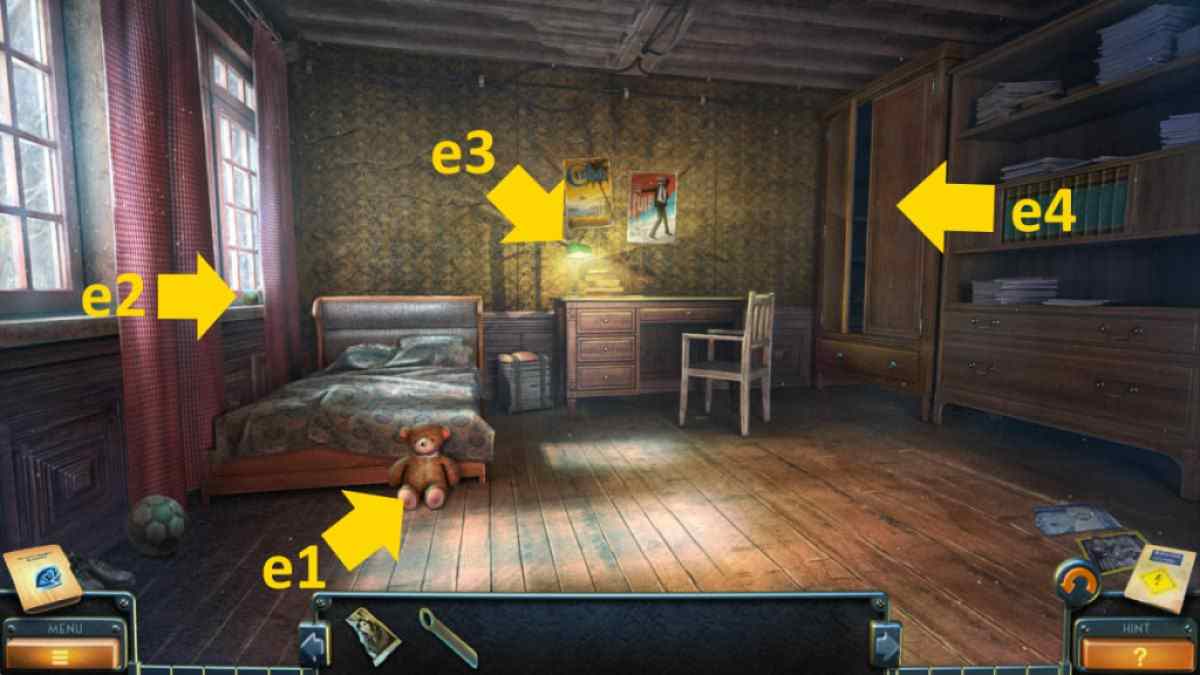
Image by Pro Game Guides
Take it to the backyard , add the spring to the corner ( m4 ) , and move the fountain to the right situation ( you got the clue on the glass ( at l3 ) - it is bottom , top , halfway , top ) . Once it opens , come home around inside to get youreighth Planetand aScrewdriver .
The third puzzle
In the boarding schoolhouse yard , use the screwdriver to start the mailbox and get a third puzzle musical note and aChess Piece . Go back to the teacher ’s room next and lend the chess piece to the board ( q1 ) , clicking the piece again to move it . This open a compartment , from which you take aRazor Blade . employ it on the patch on the pillow ( q2 ) to get aPigeon Figurine .
colligate : Abandoned Walkthrough & Puzzle Solutions
Move across Ithiel Town to under the bridge and apply the pigeon figurine on the wall ( f5 ) , take theBuddha Statuefrom the cupboard . Take this to the cafe and use it on the door ( o2 ) to begin a missing object teaser .
Screenshot by Pro Game Guides
Take theScissors(r1),Hand Fan(r2),Ladle(r3),Tape(r4 ) , andDynamite(r5 ) . expend the scissors to unfold the box ( r5 ) and the ladle inside to get aLadle of Ashfrom inside the box . Grab theStick(r6 ) and use it to get theTongs(r4 ) . Now use the rooter to get the coal burn ( r3 ) and apply the pair of tongs to get aCoal .
Put the dynamite next to the safe ( r1 ) , click it again to stand it up , and use the tape to bond it to the secure . Now use the ash to make a fuse running from the safe in the same stopping point - up . Ignite the fuse with the coal to bluster the dependable and get theDragon ’s Head . total that to the dresser ( r7 ) and get theOil Can .
Finding the final leaf
employ the rock oil can on the roundabout in the backyard ( m5 ) , which moves it , allowing you to take theWindow Handle . Move to the corridor , use the handle on the window ( l3 ) , and take theSpatula . you could now go back to the instructor ’s room and use the spatula on the back wall ( q3 ) to fully divulge the out of sight door and get thefinal ( 13th ) Leaf .
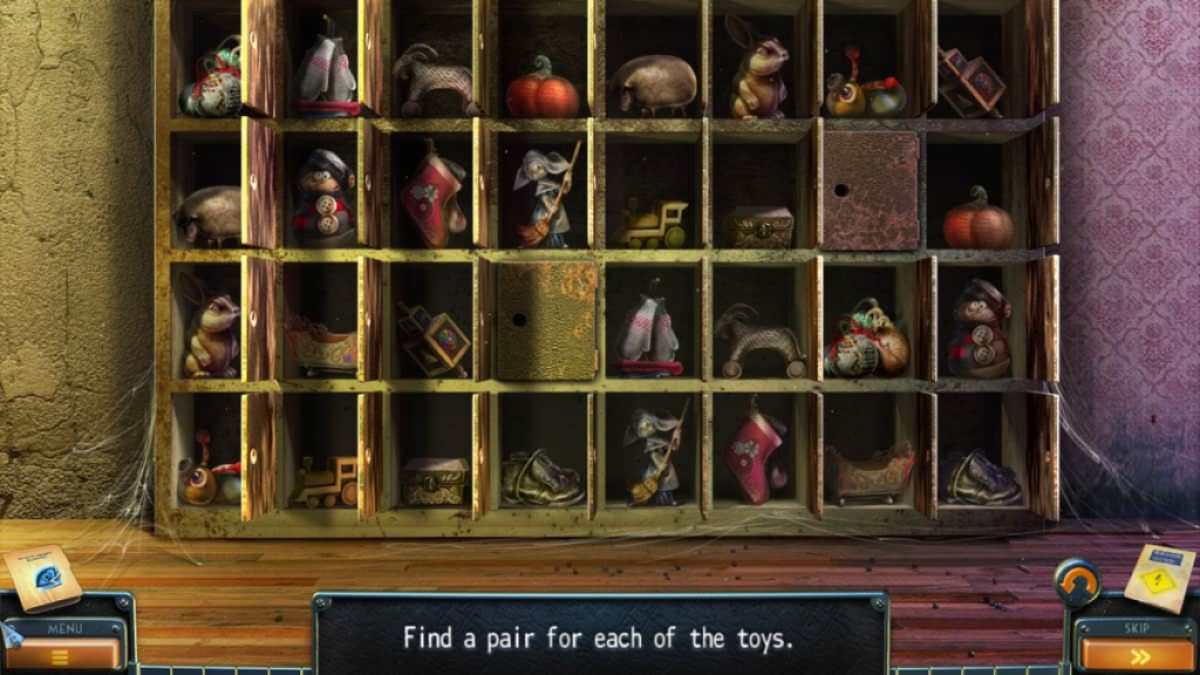
flick the bedside lamp in the children ’s bedroom ( p7 ) , select the al-Qur’an , and tote up the leaves for a simple material body puzzle . Once completed , you ’ll get aPhotoof how the toy ledge needs to be order . Clci the shelves ( p8 ) , add the picture , and rearrange the toys . Once done , you ’ll be able to take thePuzzle piece .
take the puzzle box ( p1 ) , add the art object , and restore the images . They need to be in the right order : tractor top impart , dolls top right wing , horse cavalry bottom left , lane bottom right wing . Then just click two objet d’art to switch them . You ca n’t go wrong , and piece of music go blue once in the correct spot . you could also use the bits of the puzzle showing out of the side for guidance . Once done , you may take theLadderfrom inside the box .
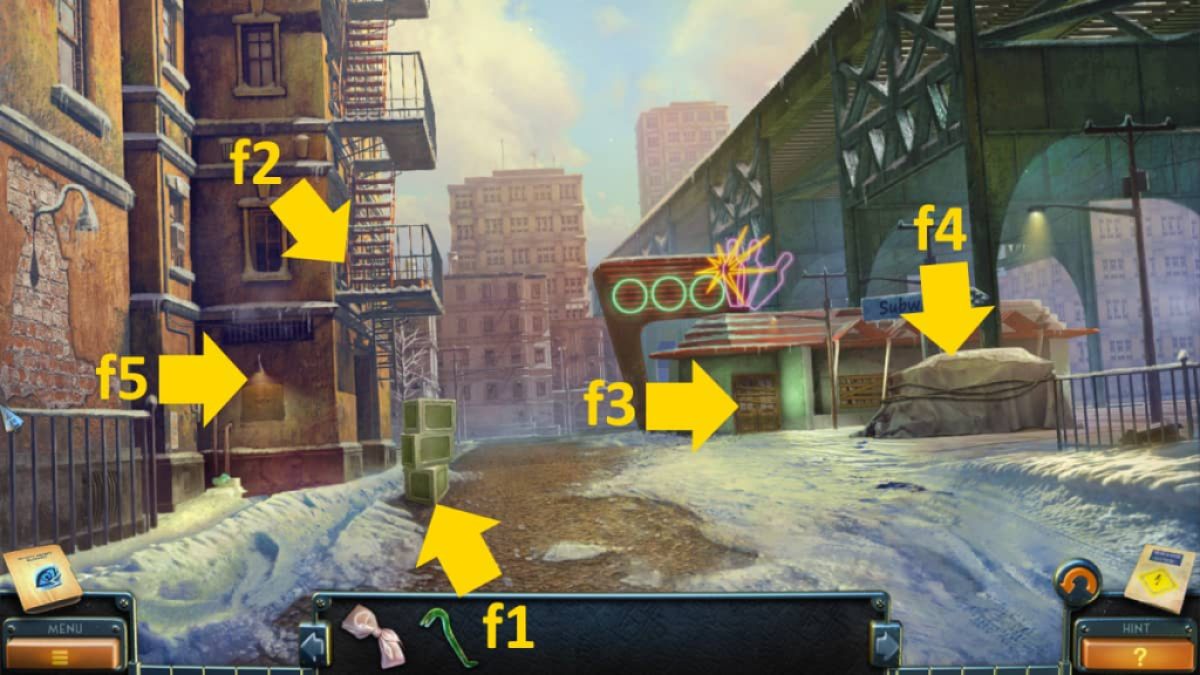
Image by Pro Game Guides
The Hunter’s Cabin puzzle
Back at the hunter ’s lodge , expend the ladder to get to the cabin ( n4 ) and start up the final particular - matching puzzle . Move the hay ( s1 ) and get aDart , then project it at the dartboard ( s2 ) to reveal a compartment . Take aDiscfrom inside . Click the apples ( s3 ) until you find theWeight , and take theKnife(s4 ) from the board . Use the knife to open up the tin ( s2 ) and get theTusk .
Related : Escape the Bathroom Walkthrough
Get a close - up of the animal nous ( s5 ) and take theScale Bowl , then tot up the tusk . Add the bowl to the scale ( s4 ) , tot up the Isle of Wight , and take thesecond Discfrom the privy compartment . Add the two discs to the cupboard ( s6 ) , then rotate the closed chain to open up it and get theTongs . Grab theRifle Butt(s7 ) , use it to trigger the yap ( s8 ) , then take theHookfrom the antler ( s9 ) .
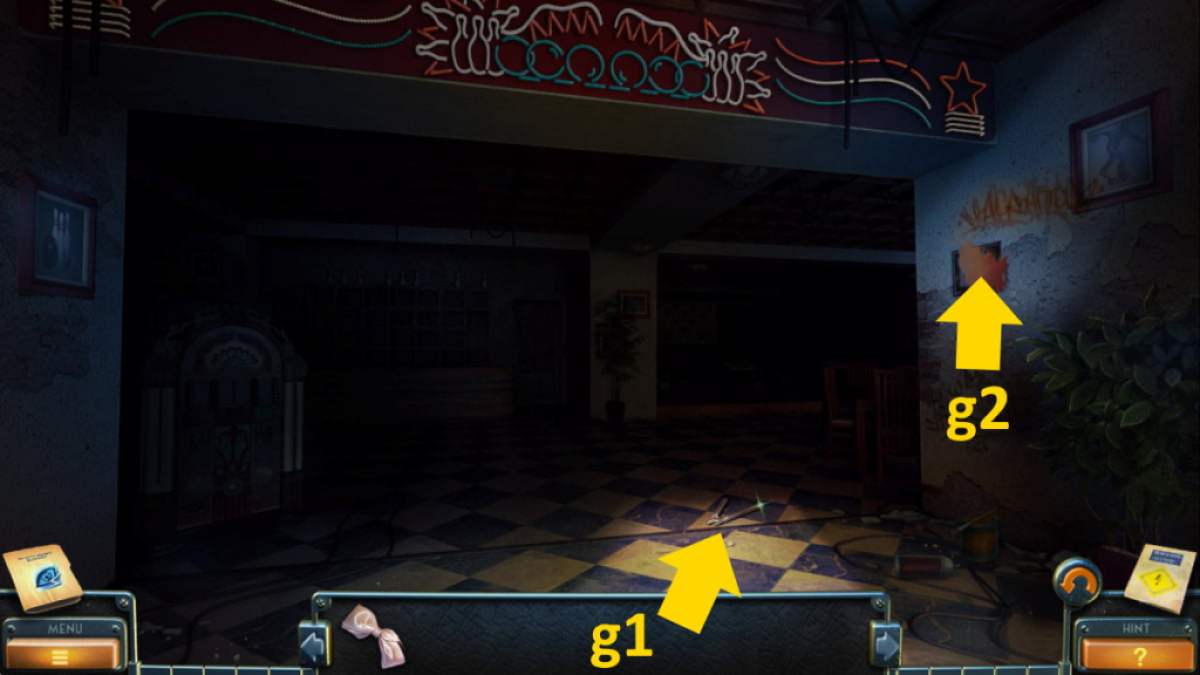
Image by Pro Game Guides
append the hook to the chain ( s1 ) , and fall into place it again to connect it to the hatch , then move to the animal head close - up above it . Select the animal head , get through the tusk you added to rear the chain , and use the tongs to open up the gob inside the hatch . Take yourfinal Planetfrom inside the box .
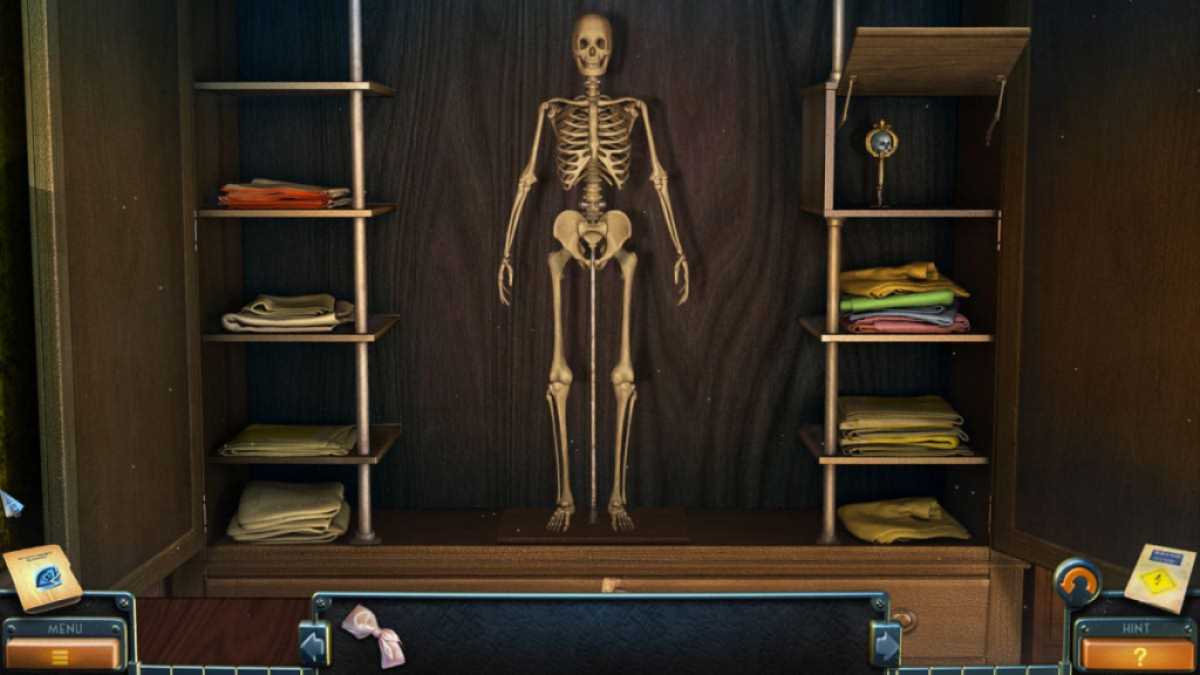
The skeleton puzzle
Add any stay on planets you have in your inventory to the planet good example ( d1 ) , then take theSkullwhen the simulation opens . Next , fall into place the wardrobe in Hugo ’s room ( e4 ) and add the skull to originate a skeleton puzzle ( see the look-alike above for the stark skeleton ) . Once done , take theKey .
All that remains to do is to return to the instructor ’s elbow room , open up the secret door ( q3 ) with the key , and fill out the clod - rolling puzzle . It ’s simple right , left-hand , right , left , etc . , until it falls out the bottom . Now , you could start the doorway to discover the fate of the missing missy and complete the biz .
For more puzzler game guide , check outOn Thin Ice – Full Walkthrough & SolutionsandHaunted Hunt Walkthrough – Adventure Escape Mysteriesright here at Pro Game Guides !
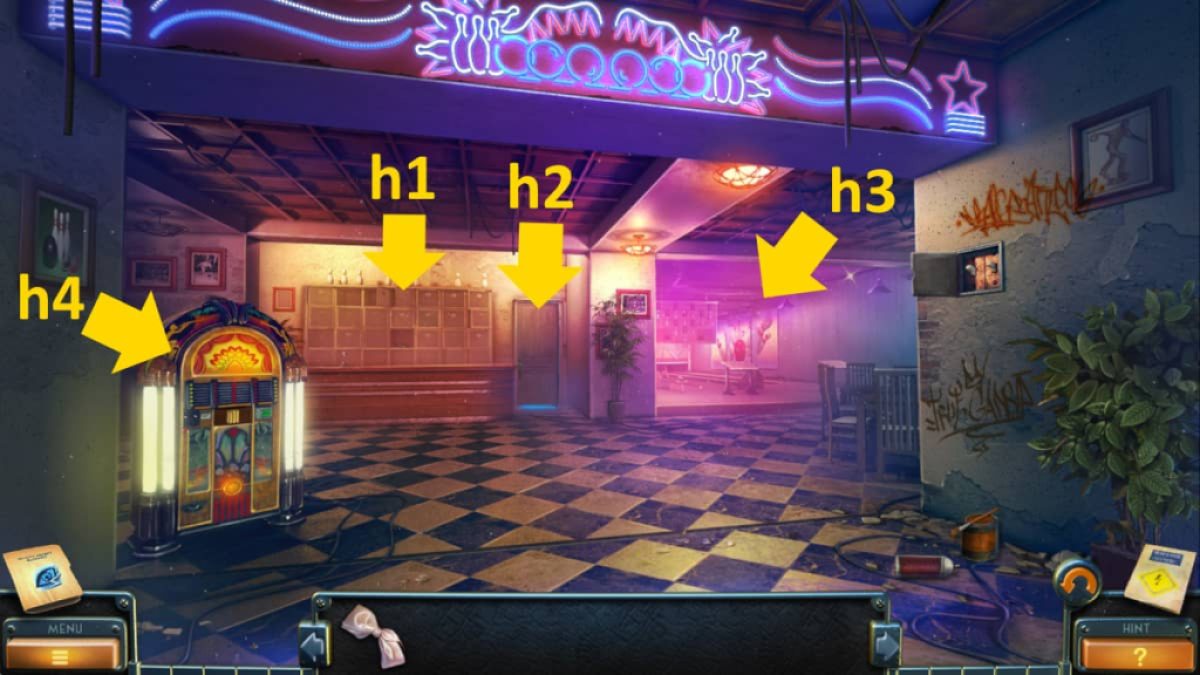
Image by Pro Game Guides
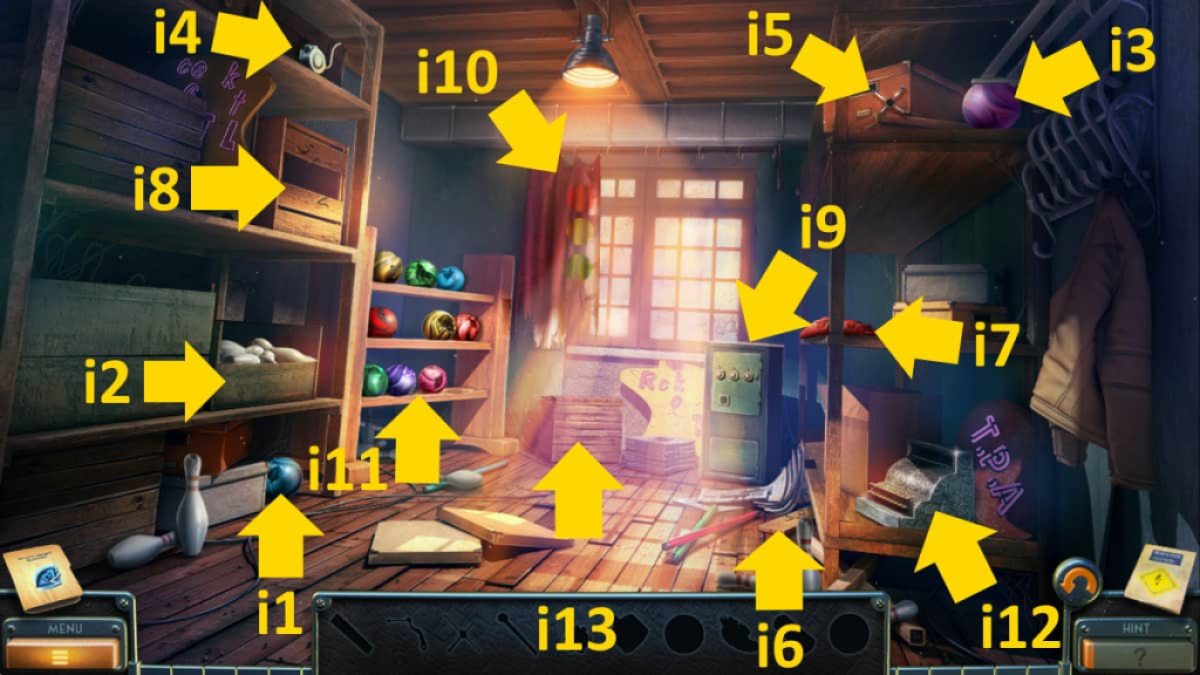
Image by Pro Game Guides

Image by Pro Game Guides
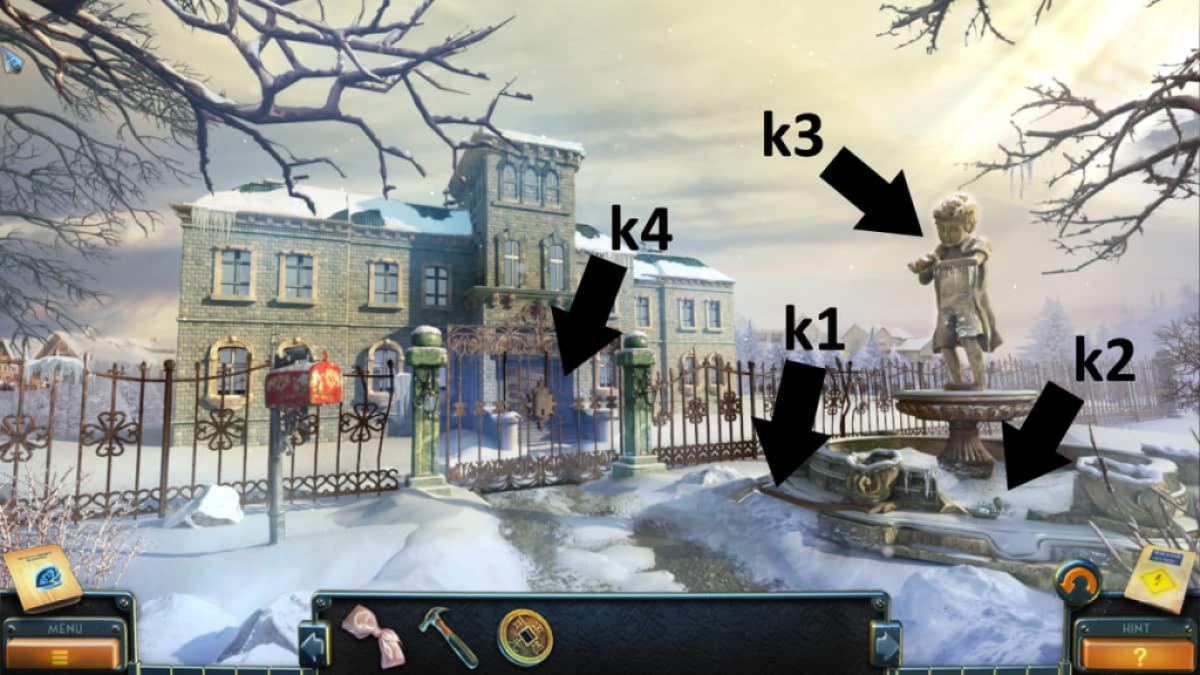
Image by Pro Game Guides
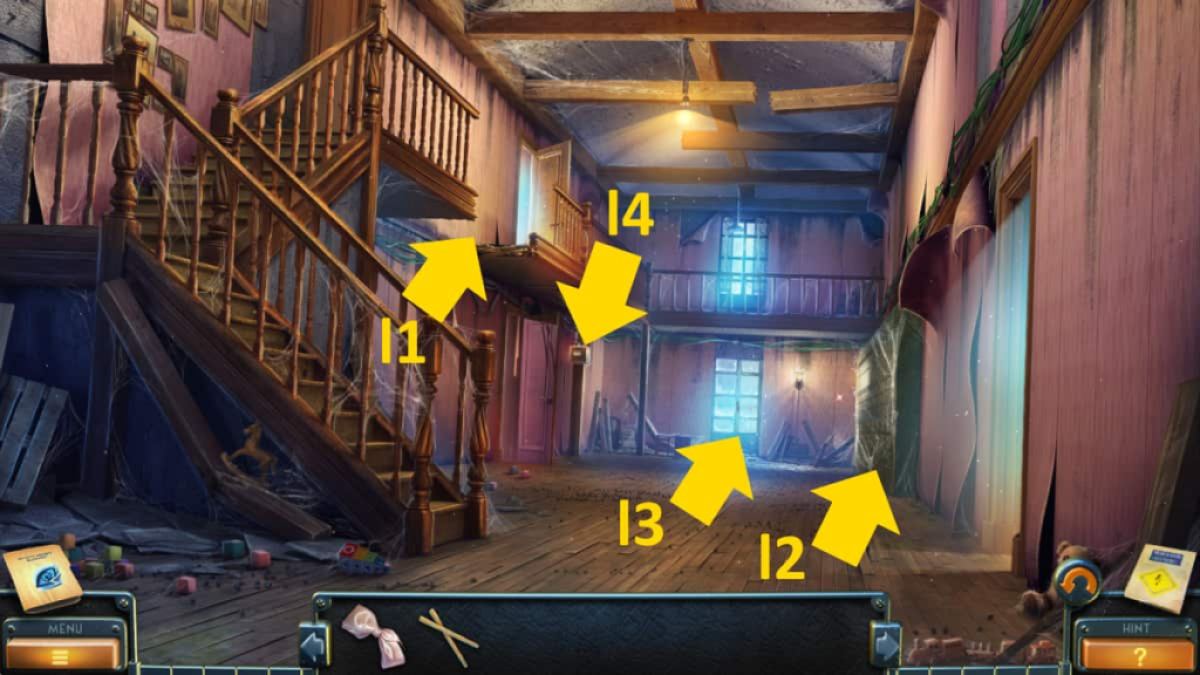
Image by Pro Game Guides

Image by Pro Game guides
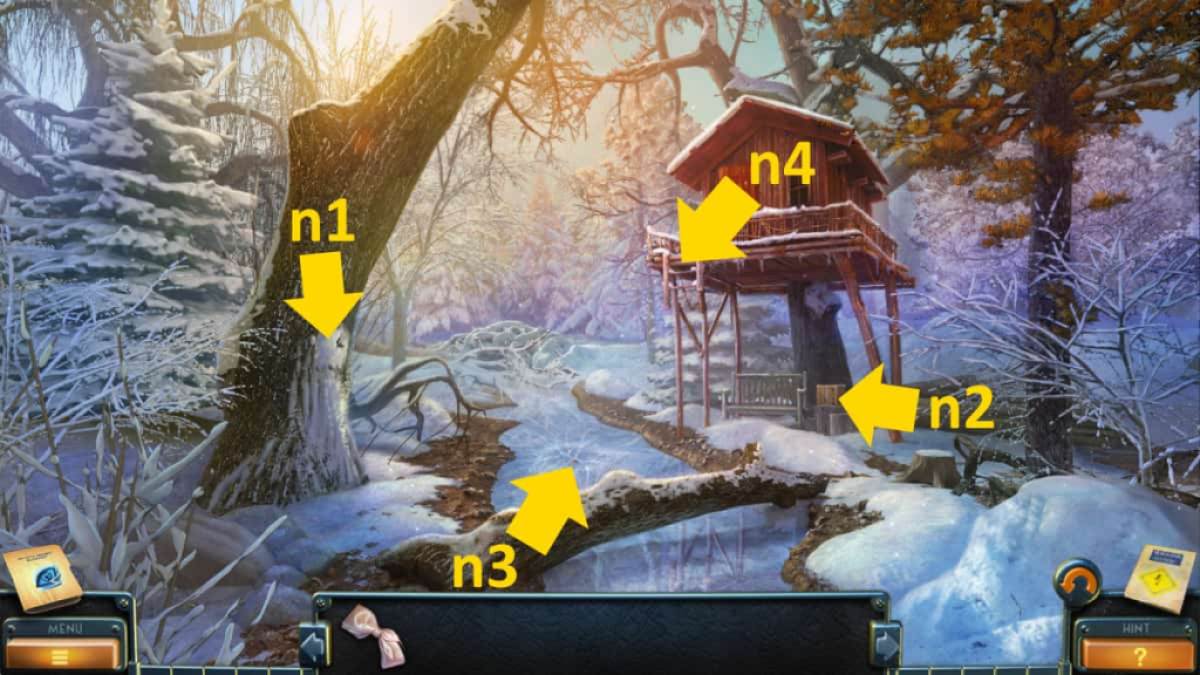
Image by Pro Game guides
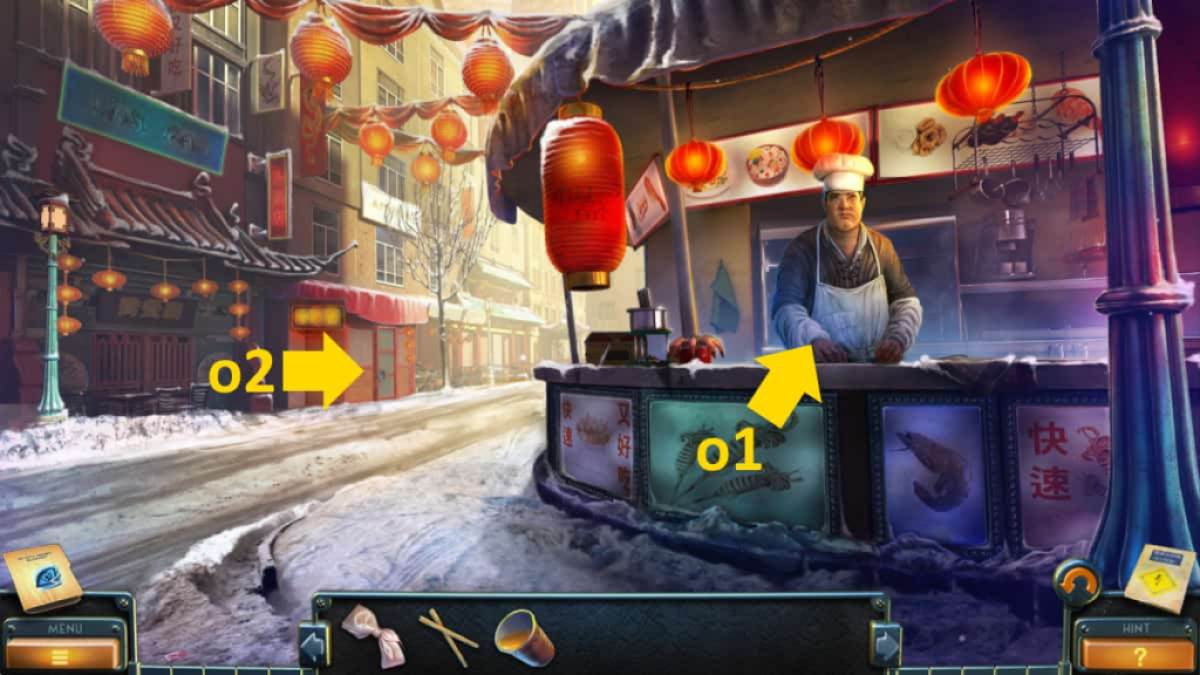
Image by Pro Game guides
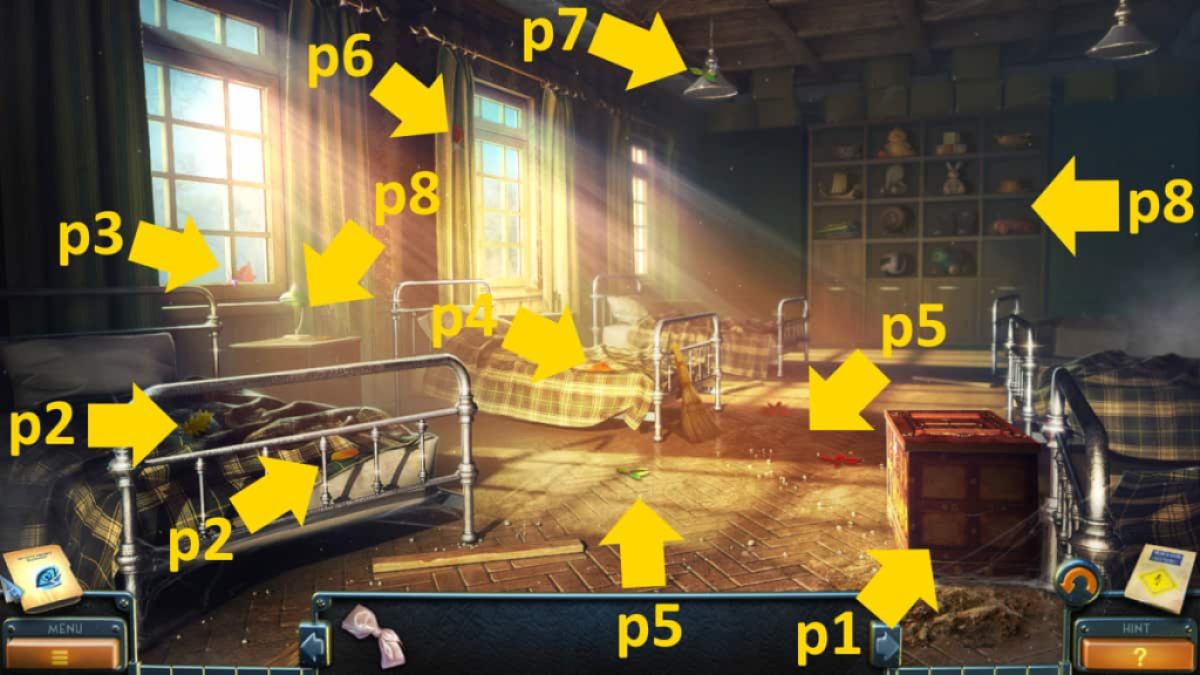
Image by Pro Game Guides
Screenshot by Pro Game Guides

Image by Pro Game Guides

Image by Pro Game Guides

Image by Pro Game Guides
Screenshot by Pro Game Guides
