Hunting the alchemist .
I love testing my wits against a bang-up escape room and Room Escape : Strange Case is one of the more fun ones I ’ve tried recently . The art flair is cool and the teaser are both original and interesting . Read on for my full walkthrough .
Room Escape : Strange Case is a Mobile River and internet browser breaker point - and - click teaser where you ’re attempting to lick a closed book . feel and flux aim , gun trigger and solve puzzles , and fill in the case . It has manyclassic practical escape roomtropes but with some fun supernatural twists .
Room Escape Strange Case - Full Walkthrough
There are four areas in each chapter , some of which also have a way or two coming off of them . Click the arrows on the left and right of the blind to move between them . I ’ve given each room a descriptive name below so you may easily identify them .
Room Escape Strange Case, Chapter 1 - Machine
Go to the armchair panorama . peck up theWhiskyandGlass(a1 above ) , then select the pic on the same table and complete the sliding puzzler . Once ended , the rima oris opens on the picture . Click it for a close - up to see the numbers ( 2 and 3 ) and two symbols next to them .
Go to the door , wait at the calendar close - up ( b1 above ) , and again note the symbol and number ( 1 - 9 ) combinations . Go to the room with the bookshelf , click the secure ( c1 below ) , and infix the number codification as it match the symbols scratch on it ( 2 - 1 - 3 - 9 ) . When the dependable opens , take theKeyand theAlcohol Burner .
Go to the elbow room with the side arm poster and piece up theFlask(d1 below ) , then snap the bill sticker ( d2 ) for a close - up and note the letters on the heater ( B - T - S - F - P - N ) . Also , use the key on the draftsman of the tabular array ( d3 ) and take thePills .
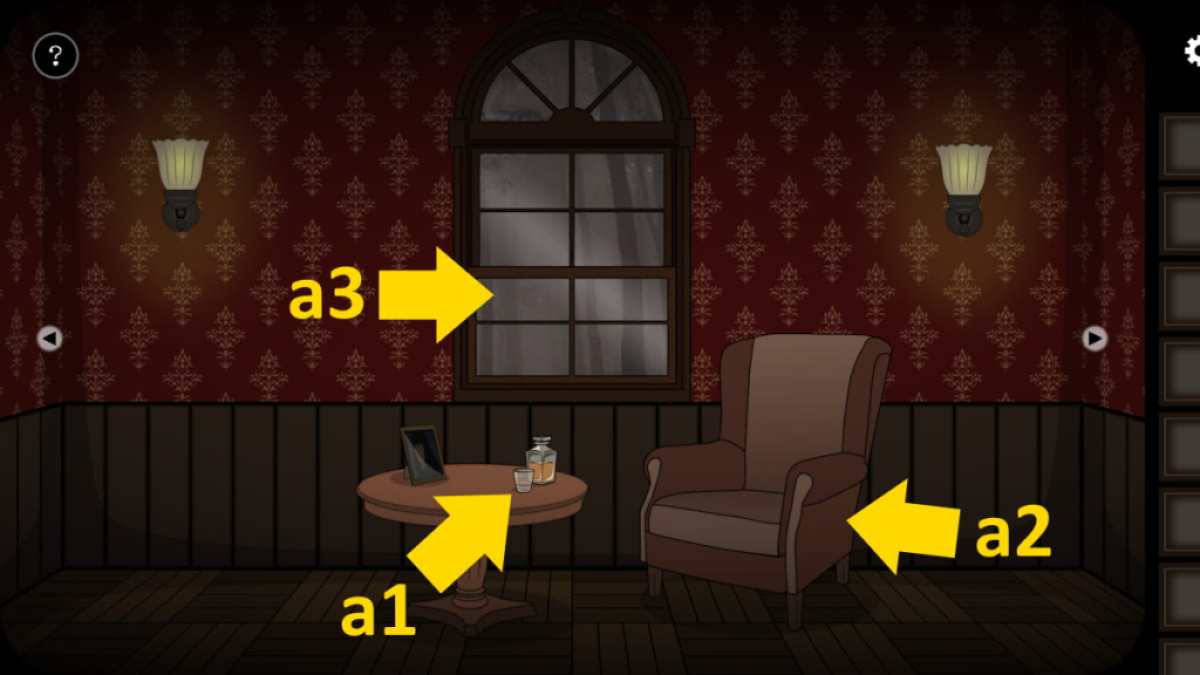
Image by Pro Game Guides
Go to the bookshelf , get across the calamitous and naughty book for a stuffy - up ( c2 ) , and put the books in the above order . Once done , collect theMatches .
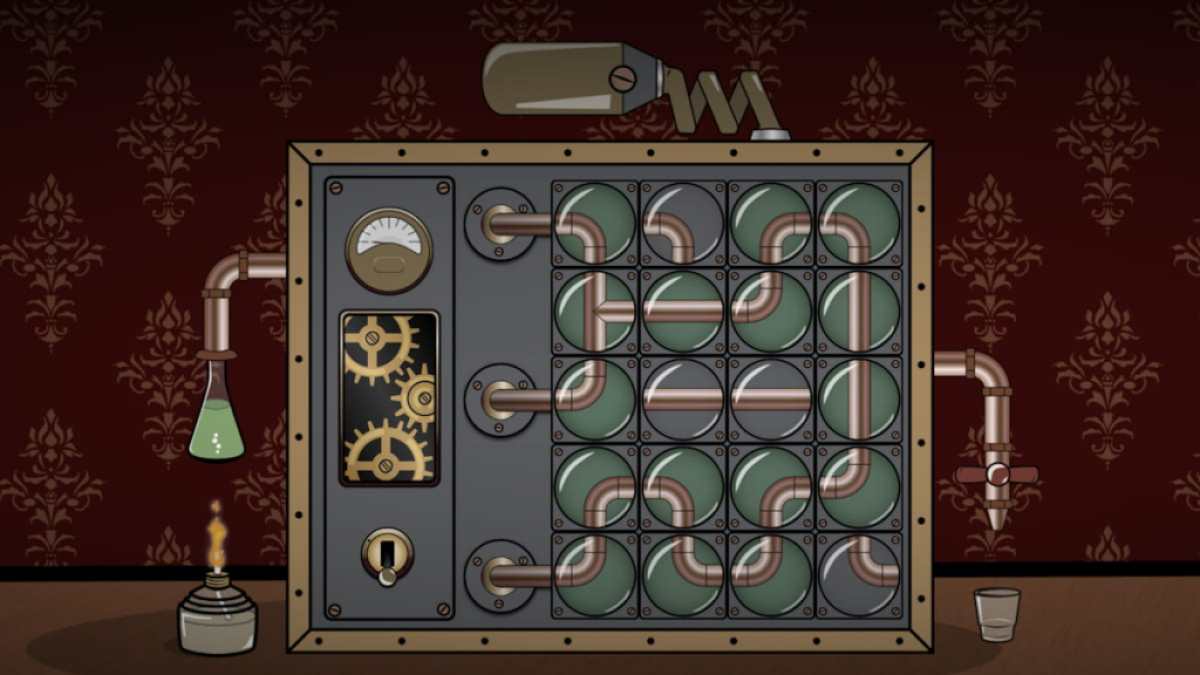
Select the auto on the table ( d4 ) and add the flaskful to the nozzle on the left hand and the glass under the one on the right field . Put the alcohol burner below the flaskful , add some whiskey , then use the matches to illumine the burner . bestow the pills to the flask , then contribute whiskey to the flask . Now create a incessant flow by get through the pipes ( see image above ) . Turn the right hooter above the looking glass , and switch the machine on . Take theGlass with Strange Liquid .
Entering Ghost Mode
Go to the bookcase image , click the mirror ( c3 ) to see yourself reflected , and utilize the glass with foreign liquidness on your reflection to get the Ghost Vision ability . With Ghost Ability enable , take theRunetucked in the side of the mirror in the same close - up . Click back on the open safe to get asecond Runefrom indoors .
Go to the pistol poster ( d2 ) , get a close - up in Ghost Mode , and you ’ll see a skeletal hand in the top left of the epitome . Click the top left over corner of the poster to peel it back and take theKey . In the door room , observe the skull parliamentary procedure to the right field of the door ( human , shuttlecock , human , fauna , chick , brute ) .
practice the Francis Scott Key to enter the cupboard doors below the bookshelf ( c4 ) and take theSkull , Screwdriver , andKnife . Put the skull on the empty rod on the top shelf of the bookshelf ( c5 ) , then click the skulls in the rules of order you take note from the door ( above ) . Take theEyefrom the human skull .
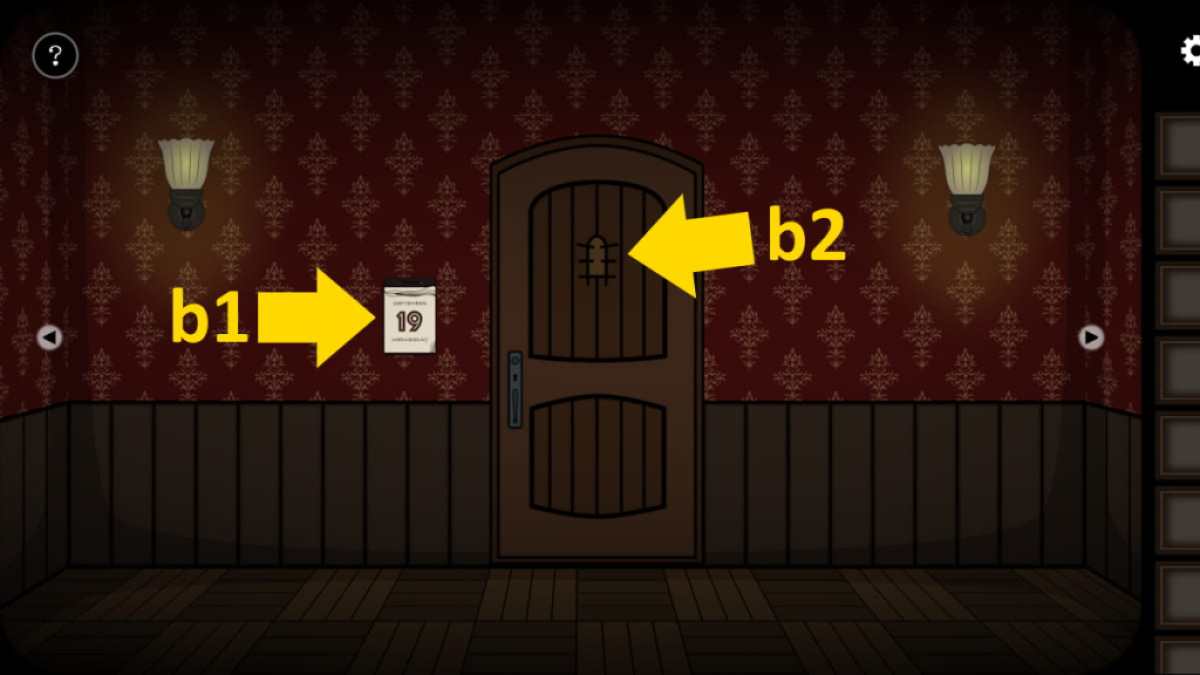
Image by Pro Game Guides
The final runes
In the armchair room , look at the chairperson ( a2 ) in Ghost Mode to see a tear in its side . Use the knife on it to get athird Rune . Now go to the machine in the shooting iron poster room ( d4 ) and use the screwdriver on the machine sticking out of its top . catch thefourth Runefrom it .
Go to the doorway , tick it for a close - up ( b2 ) , then supply the center and four runes . Note which rune the eye is depend at and clack it . Keep doing it until the eye vanish , unwrap six melodious notes . Go back to the skull on the bookshelves ( c5 ) and toy this tune ( you ’ll notice that when you click a skull , it has a note match those on the door ) . The order ishuman , dame , human , birdie , animal , human , animal . Take theFingerfrom the animal skull .
Click the windowpane by the armchair ( a3 , in Ghost Mode ) and add the finger to the zombi ’s hand . Take theKey . Use the key on the threshold ( b2 ) , then click it again to open it and progression .
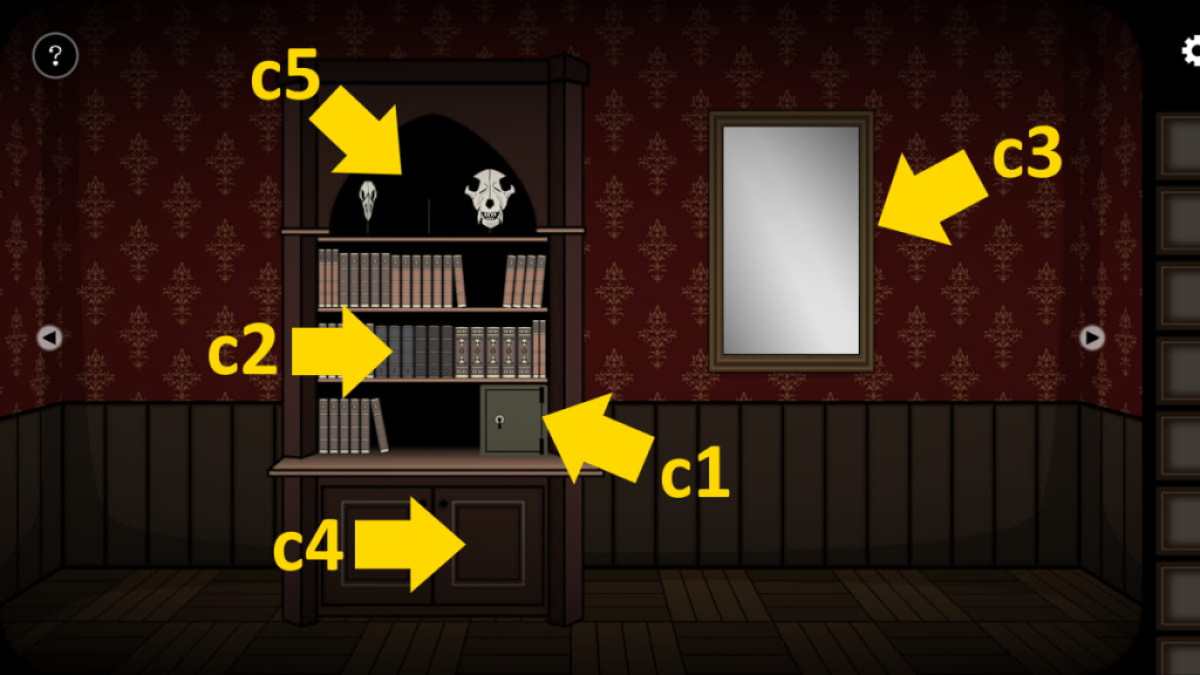
Image by Pro Game Guides
Room Escape Strange Case, Chapter 2 - After Death
In this chapter , Ghost Mode makes the hospital instead appear as a keep . Note the wording used below to see which mode you need to be in at any given time .
Related : How to beat Trace Escape Room – Full Walkthrough
Click the lab coat hanging in the locker elbow room ( e1 ) and take theKeythat declension . In Ghost mode , take theWoodfrom the same room ( f1 ) and then take theStonefrom the double doors elbow room . Click the woodwind burner ( f2 ) here for a stopping point - up , add the woodwind instrument , then apply theMatcheson top of the burner to light it ( then exit the burner door ) .
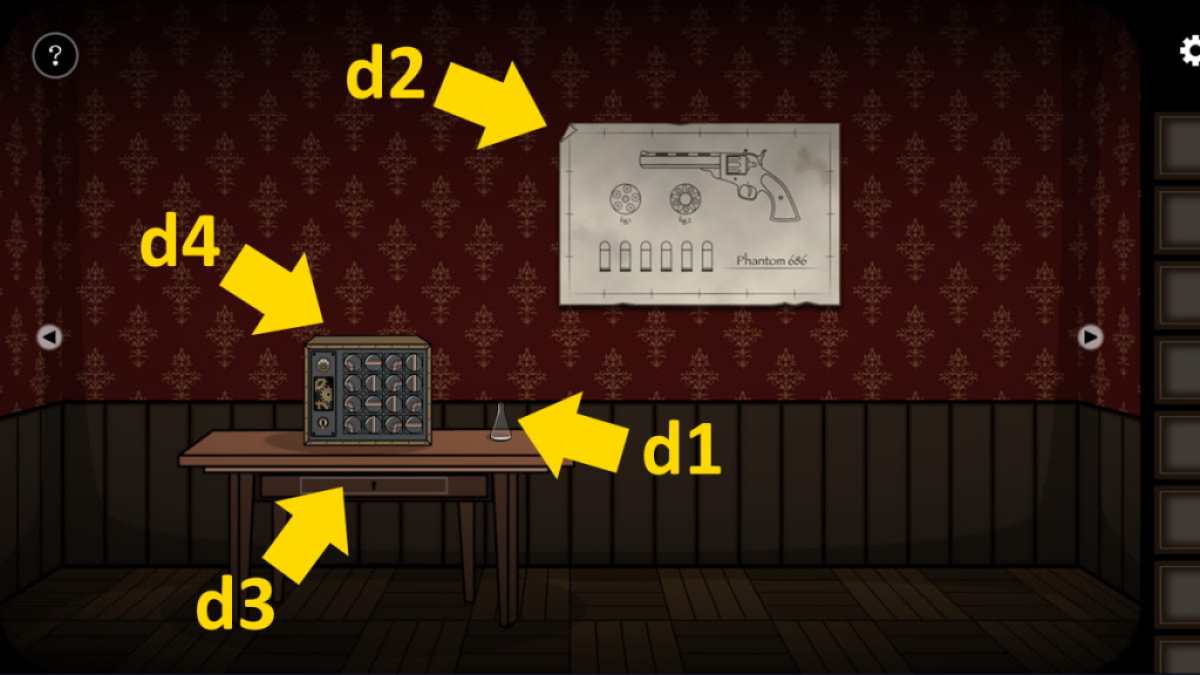
Image by Pro Game Guides
Still in the dungeon , enter the threshold next to the one lug by stone into a lab , then switch back to normal mode . Use the key to launch the desk draftsman ( g1 ) and take theScrewdriver . Also , take theIce Cubefrom the fridge ( g2 ) .
The red glass
Back in Ghost Mode riposte to the burner ( f2 ) and use the methamphetamine hydrochloride cube on it to disappear it and get someRed Glass . Return to normal and go to the way with two threshold where one has a keypad ( h1 ) . Get a closemouthed - up , habituate the red glass to see what keys shine , and then enter the passcode ( 1 - 6 - 9 - 7 ) . Go into the room . Take theJar With Nastyfrom the interrogatory table ( i1 ) . Also , flick the broken lamp ( i2 ) for a stopping point - up and take the fuse from the exposed wires .
Now dawn the x - ray ( i3 ) and follow the instruction manual along the side . The number of squares you need to tick pauperization to be right on both sides . It ’s easiest to do the bigger 1 first ( like 3 - 1 - 1 ) . When you get it right , it will absolved ( you ca n’t fail ) . Do three of them , and a dependable will be revealed . The compounding is1 - 7 - 1 - 0(it ’s on the back of the pic on the document ( g3 ) on the desk in the room with the electric refrigerator ) . Take theGold Bar . Also , go into Ghost Mode here and grab aHammerfrom the stocks ( j1 ) .
Go to the Ghost Mode room with the electricity box seat on the paries and employ the screwdriver to launch the box ( k1 ) . Add the fuse , then click the three wires until all three line up and the door spread .
Screenshot by Pro Game Guides
Head inside , take a looking at the Word on the pedestal ( m1 ) , note the letter of the alphabet order on the pedestal ( m1 ) , and light up the candles with the mates . In terms of height , they areB5 - S3 - P4 - N2 - F1 . While here , you could also add the stone to the pentangle on the flooring ( m2 ) .
Finding the blood sample
exchange to normal mode and you ’ll be in a medical way with a chair . tick the trolley ( n1 ) and take aKeyand aScalpel . Go to the locker room and use the cay to open up the locked footlocker ( e2 ) , taking theWrench . Head back to the room with the chair , click the head twosome ( n2 ) , and use the wrench on it to get theScrew .
In Ghost Mode , go to the creepy-crawly science lab with the shelf of samples and add the one you ’ve picked up ( o1 ) . cluck the central motorcar ( o2 ) for a stopping point - up and add green liquid on the left by clicking the release on the left . The amount of green that goes in will equalise the amount of red on the right side .
Collecting the brains
You need to get the William Green to exactly the gloomy line on the fleeceable side . Alter the amount of cherry-red liquid by clicking the switches on the left over and correct side . You want one ofleft switch , leave alone side / right switch , middle , and one ofleft - midway , right - right ) . When you do , a brain will appear from the top of the auto . utilise the hammer to smash the glass ( o2 ) and pull in theBrain .
While you ’re here , put the jars into the right position by using the two icon you ’ve go steady on the infirmary paries .
Once complete , take theStatuette(o3 ) that come along .
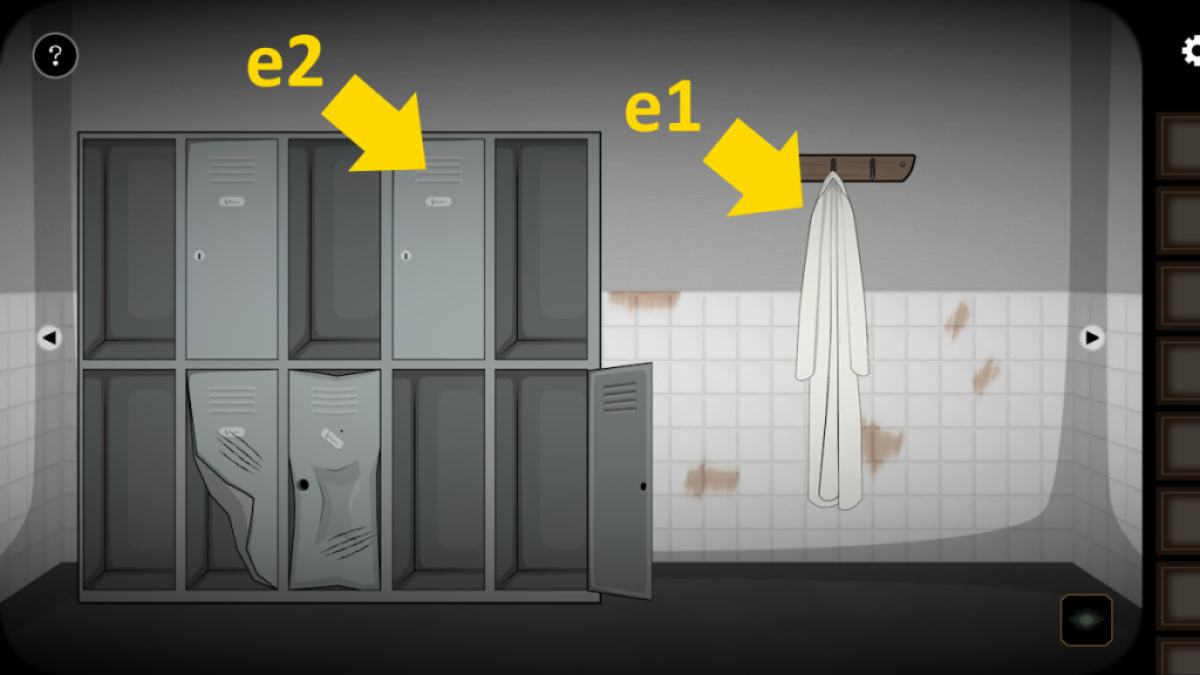
Image by Pro Game Guides
Go to the infirmary elbow room with the chair next and click the trolley ( n1 ) . supply the mental capacity to the stadium , use the scalpel on it , and take theBowl with Minced Brain . Back in Ghost mode , click the cell hachure ( k2 ) on the closed door in the room with the electrical energy boxwood . Put the bowl in , close up the hatching , and the zombie will evaporate . cluck the hatching to open it once more , and take aTooth .
Balancing the scales
In the Lord’s table way , tally the tooth to the pentagram ( m2 ) and it will be zapped and supercede with a suitcase . open up it and take theBolt CutterandGold Cross . expend the deadbolt cutters on the chains on the wall ( j2 ) in the Ghost Mode stocks way to get aChain .
Go to the hospital elbow room with the fridge and get a close - up of the scales ( g5 ) . The three need to balance , so place the keep abreast objects in the tray :
The middle of the scales will open up and you could take theGold Disk . Return to the outlet door , go into Ghost Mode , click the arch bars for a close - up , and add the disk and cross to complete Chapter 2 .
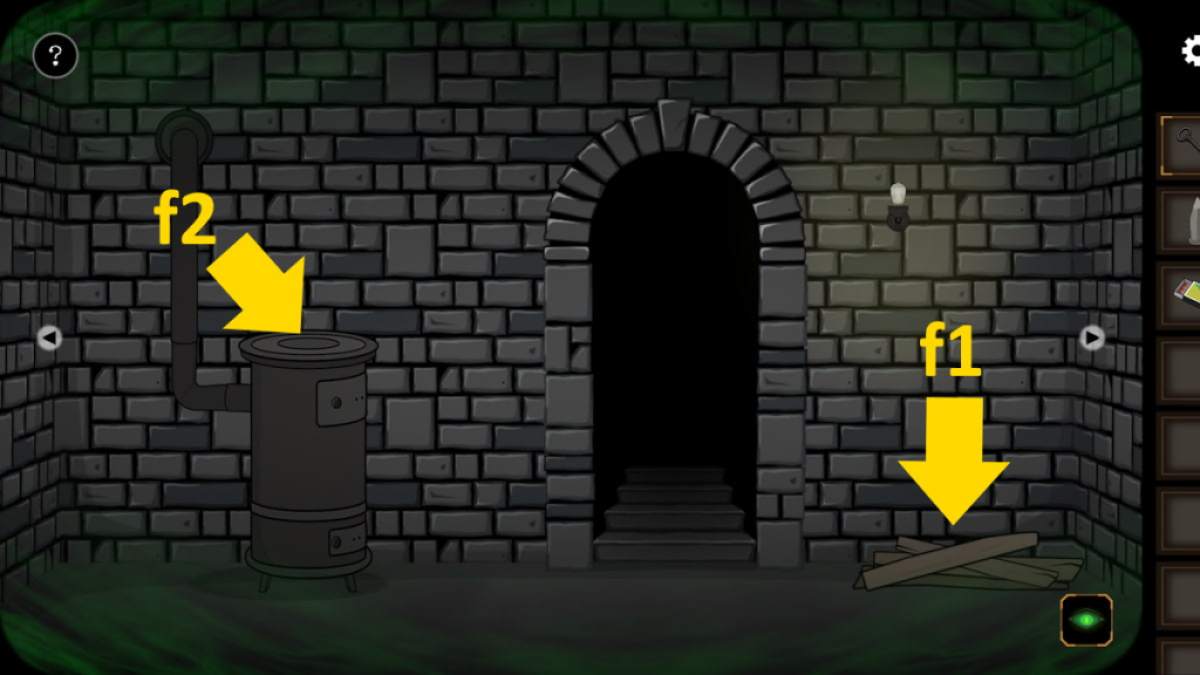
Image by Pro Game Guides
Room Escape Strange Case, Chapter 3 - Honey
get across the ladder , then the hatching , for a door latch puzzle . You need the counsel of all the arrow on the six slots to shift sides by clicking either side of the blank space to move the arrows . From left to right , click3 - 5 - 6 - 4 - 2 - 1 - 3 - 5 - 7 - 7 - 5 - 2 - 3 - 5 - 4 . Click the hatch to go up .
have-to doe with : Cafe Bacon Escape Room Walkthrough
After a cutscene , nail the three batrachian word-painting on the walls by snap one piece to shift it with another . Once done , each will be missing a art object . Use Ghost mode in the corridor with the anuran ’s crapulence image , get through the maw , and take aPicture Piece . This make out theballoon word-painting , giving you thenumber 7 .
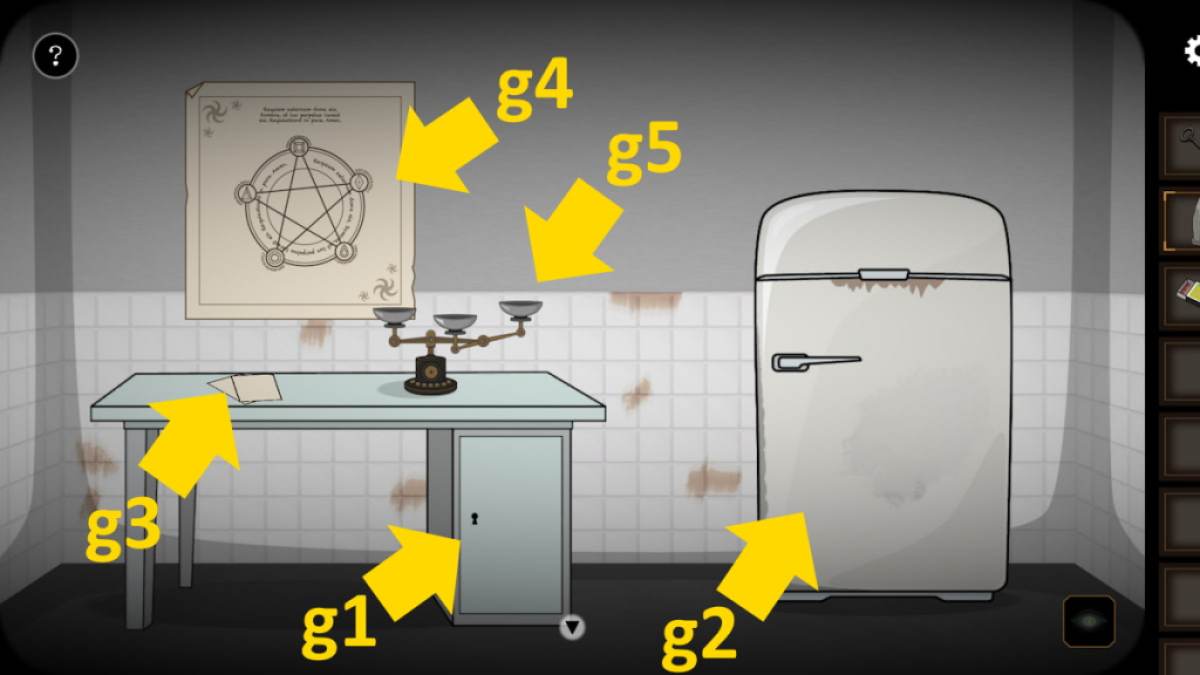
Image by Pro Game Guides
Go to the scene with two doors . participate the sleeping room ( left room access ) and clack the pillows ( p1 ) to find aKey , then open up the bedside table ( p2 ) and get someAmmo . In Ghost way , click the bear ( r1 ) and take theScalpeland theMechanismyou break under the scalpel . Also launch the crushed bedside tabular array ( r2 ) , clicking the skull inside until you get aCockroach .
You now demand to get a caterpillar from the crappy industrial plant on the left hand of the screen door ( r3 ) . Get a closing curtain - up , then flick them in the following order : ( top being 1 , one below it 2 , and the one on the offshoot 3:1 - 1 - 2 - 1 - 1 - 2 - 1 - 3 - 1 . Now you could take the remainingCaterpillar . Go to normal mode , use the cat on the healthy flora ( p3 ) , and you ’ll create a butterfly stroke .
Next , go to the subject area ( the veracious door ) . expend the key to start the top - exit desk draw ( s1 ) and getanother ikon art object . This allows you to complete thedrinking batrachian image , which disclose thenumber 4 .
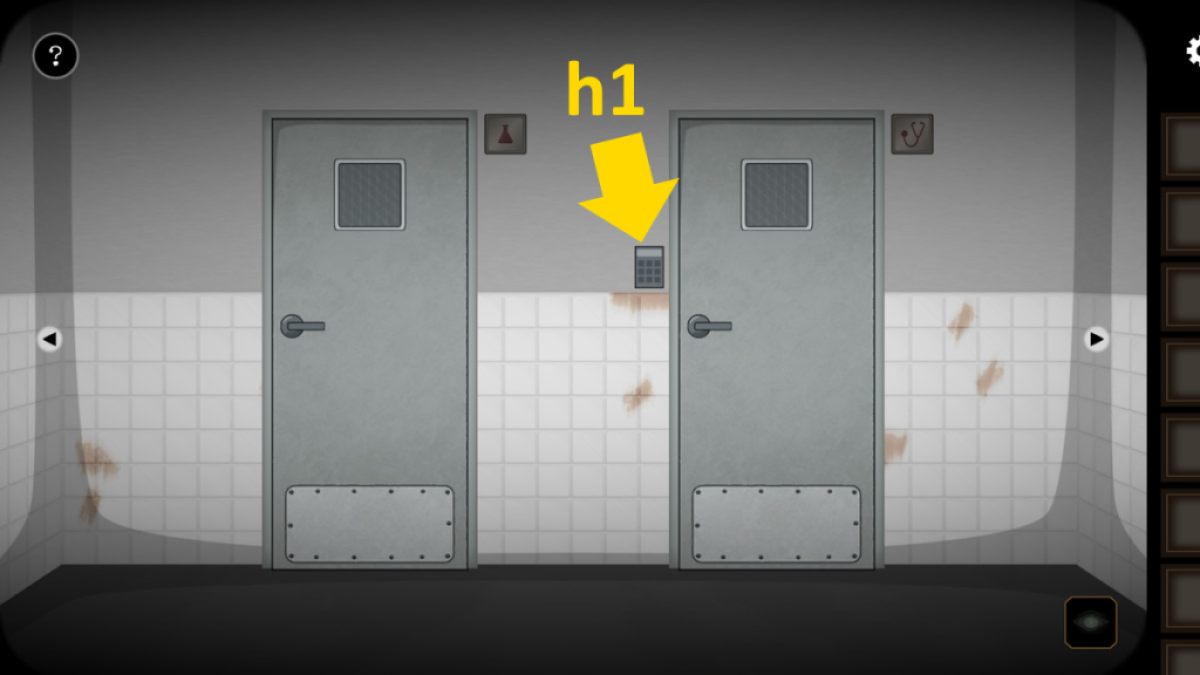
Image by Pro Game Guides
The puzzle box
There is also a teaser box seat in the top - left study drawer . To complete ( numbers above ):
The boxful opens and you’re able to take theMagnifier . Also , use the scalpel on the ruby cloth to get anotherKey . apply this new key to enter the cupboard below the left drawer ( s2 ) and take theFrame .
tick the unexpended side of the background ( s3 ) and add the cockroach to the examination stand . tick the papers to the correct side of the desktop ( s4 ) to get thelast picture sherd . Use it to terminate thecycling batrachian image , revealing thenumber 1 . Select the Project Dallas poster ( s5 ) on the wall in the study and take thePinfrom the roach .
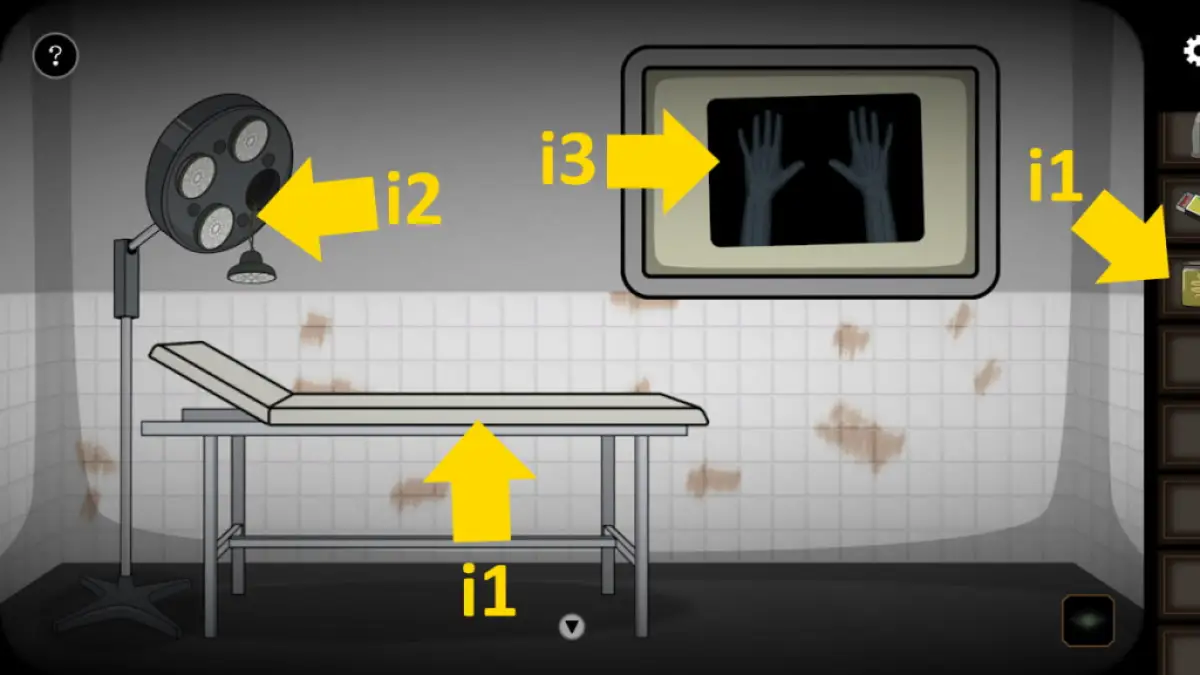
Image by Pro Game Guides
The pictures on the bedroom wall
you could use the pin tumbler in the written report to get theButterflyin the bedroom ( now on the pillows ( p1 ) ) . Click the pictures above the bed ( p4 ) , add the bod to the wall , and then add the butterfly stroke to the frame . If you look in ghost mode you’re able to see the frame order required ( square , diamond , oblong , round ) . exchange them into the correct order and take theShotgunplus your latestKey . apply the key to launch the top right - hand draftsman ( s6 ) of the study desk to get theWirecutters , Lockpick , andTweezers .
interchange to Ghost Mode and take a stone from the bottom section of the clock ( t1 ) . In the top one-half ( t2 ) , note the symbols that match the toad painting ( balloon , drink , cycle , cycle , crapulence , or7 - 4 - 1 - 1 - 4 ) . Take theClockwork Keyfrom the mechanical informer on the desk ( t3 ) , and employ the tweezers to get both theAntennafrom the rat and theBroken Keyfrom the bottom - right field closet keyhole ( t4 ) .
Back in normal manner , open up the clockface ( s7 ) and click the Roman numerals that match the toad episode ( 74114 ) . Take theCrystalfrom the surreptitious compartment . Now use the lockpicks on the bottom - right hand desk cupboard ( s8 ) , add the broken key to see how you take to neuter the cylinder .
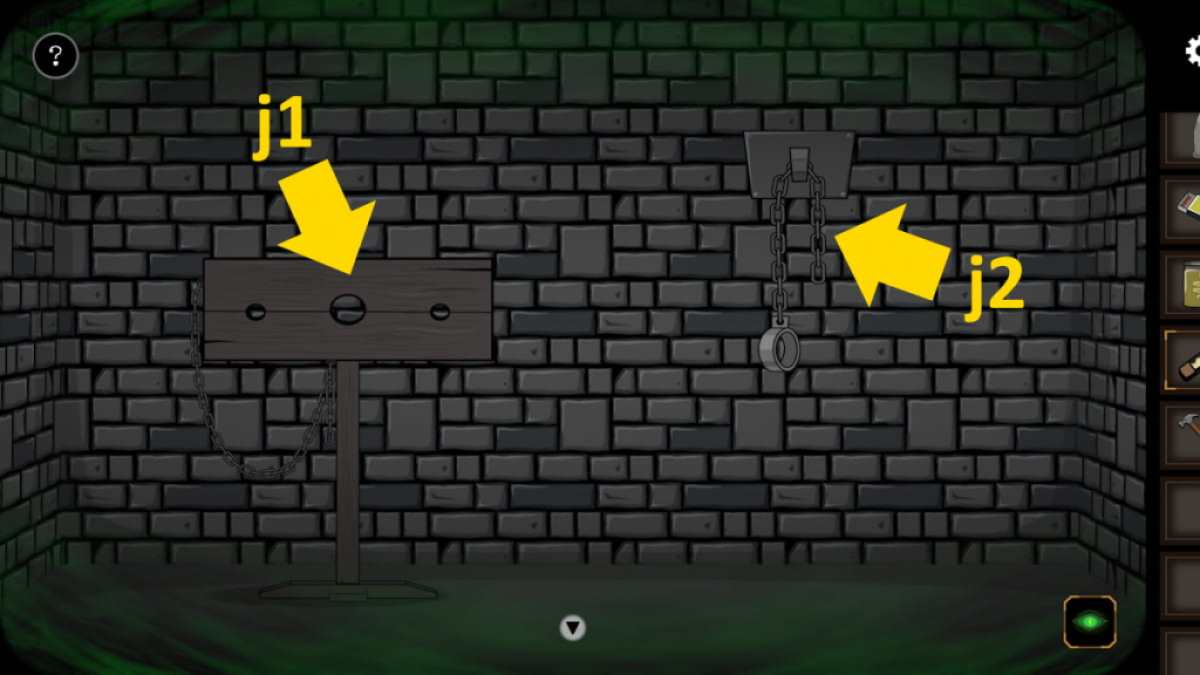
Image by Pro Game Guides
The chess puzzle
Copy the pattern to reach the draftsman , then cluck the box seat deep down to start a chess puzzle .
get across the top - good white space ( 1 ) and it will extend up , set aside you to get through the knight and move it there . Move the horse to the top left space ( 2 ) from there , then to the halfway - good white quad ( 3 ) , and finally to the bottom left blackened distance ( 4 ) . Click the king ( 5 ) and the loge will open . Take theRemote Control .
Use the stone to bankrupt the ice on the bottom section of the clock ( s9 ) and take theWooden Key . Select the top of the desk again and total the blow up glass to the contraption holding the cockroach ( s3 ) . Now habituate the scalpel for a simple timing puzzle . Once to get it right three times , the scalpel disappear . Now you’re able to add the mechanism , followed by the watch glass , antenna , and clockwork samara .
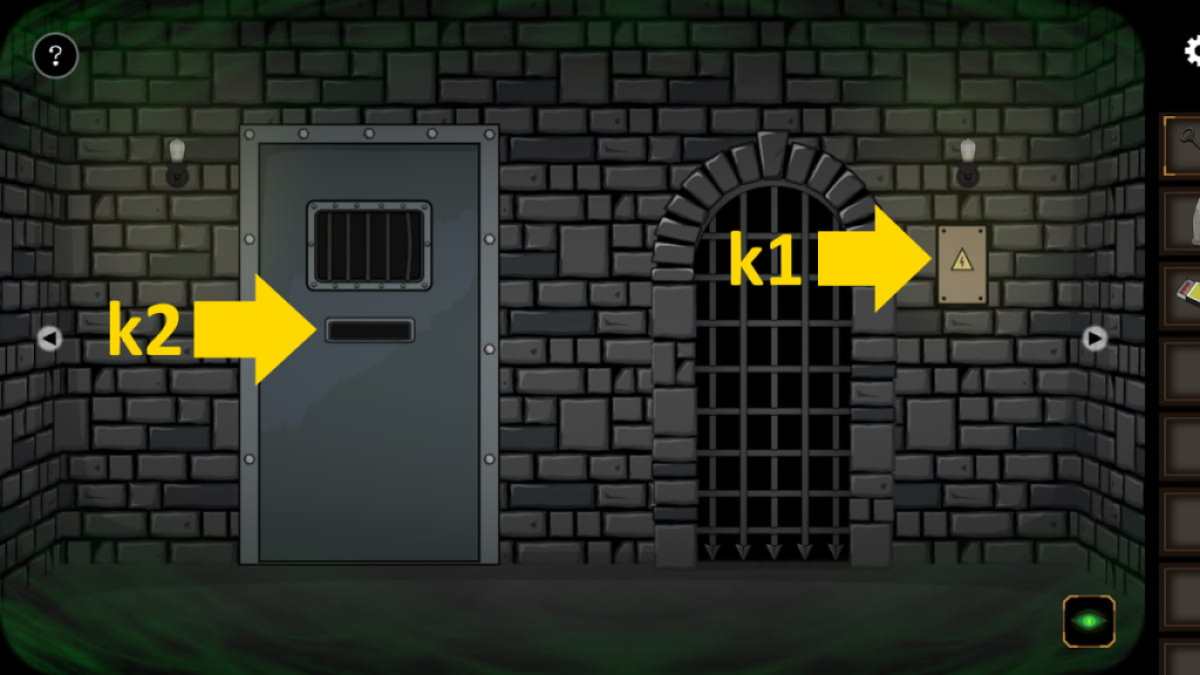
Image by Pro Game Guides
Finally , add the remote control to the closing - up . simulate the number of flashes the cockroach is giving by clicking the red button on top of the remote control the same amount of times . After a couple of right clicks , you ’ll get theRemote Control Cockroach .
pick out the rhomb gimmick in the sum of the glass cabinet ( s10 ) on the right of the room for a ending - up and add the wooden winder . slue the other pieces until you may unloosen the headstone , then penetrate the loose cabinet and take theBook of Freedom .
Controlling the cockroach
Go to Ghost Mode and click the same seemingly empty cabinet ( t5 ) for a close - up . Click the hole for an even closer penny-pinching - up to reveal a storage-battery grid of squares . Use the remote control on it to trigger off the cockroach . You need to complete three puzzle , coloring all the squares light-green by walking across them without decease over your tracks . It ’s trickier than it should be becausethe direction you labor is the fashion it is facing , not how you ’re looking at the cover .
Combining the books
Take theBook of True Formand return to normal mode . Click the bookstand on the desk ( s4 ) , add the Book of True Form to it , and then dawn it while loose to remove aPage . Now add together the Book of Freedom , then add the removed page to it . Pick up theFake Book of Freedom .
Go to the char in front of the woman and give her the book . She ’ll read it and reveal that she is the Alchemist . After the cutscene , select the scattergun and flick the alchemist . When the shotgun appear in your hands , select the ammunition and add up it to the scattergun . You ’ll now get a sliding gage and you ’ll have to snap the Alchemist twice . This then concludes Room Escape : Strange Case .
For more free teaser game walkthroughs , hold outHow to Beat Must Escape the Haunted HouseandEscape the Bathroom Walkthroughhere at Pro Game Guides !
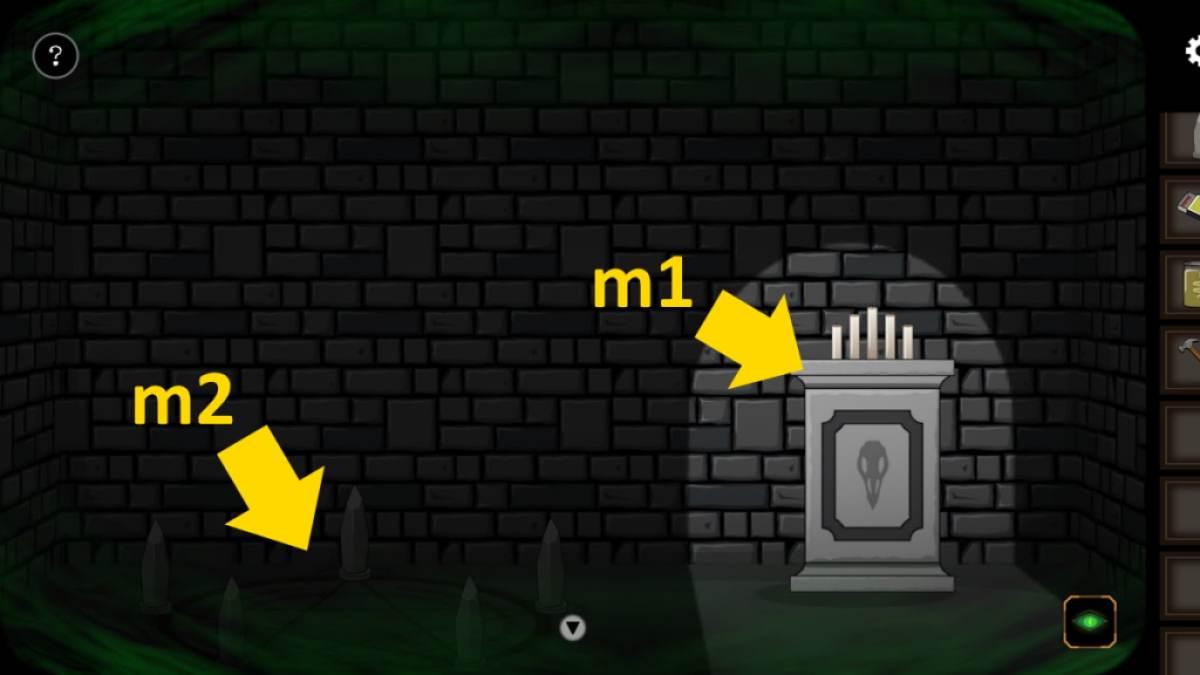
Image by Pro Game Guides
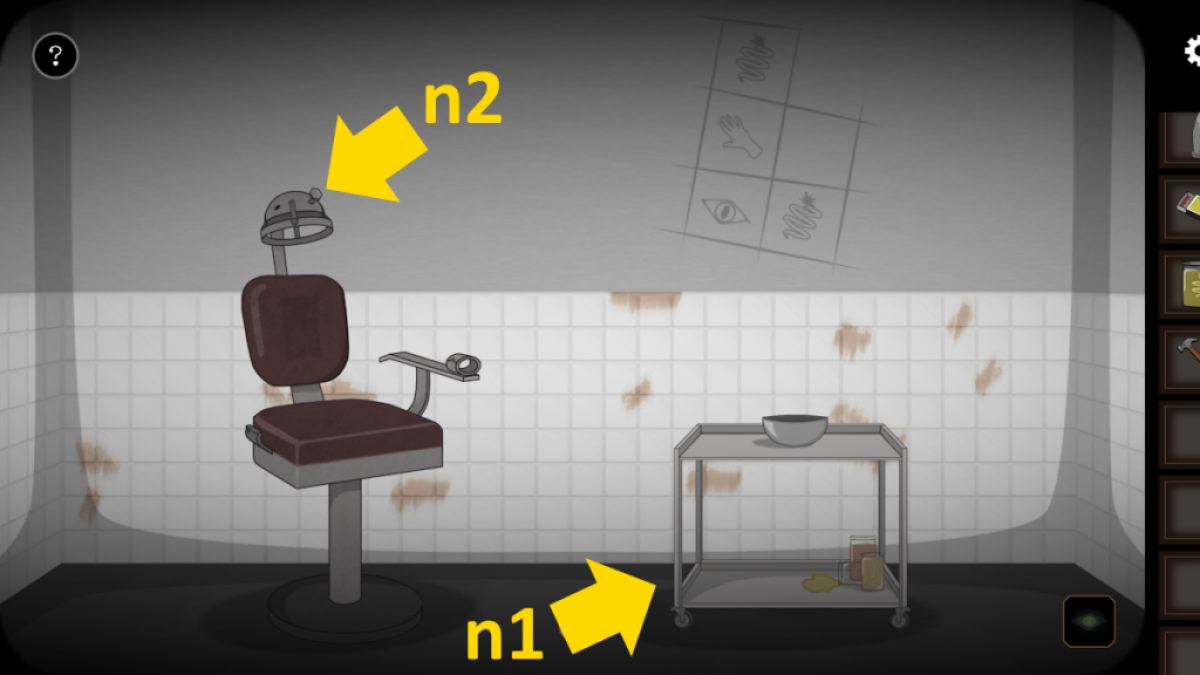
Image by Pro Game Guides

Image by Pro Game Guides
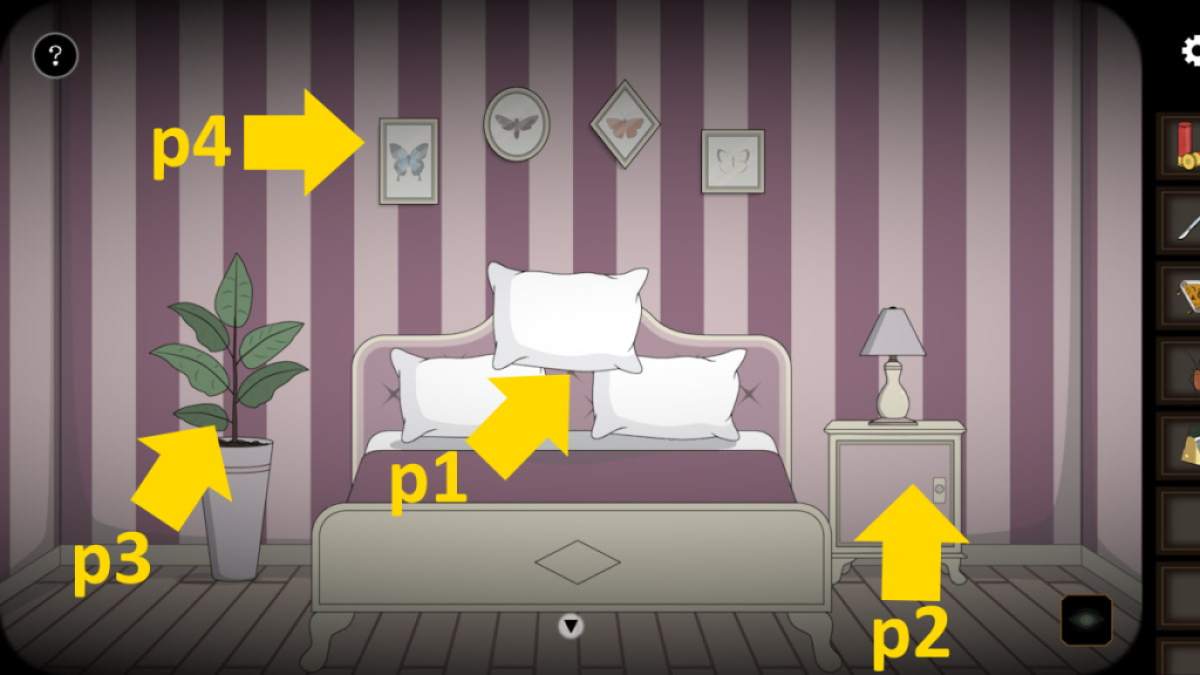
Image by Pro Game Guides

Image by Pro Game Guides

Image by Pro Game Guides
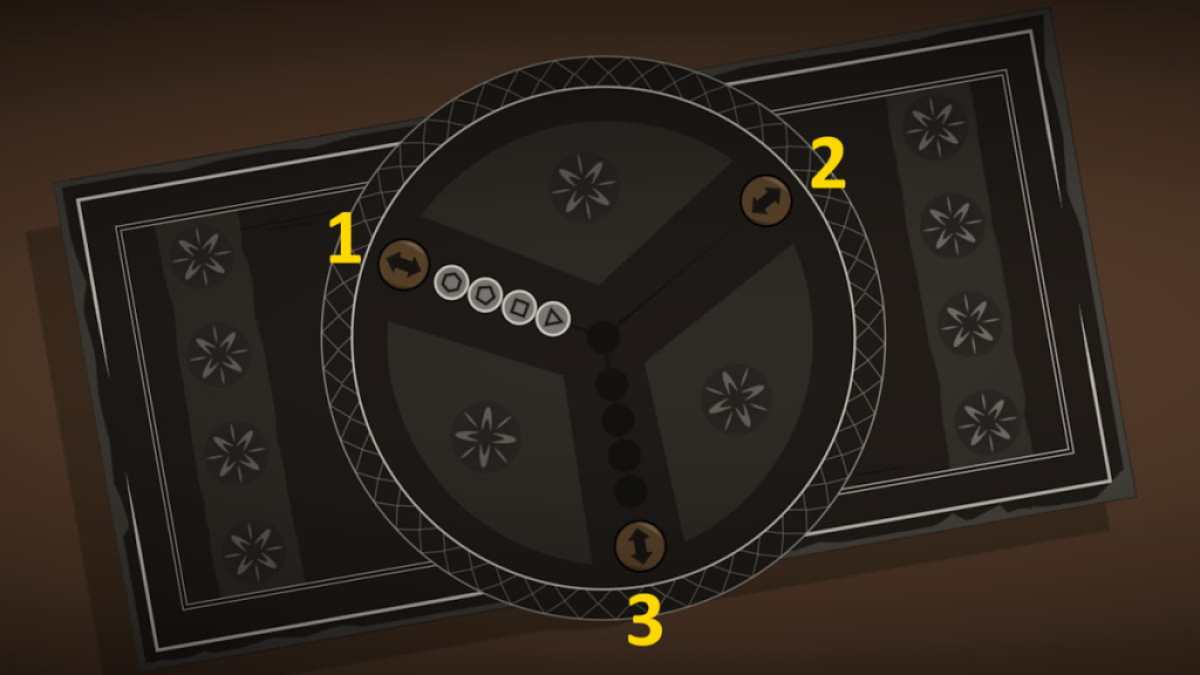
Image by Pro Game Guides
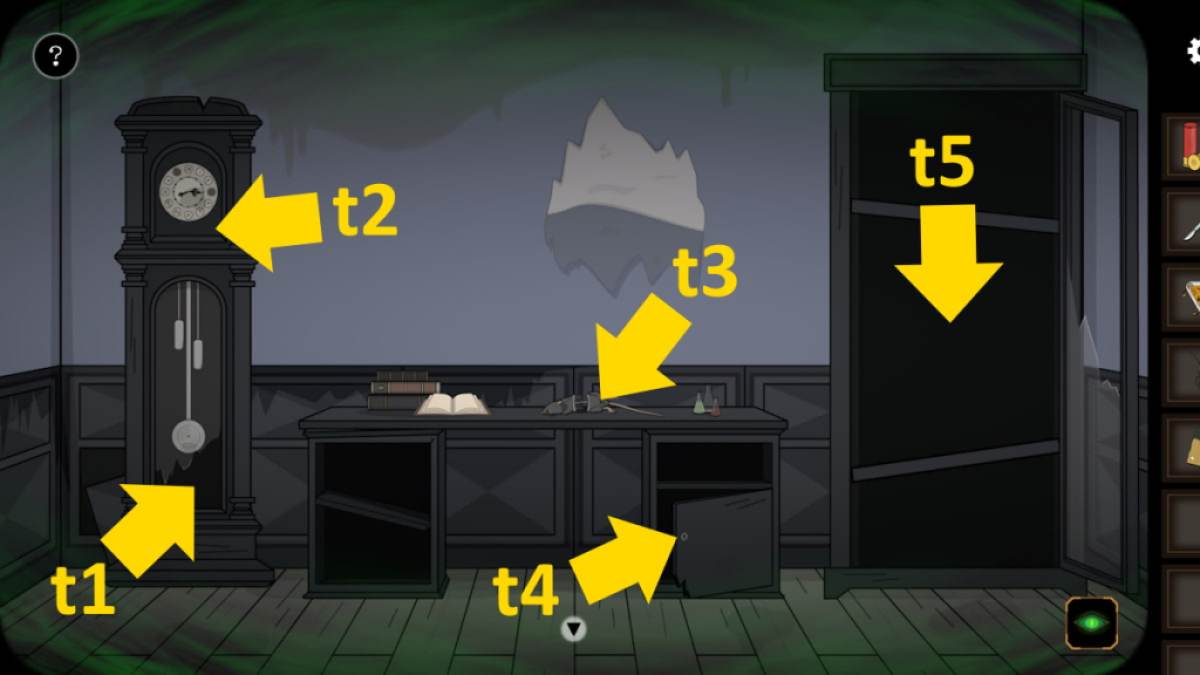
Image by Pro Game Guides
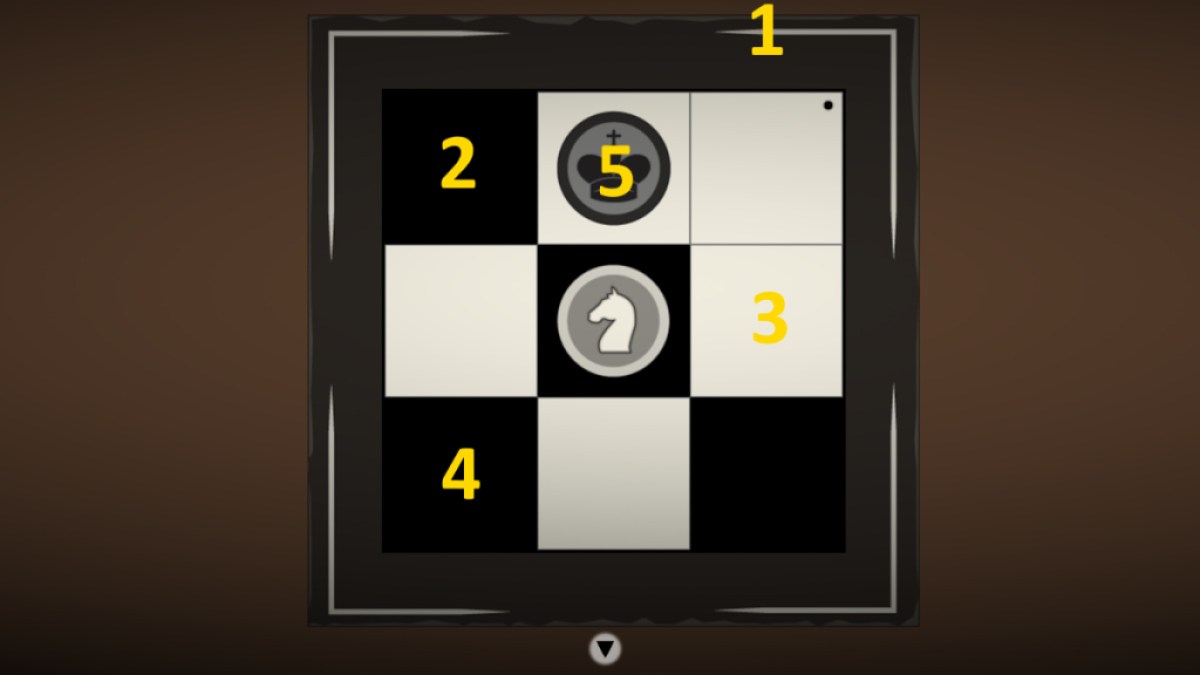
Image by Pro Game Guides
