redundant chapter ? Bonus !
If you ’ve made it through the main story of Royal Legends : Marshes Curse , you ’ll now know that it is n’t the final stage , as a fillip chapter look . It ’s about a third as long as the main story , with all the RPG - infuse point - and - click puzzler we ’ve do to love . But just because we ’ve made it this far does n’t make some of the challenges any easy . So if you ’re looking for a bit of guidance to make it through this concluding challenge , check out my Royal Legends 1 bonus chapter walkthrough below .
Royal Legends 1 - Marshes Curse Bonus Chapter full walkthrough
This is a walkthrough for the last bonus chapter of Royal Legends : Marshes Curse , which only becomes uncommitted once you’vecompleted the main part of the game , go through the credits , and clicked play once more to extend . If you ’re stuck on an earlier part of the game , check out these guides instead .
Note that I’veplayed the game on PC , not on Mobile River . I did come up againstsome bugsbut only in a span of puzzles . It meant that I could n’t play one or two puzzle , but I was able to skip them using theHint feature article , so I could still complete the secret plan .
Extinguish the Fire
accumulate theWitch ’s Belongingsnear theBarrels(a1 ) , then click theGate(a2 ) and take theMap , Note , andPitchfork . Next , select thePile of Hay(a3 ) and use the Pitchfork to move it , aim theWitch ’s Coins , Knife , Rope , andLadder .
Select theWindow(a4 ) and use the Ladder to get to the ceiling , and take the Brace , Shovel , and Mallet . Now snap the Cellar Entrance ( a5 ) and use the beetle to break the ignition lock , starting a simple physical object - finding or match - three puzzle . Once thoroughgoing , you ’ll get a sacking of Sand . apply the Sack of the Sand on the Fire ( a6 ) to get rid of it . After a cut scene , the innkeeper will give you aKey , allowing you to move on to theCrossroad .
Walk the Secret Path
Once at the crossroad , click in front of theField(b1 ) to take theSieveandSaw . Now click theWell(b2 ) and take theNote , then employ the sawing machine to remove the log and take theBoards . Now choose the areaLeft of the Well(b3 ) and use the Rope , Planks , and Brace to make theRope Ladder . You now have access toBy The Lake .
When you ’re by the lake , take theWitch ’s Belongingsby the steps ( c1 ) , then take theFishing Rodby theTree(c2 ) . Next , prime theSand(c3 ) and take theHandkerchief , then use the Fishing Rod on the meshing in the water here to get theGrindstone(you have to take the Handkerchief before you may practice the Fishing Rod ) . In your inventory , apply the Grindstone on the Knife to make aSharpened Knife(you have to move the Harlan Fiske Stone to sharpen the knife in the close - up ) .
Next , pick out the buried box by theWater(c4 ) , take theWitch ’s Coins , then utilise the Knife on the net by the box and take theBroom , plus aNote . you could now utilize the Shovel on the dirt underneath and get thePendant . Combine this with the Map in your armory to derive thefinished Map .

Walking the Secret Path
Move back to the crossing , select thePath(b4 ) on the right hand , and use the Map ( see range above ) . dawn the leftover marker to advance to d2 , take theRake , then move back and employ it to remove the central itinerary at d1 .
Now move ahead on the primal course to d3 , then go right to d4 ( you may postulate to get down the map ) and garner thePlanksthere . Move back to d3 , then apply the planks to allow yourself to go exit across the river to d5 . Now go depart to d6 , get theRope , go back to d5 , and practice the Rope on the tree on the rightfulness to open that path and move to d7 . With that , you ’re through the Secret Path at theTrail by the Ruins .
Getting to the Herbalist
At the Trail by the Ruins , pick out theMuddy Puddle(e1 ) and use the Sieve to fish out theMoon Amulet . Click theRuins Entrance(e2 ) next , and grab theSun AmuletandWheel . Next , quality theTree(e3 ) and add the Sun and Moon Amulets to the old bag there , take theBucketandSicklefrom inside .
Related : Echo Bay Murders – Chapter 1 Walkthrough
expend the map to return to the crossroad and expend the Sickle at the battleground ( b1 ) to realise it and take theOil LampandIron Rod . Now select the Cage ( b5 ) here and use the Handkerchief and Iron Bar to recrudesce into it , contain theKeyfrom inside ( do n’t forget theWitch ’s Coinstoo ) . Return to the lake and use the Key on the box by the tree ( c2 ) , starting a compeer - three or aim - match puzzle . Once stark , take theAmuletfrom inside the box .
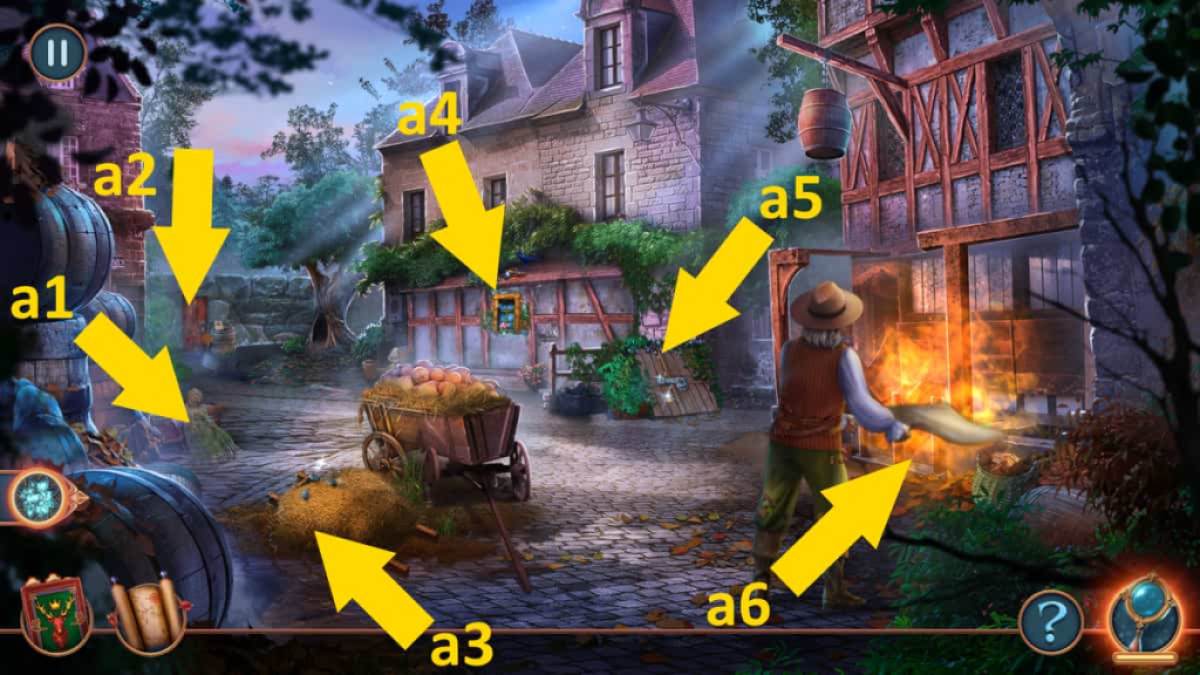
Image by Pro Game Guides
apply The Amulet on the purple luminescence ( c5 ) to remove the barrier and take theWooden PyramidandSlingshot . Move back to the lead by the ruins and use the Slingshot to get theApplefrom the Sir Herbert Beerbohm Tree ( e3 ) . Select theTent(e4 ) here , give the Apple to the badger , direct theWickandNoteafter it has gone . Now utilize the Broom to remove the dirt here and take theHandle(don’t lack theWitch ’s Coinshere too ) .
Fixing the Magic Lamp
Go back to the Well ( b2 ) and contribute the Bucket and Handle , accept theNutandMagnifying Glassafterward . Now quality theCart(b6 ) , add up the Wheel and Nut , taking theCorkscrewonce the cart has make a motion . Go to the lake next and apply the Corkscrew to open up the wooden boxful by the water ( c3 ) to get theFunnelandScrollfrom inside .
Put the Scroll in the hired man of the statuette by the water ( c4 ) , and the corner here will open , too , make you the Inlay and Oil . you may now pick out the Oil Lamp in your armoury and add the Wick , Oil , and Glass to get the Magic Lamp . Go back to the trail by the ruination , pick out the Ruins Entrance ( e2 ) , and practice the Magic Lamp to begin a puzzle to scare by the unusual creatures . See the image for the solvent above , and once complete , move on tomeet the Herbalist .
Help Drive the Witch Out
As the struggle rages , take theAmuletin the flowers ( f1 ) and then snap theHole(f2 ) there , taking thePlate . Now chatter theCage(f3 ) and use the Pyramid and Plate to force it open , taking theClothespinandMagnetfrom at heart . apply the magnet to open theMetal Box(f4 ) and get theNoteandProtection Scrollfrom inside , which you’re able to use on theBattle(f5 ) to start a symbolisation - matching puzzle . Once double-dyed , you canspeak to Priscilla .
Help Priscilla
Inside the house , take theWitch ’s Belongingsfrom the mantlepiece ( g1 ) and then select theCauldron(g2 ) , taking theWitch ’s Coins , Magic Chain , Note , andFlask . Now click theTable(g3 ) , tote up the Flask and Funnel to the flask already there , and take theAcid . Select theBack Door(g4 ) and use the Acid on the chest padlock and take theHookandDoor Handlefrom inside .
Head outside and select theShed Door(h1 ) , using the Inlay and Door Handle to specify it . Complete the compeer - three or matching puzzler ( your pick ) to get theInsect Repellant . Use the Repellant to remove the Wasps by theGate(h2 ) , giving you access to theForest Path . channelize to it now .
Find the Mushrooms
Take theAmuletfrom just below the toadstool ( i1 ) , then chatter theToadstool(i2 ) and take theNoteandRake . Next , select theBox(i3 ) and use the Rake on the leaves to get to theScythe , Mushroom , andTurquoise Flower . Now you’re able to get across theReeds(i4 ) and apply the Scythe to bump off them , taking a secondMushroomand using the Clothespin to get theComb .
concern : Lost Lands 3 Full Walkthrough ( Golden Curse )
maneuver outside the mansion and practice the Comb on theBox(h3 ) , drive thePadlock , Mushroom , Branch , andWitch ’s Coinsfrom indoors . sum the Hook and Padlock to the Magic Chain in your inventory , creating aChain With Hook . Now utilize it on the Hole ( h4 ) to fish out the bag there , take theAmuletafterward .
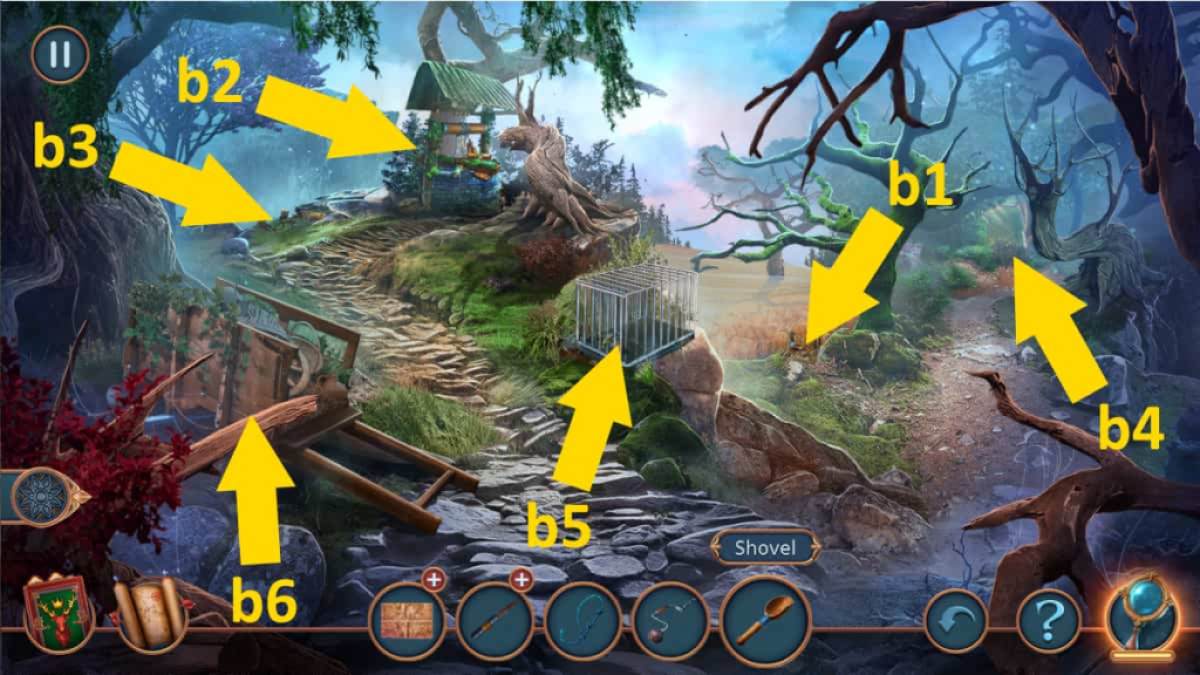
Image by Pro Game Guides
Back inside Priscilla ’s Hut , use the Amulet on the back doorway ( g4 ) and complete thegemstone mystifier , read theNoteandKeyafter you ’re finished . Move back to the forest path and utilise the Handle to open up the Box ( i3 ) , allowing you to take anotherNote , theBrush , the finalMushroom , and some moreWitch ’s Coins .
While in the woodland , select the Toadstool once more ( i2 ) and expend the four M mushrooms to spread out the room access , flummox theCode , Magic Mushroom , andBroken Pickaxe . Go into the business firm now and use the code with the boxful on the Table ( g3 ) , following the code to open up the box and take theNote , Wooden Peg , andPowder .
Select the Cauldron ( g2 ) and add the Turquoise Flower , Branch , Magic Mushroom , and Powder to make thePotion of Strength . Take it and give it to Priscilla , who will honour you with aMagic Scoop Net .
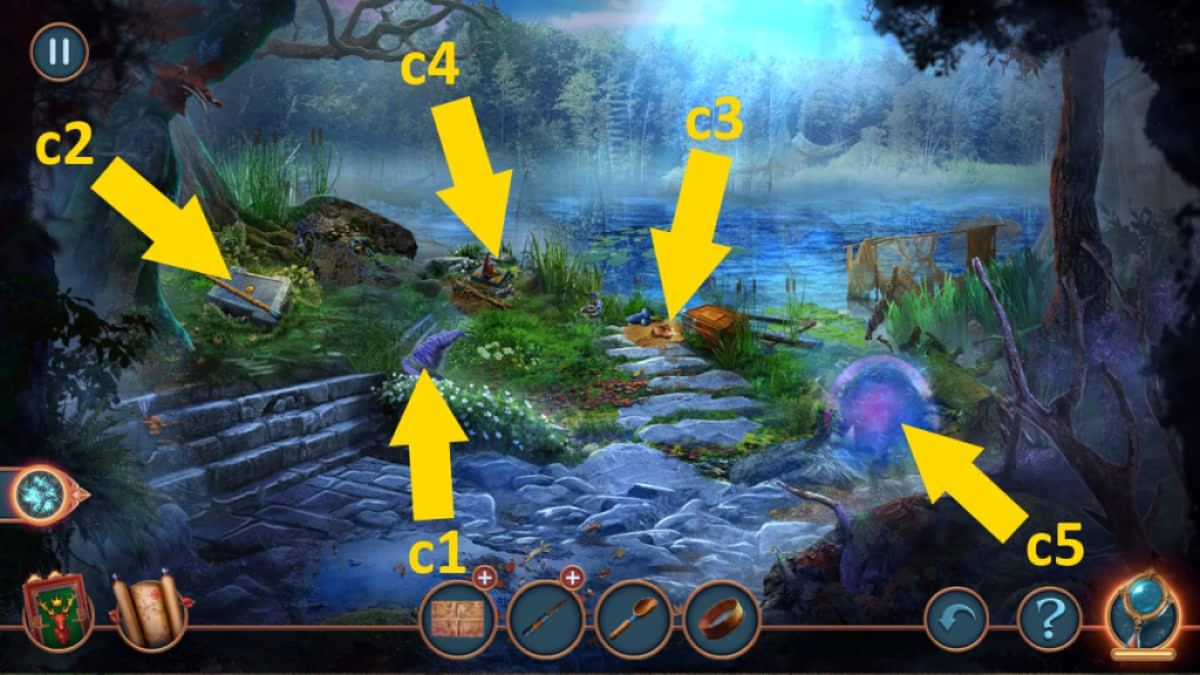
Image by Pro Game Guides
Go to the forest course and use the Magic Scoop Net at thePond(i5 ) to trigger a mates - three or frog - finding mystifier to get theMagic Staff . Now you’re able to use the Magic Staff to remove the rock cover theCave Entrance(i6 ) , allowing you to move on to theCave .
Put Silvan to Sleep
Once inside , click theWooden Box(k1 ) to open up it , taking theNoteandHerbs . Now select theSack(k2 ) and pick up theWooden Box , Censer , andNew Blade . choose the Broken Pickaxe in your inventory and tot up the Brush and New Blade to make thePickaxe . Now you could pick out theRight Back Wall(k3 ) and apply the Pickaxe to break through and get aFlaskandParchment .
Use the Flask in the body of water by theFire(k4 ) , pullulate it on the fire so that you’re able to take theStatuette . Now click theLeft Back Wall(k5 ) and use theStatuetteandWooden Pegto make a ravel , starting a teaser . Click the right objective to climb up and enterSilvan ’s Lair(see above ) .
snaffle the last collectibleAmulet(m1 ) , then add your Box to theBoxes(m2 ) . you’re able to now pick out the smallNook(m3 ) above it and take theWitch ’s Coins , Feather Pen , andTongs . take the area at the end of theSingle Plank(m4 ) and take theMagic StoneandNote , then employ the Tongs to get theHot Coal . Add the Herbs and the Hot Coal to the Censer in your inventory to make theCenser With Potion , then use it onSilvan(m5 ) to put him to sleep .
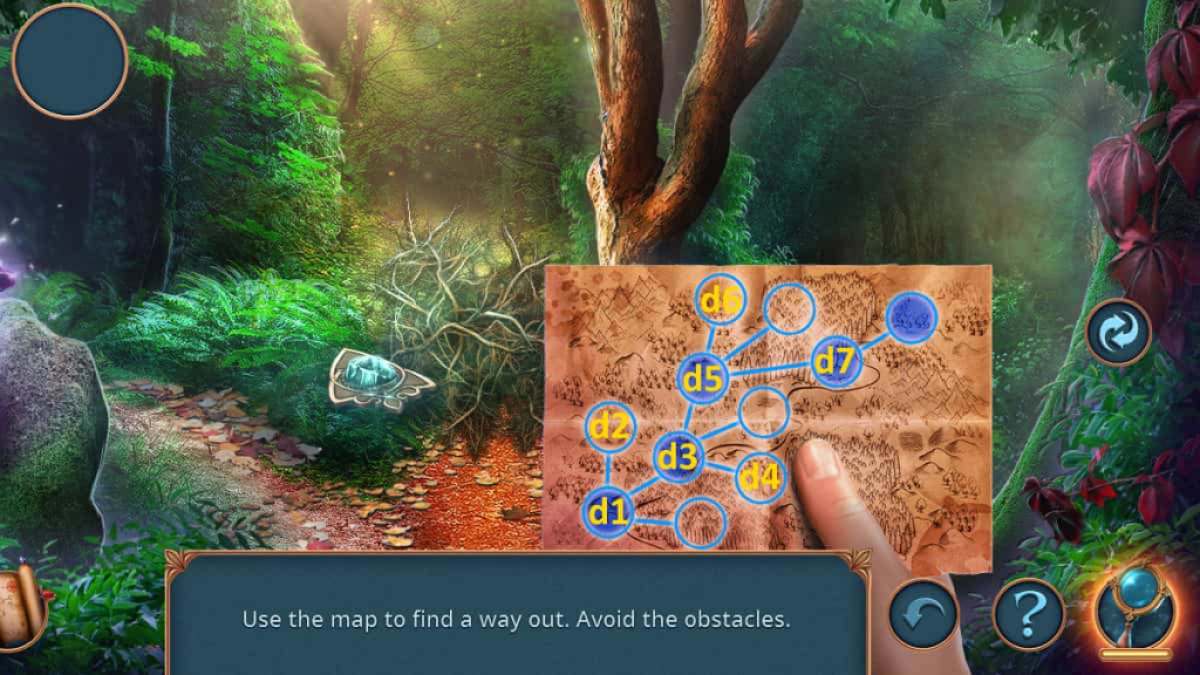
Image by Pro Game Guides
Destroy Lacrima’s Crystal
You now have accession to the Ominous Grove behind Silvan ( m5 ) . Once there , click theBag(n1 ) and take your secondMagic Stoneand theScrewdriver . Now choose thePedestal(n2 ) and use the Screwdriver to remove the plate , and take the Note , Incomplete Dynamite , andHook . Now prize theTreestump(n3 ) and use the Hook to get theWheel .
Related : Must bunk The Wizards Castle Walkthrough
Back at the cave , use the Wheel on the Box ( k1 ) to get theMatchesandSickle , as well as your finalWitch ’s Coins . habituate the Sickle to interrupt launch the Sack ( k2 ) and get theSpongefrom inside , then add the Feather Pen and Parchment here to copy the symbol on the wall , taking theDrawingafterward .
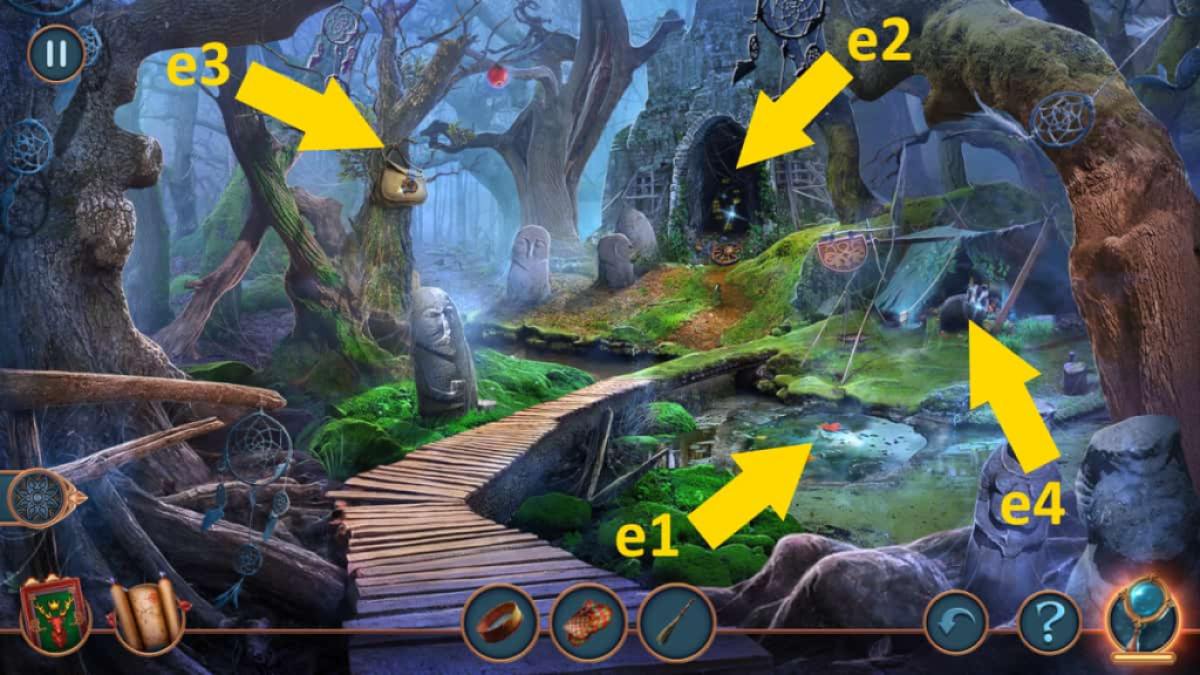
Image by Pro Game Guides
Go to Silvan ’s Lair and come home the wall at the end of thePair of Planks(m6 ) , begin a match - three or symbol - finding puzzle . You ’ll be rewarded with theBarrette . Use it to open theChest(m7 ) and get the concluding Magic Stone , mean you could now head to the Ominous Grove and add them to the pedestal ( n2 ) . blame up theStar Amuletthat appears to trigger a cutscene .
How to defeat Lacrima in Royal Legends 1 Bonus Chapter
Use the Star Amulet on the Treestump ( n3 ) and take the Net . Head back to the cave and habituate the Net in the Pool ( k4 ) to catch aFish , which you could give to the Bat in the Nook in Silvan ’s Lair ( m3 ) to make it move aside . Take theGunpowder .
Add the Gunpowder to the Incomplete Dynamite in your inventory to makeDynamite , then practice it with the Matches at the conclusion of the single board ( m4 ) to blow the wall and take thePotion . Head out to the Ominous Lair once more , use the Potion with the Sponge on the Bag ( n1 ) , and getPriscilla ’s Amulet .
select her with the Amulet take to enter a game in which you take towin more chip than Lacrima to make headway . Each time you place a chip adjacent to an opposite ’s buffalo chip , you take it , so look for any chance to do so . you may keep trying until you win , after which you ’ll have discharge the game !
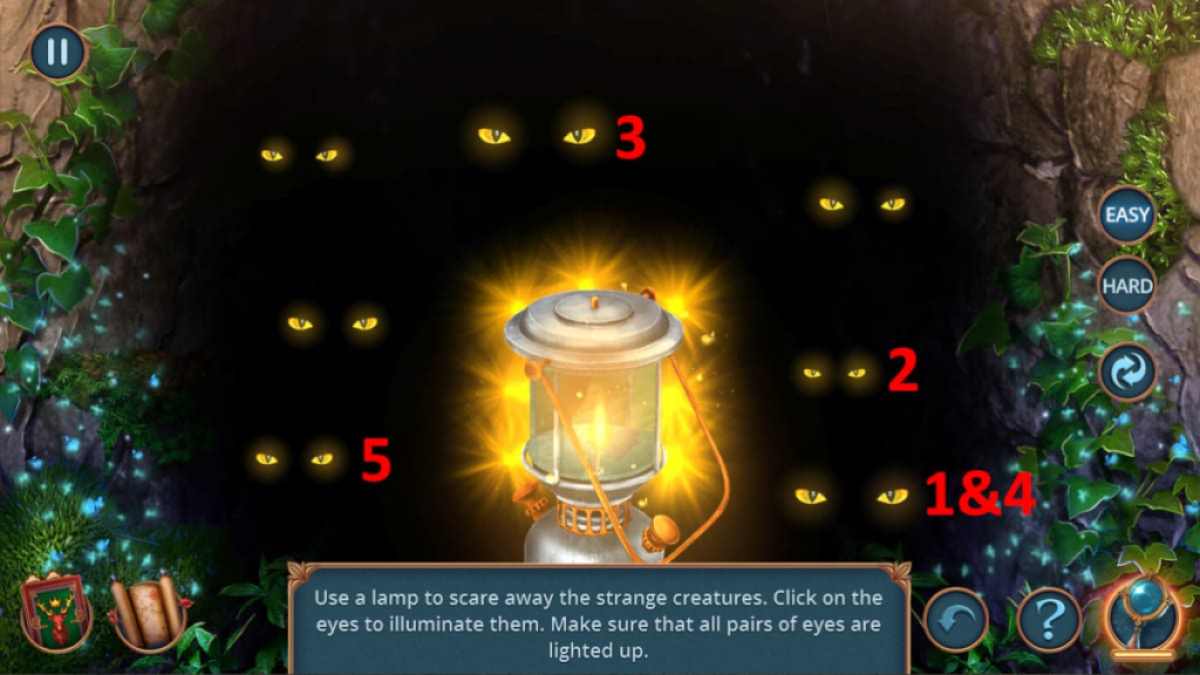
Image by Pro Game Guides
For more point - and - click walkthroughs at Pro Game Guides , also check outAbandoned Walkthrough & Puzzle SolutionsandClue The Murder of Mr Black – Full Walkthrough .
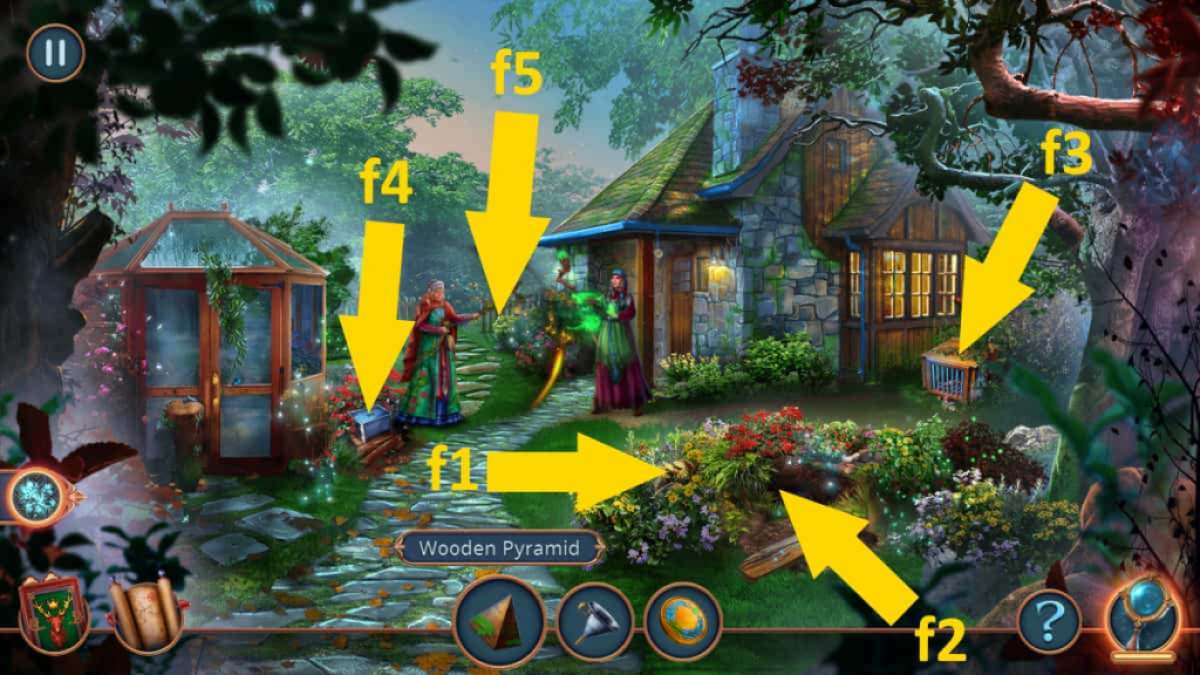
Image by Pro Game Guides
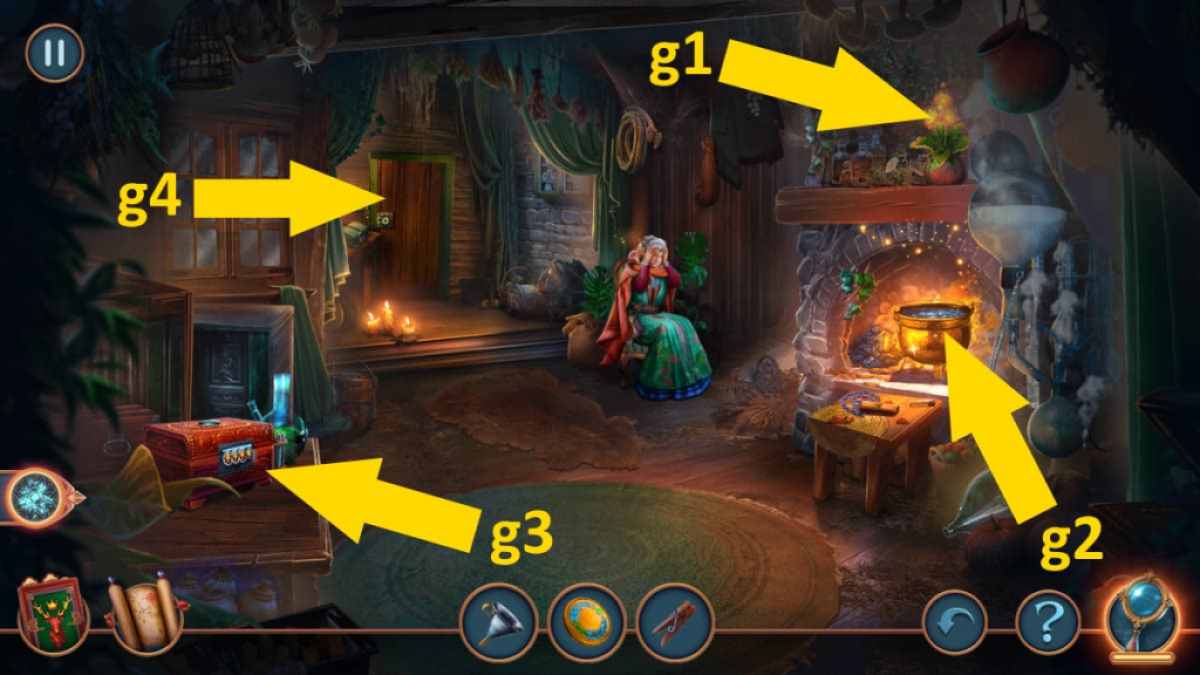
Image by Pro Game Guides
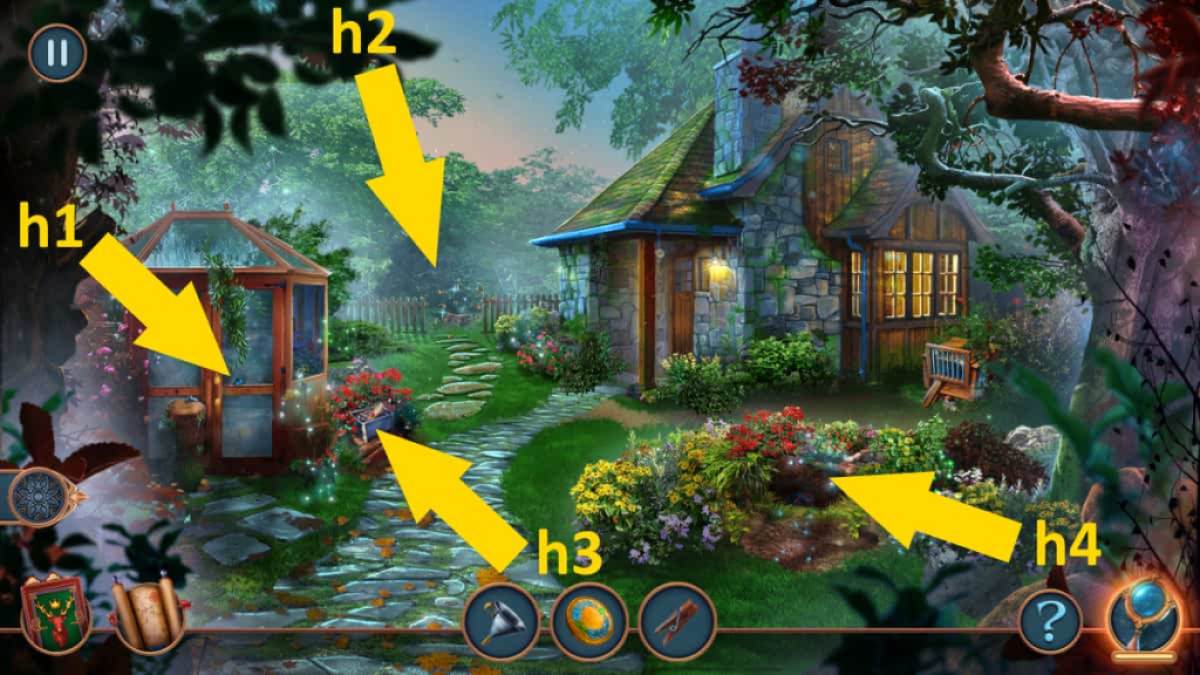
Image by Pro Game Guides
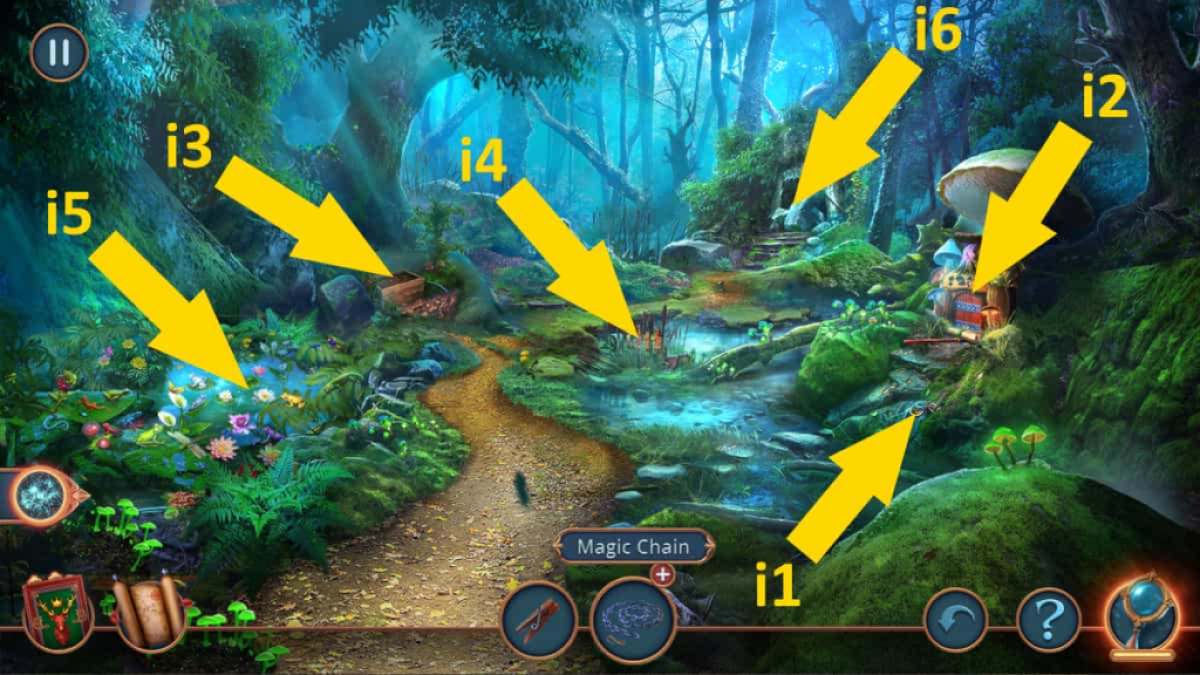
Image by Pro Game Guides

Image by Pro Game Guides
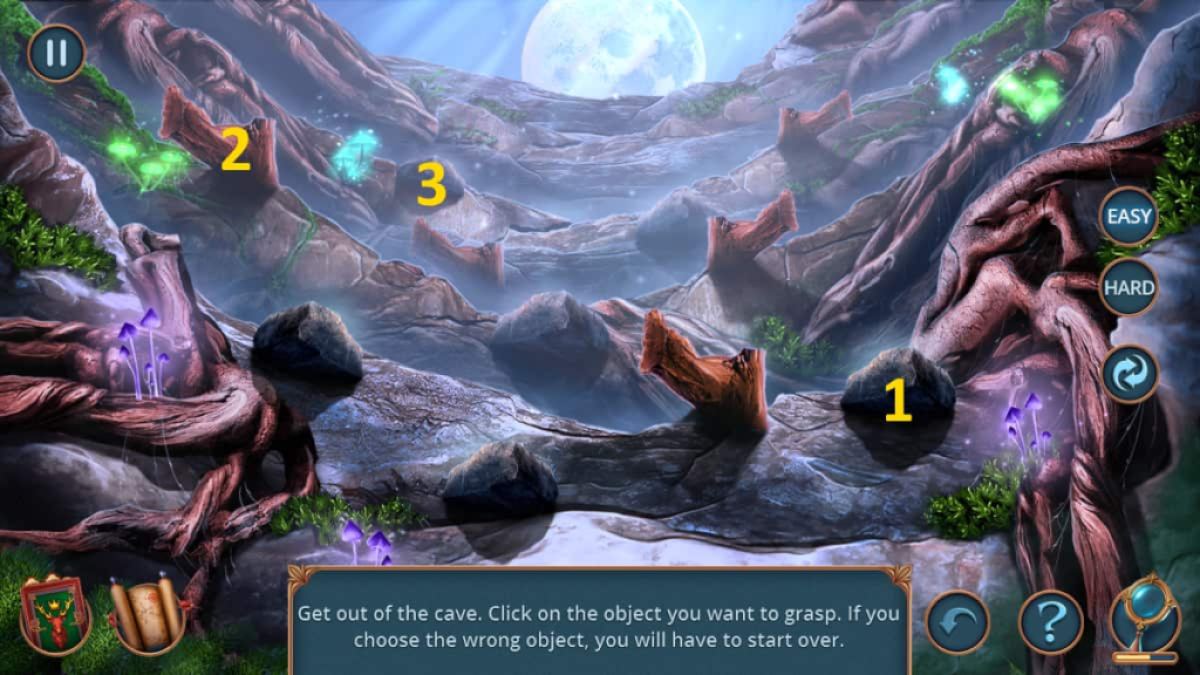
Image by Pro Game Guides
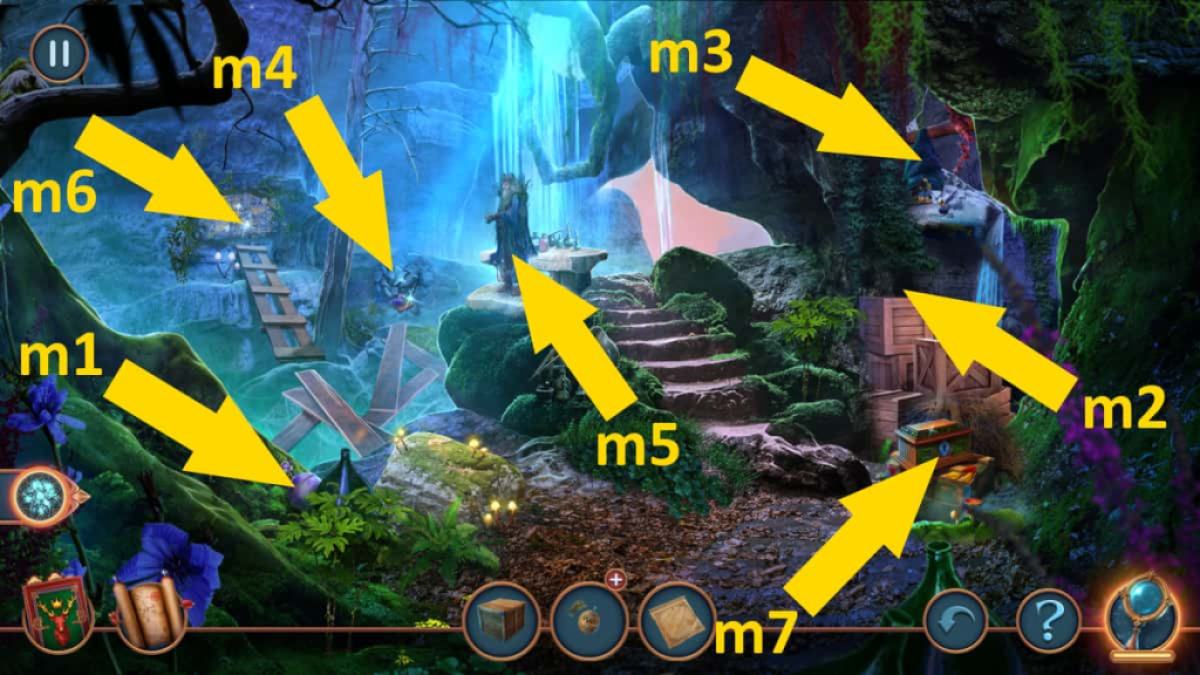
Image by Pro Game Guides
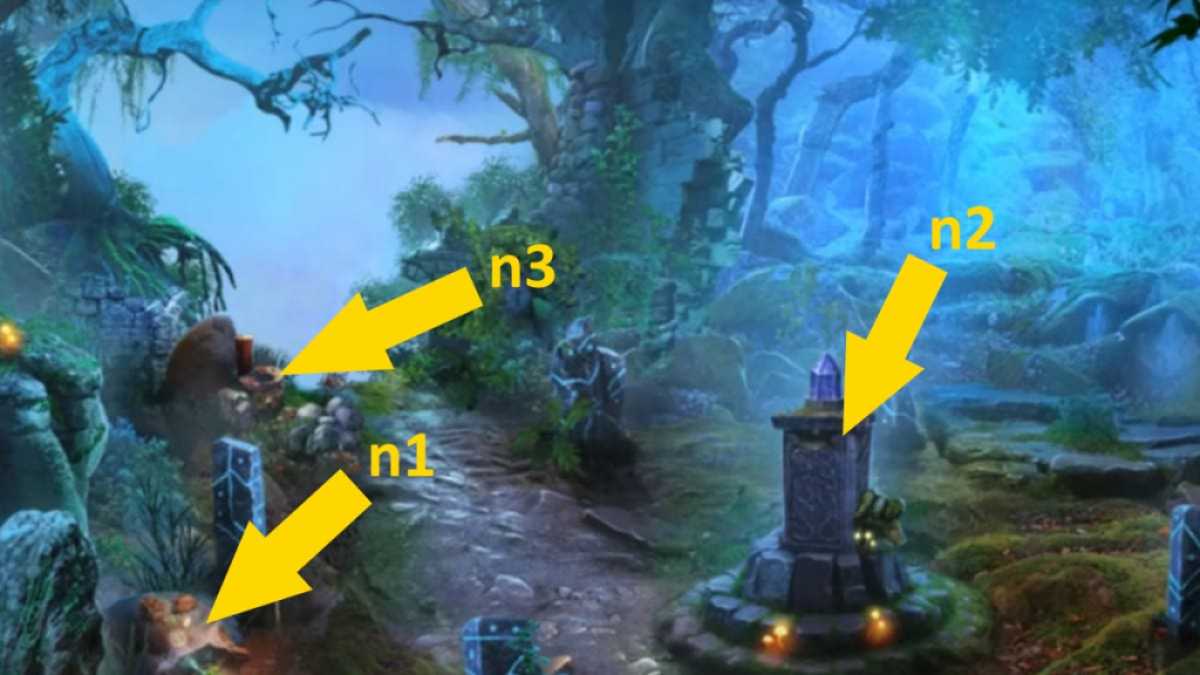
Image by Pro Game Guides
