break out of pokey !
Royal Legends is a Graeco-Roman point - and - come home puzzler with fantasy RPG factor . You ’re presented with a series of scenery in which you ’ll have to discover and combine object , using them to open up new areas and unavowed compartment as you follow the storyline and stark quests . In the first part of Royal Legends 1 , Marshes Curse , you were tricked by the Witch and give in jail , but luckily you have some allies . Below you ’ll happen Chapter 2 of our Royal Legends 1 walkthrough .
Royal Legends 1 - Marshes Curse Chapter 2 full walkthrough
This is thesecond partof my Royal Legends 1 walkthrough , covering you from when you’rethrown in Jailup to when you go through the Druid’sportal toMargeria ’s House . If you need help and information on the start or end of the game alternatively , comply these link to the other sections of this walkthrough :
relate : How to beat Riddle School 5 – Walkthrough Guide
observe that I ’m playing this on PC , so theexperience on a mobilemay be a little dissimilar . Also , mention that I ’ve experiencedseveral pesky bug in puzzlesin the game , which have sometimes meant I ’ve had to skip them as the mechanics do n’t function . However , skipping via a Hint has always worked to get around the hemipterous insect andI was able to complete the game .
Breaking Free
Grab the Witch ’s Belongingsunder the bunk(a1 ) , then click theBarrel(a2 ) and take theShackles . Select theBunk(a3 ) and take thePlank . Click theWindow(a4 ) for a cut scene , after which you ’ll get your bag back . take the bag in your armoury and take theMagnet , Leaf Cup , Corkscrew , andPendant .
Use the Corkscrew on the Cork on the Barrel ( a2 ) , and take theWitch ’s Coinsand theCork . utilise the Cork on the spike on theDoor(a5 ) to slide start the hatch , then give theMouseby the Barrel theCheesethat the safeguard give you . you could now take theHeavy Boot . Use the Boot and the Pendant on thebricks by the Bunk(a3 ) where you remove the Plank and complete the wide-eyed teaser ( or play match - three ) to gain theFile . habituate the file on the windowpane bars ( a5 ) toescape the cellular phone .
Hide from the guards
Select theNewspaper Stand(b1 ) and take theBoltandSeam Ripperfrom the land in the plant pot . Then use the Leaf Cup to get the picture into the ground and take theDoor Knocker . Click theTannery Door(b2 ) and seize the Door Knocker to it , after which you ’ll have accession to theWorkshop . Do n’t miss theAmulet(b3 ) on the Tannery step .
recruit theWorkshopand choose thecupboard on the right(c1 ) . Take theIncomplete SpectaclesandMatches . expend the Magnet to open themetal lockholding thetop cupboard doorsopen and take theFeather DusterandWitch ’s Coinsfrom inside .
Fix the glasses
Click thetable(c2 ) and employ the Feather Duster to empty the glass . Now take the secondPlank , Lenses , andScraperfrom the table . Take theWhich ’s Belongings(c3 ) from the leftfield of the table , then select theBroken Stairs(c4 ) and habituate the two Planks to start a simple plank - size mystifier . You ca n’t go amiss , as you but necessitate to keep placing a board until it is straight ( some footstep combine two planks ) . Once all are put , you ’ll have access to the Cellar .
Go into theCellarand snap theAmuletby the barrel ( d1 ) , then get through theDumb Waiter(d2 ) at the back of the root cellar , and pluck up theVise Lever . Next , tot the Shackles to the chain here and pull the lever to spread the alloy hatch . Take theTwo - Pronged Forkfrom inside .
Click theBox(d3 ) and take theBroken Hammer , then use the Two - Pronged fork to open up the boxful and take theBookandWirefrom the boxful . Select the Incomplete Spectacles in your stock and add the Bolt , Lenses , and Wire , to make theSpectacles . apply the map to go back upstairs to the Workshop and give the Spectacles to Heinrich . He ’ll give you the gloves you need and hisRing .
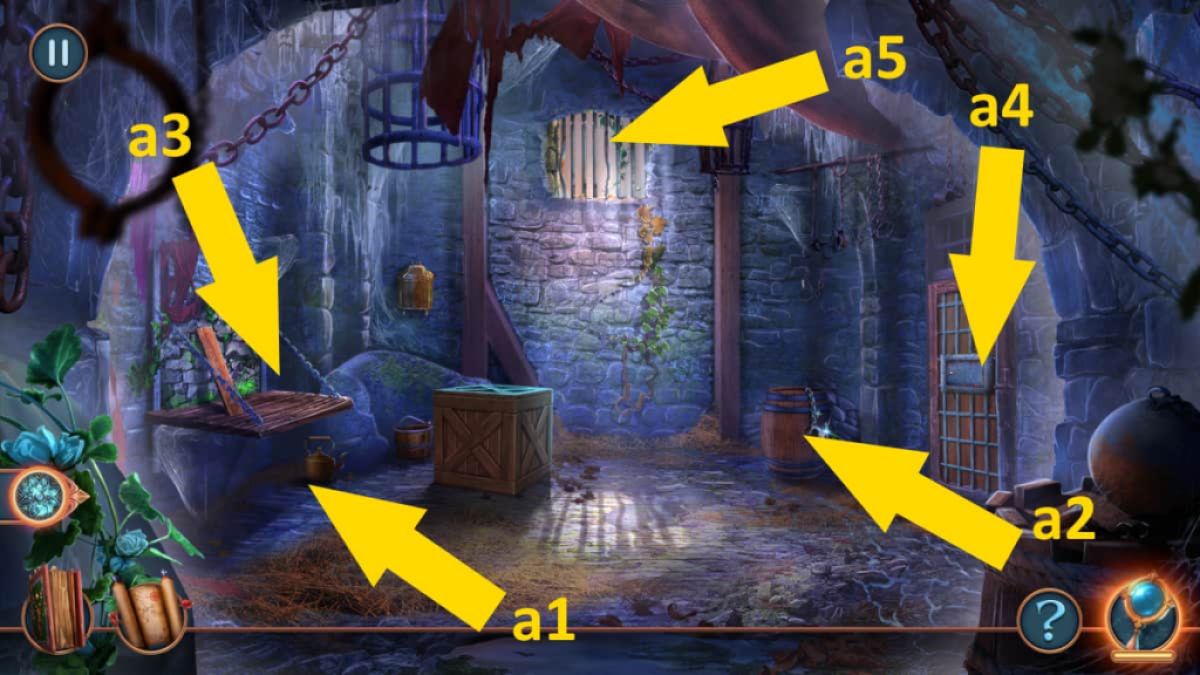
Image by Pro Game Guides
Get to the Druid’s house
clack the mesa ( c2 ) and then the Green Bag , use the Ring to open it , then complete the unsubdivided puzzler to open it up . Take theComb , then habituate the Seam Ripper to remove the leather plot of ground on the inside of the bagful and take theHandkerchief .
Head outside to the street and select theFountain(b4 ) , apply the Handkerchief on the impoverished pipe , and sum up theStrapthat ’s by the spring already to complete the patch - up line . Once the urine has drained , take theAwland theWitch ’s Coinsfrom the dry fountain . Finally , use the Scrapper to off the moss here and take theCoinsunderneath .
Related : Lost Lands 3 Full Walkthrough ( Golden Curse )
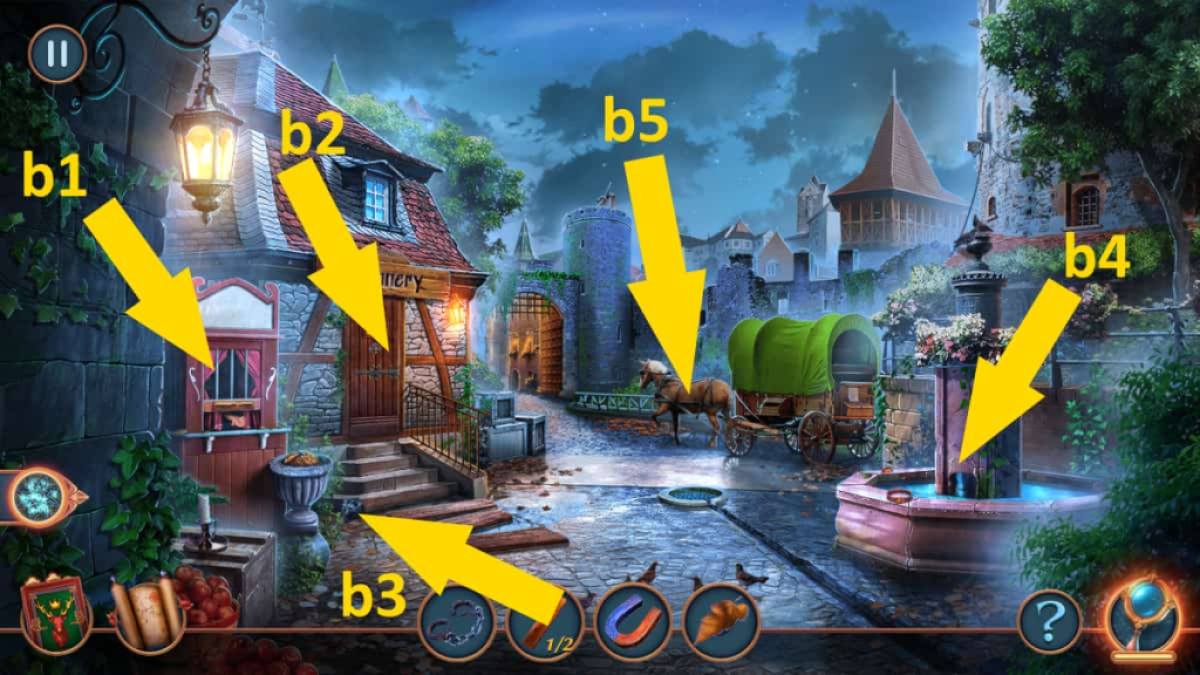
Image by Pro Game Guides
Go to the paper stand ( b1 ) and put the Coins in the hand to get theNewspaper . Now go back down into the cellar and select theFireplace(d4 ) . tot the Matches and Newspaper to illumine the fire . Once the fire is glowing , click it again to find the point required , or play match - three and get thePike Poleafterward . Use the Pike Pole to get aWooden Chipand the secondBookfrom the dumb waiter ( d2 ) .
Move back to the Workshop and practice the ledger on the shelf in the cupboard ( c1 ) to launch the secret compartment and take theFanand aBent Amulet . direct into the Cellar again , select the Vise ( d5 ) , and bestow the Vise Lever to it . utilize theBent Amuletin the Vise ( set the Amulet , then click the Vise Handle ) to get anAmulet .
Select theShelves(d6 ) , take theWitch ’s Coins , then expend the Amulet to unfold the draw . Remove theChalkandHammer Headand unite it with the Handle and Wood Chip in your inventory to make aHammer . Head outdoors , select the Horse ( b5 ) and use the Hammer to fix its shoe . Finally , make out the simple driving game to get off the town .

Image by Pro Game Guides
Stopping the Witch in Marshes Curse
Click thePond(e1 ) and take theTweezersandCogwheel . Next , sink in the Rope and Stick on the ground here and add the Comb from your inventory , making aForkthat you could immediately utilize to move the smoke aside . Take theLily Padyou find under the pasture .
Select theFront Door(e2 ) , place the Lily Pad on the level under the door , and then utilise the Awl to push the Francis Scott Key through the lock . Take theKeyfrom the story and use it to get to the door and inscribe the Druid ’s House .
Once indoors , grab theAmuletneat the Witch ’s feet ( f1 ) then choose thePortal(f2 ) and take theUncharged Magic StaffandWooden Peg . Click theWindow(f3 ) , habituate the Fan to authorize the poisonous gas , then take theWitch ’s Coins , Note , andMagical Dust . Use the Magic Dust on the Uncharged Magic Staff to make aMagic Wand , and use it on the Witch to save Aldred the Druid . After a slash scene , he ’ll give you theRug Pattern .
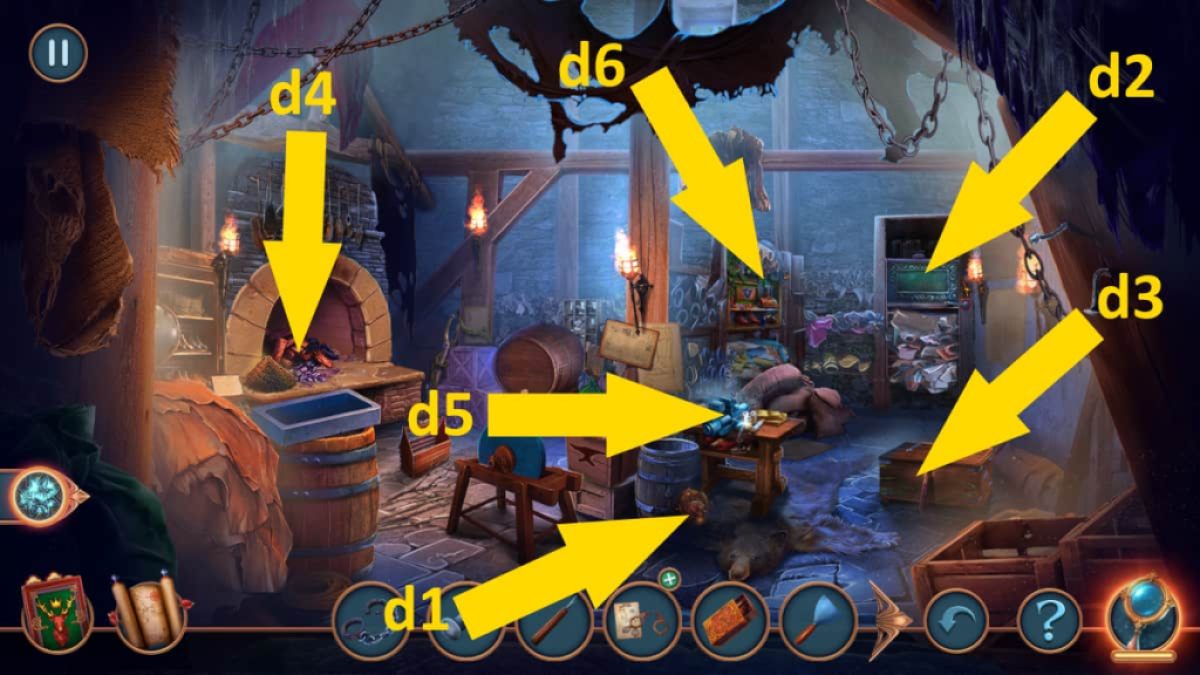
Image by Pro Game Guides
Healing Aldred
Click theLoom(f4 ) , add together the Rug Pattern , then flick the Loom once more for your choice of pattern - matching or match - three . Once pure , take theRug . Select theDoor(f5 ) , utilize the Rug on the step , and go down into the Pantry .
Take theWitch ’s Belongingsnext to thetree podium chair(g1 ) , then clack theCabinet(g2 ) and pick up theWitch ’s Coins , Holly Twig . lend oneself your Chalk to the Instructions , and then pick up theRecipe .
pertain : Must Escape The Wizards Castle Walkthrough
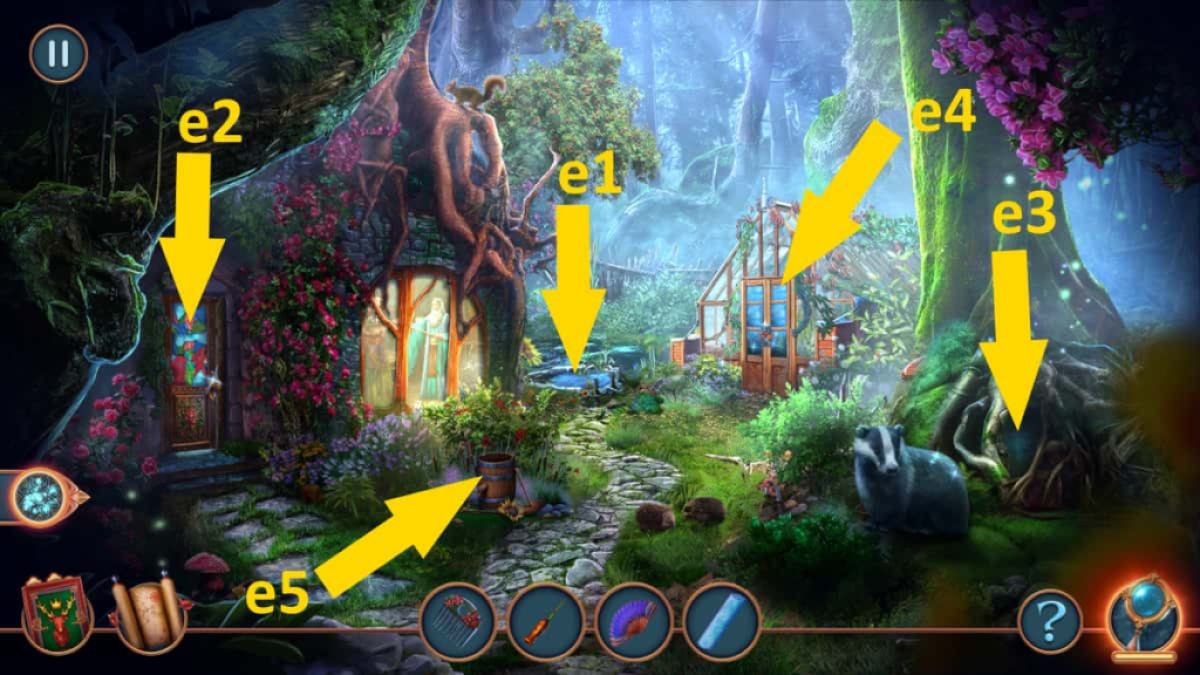
Image by Pro Game Guides
Click theDesk(g4 ) and take theBread . Use the Acid on the padlock to launch the drawer and take theEmpty Oiler . Then use the Tweezers on the drawer to get the third and lastCogwheels . Next , sink in theGrandfather Clock(g5 ) and add the Cogwheels to pop out a puzzle . You simply have to move the red and blue cogs along paths until they ’re in their colored position , and you ca n’t fail . Once done , take theDruid ’s Hatfrom the opened compartment .
Go back to the Pond ( e1 ) and place the Druid ’s chapeau next to the water supply . Take theBowlandSawthat appear in the water . Select theTree(e3 ) , take theWitch ’s coin , then use the Saw to ignore the roots and take theHennaandMetal Sponge . Next , use the Wooden Peg to dislodge the stone that ’s also in the tree trunk and take theRuby Eye .
Head down into the Pantry and select the Desk ( g4 ) , then add together the Ruby Eye to there d bookto start out a matching miniskirt - plot ( answer below ) . Once complete , the Holy Writ will open , and you could take out theRibbon , Portal Activation Instructions , andDragon Scale . Move over to the Chest of Draws ( g3 ) and localise the Holly Twig and Dragon Scale in the grey mixing pot to make theLife - Giving Potion . Take it upstairs and give it to Aldred . Now amply recovered , he explains to you how to defeat the Swamp Witch . He also give you aGriffin Figurine .
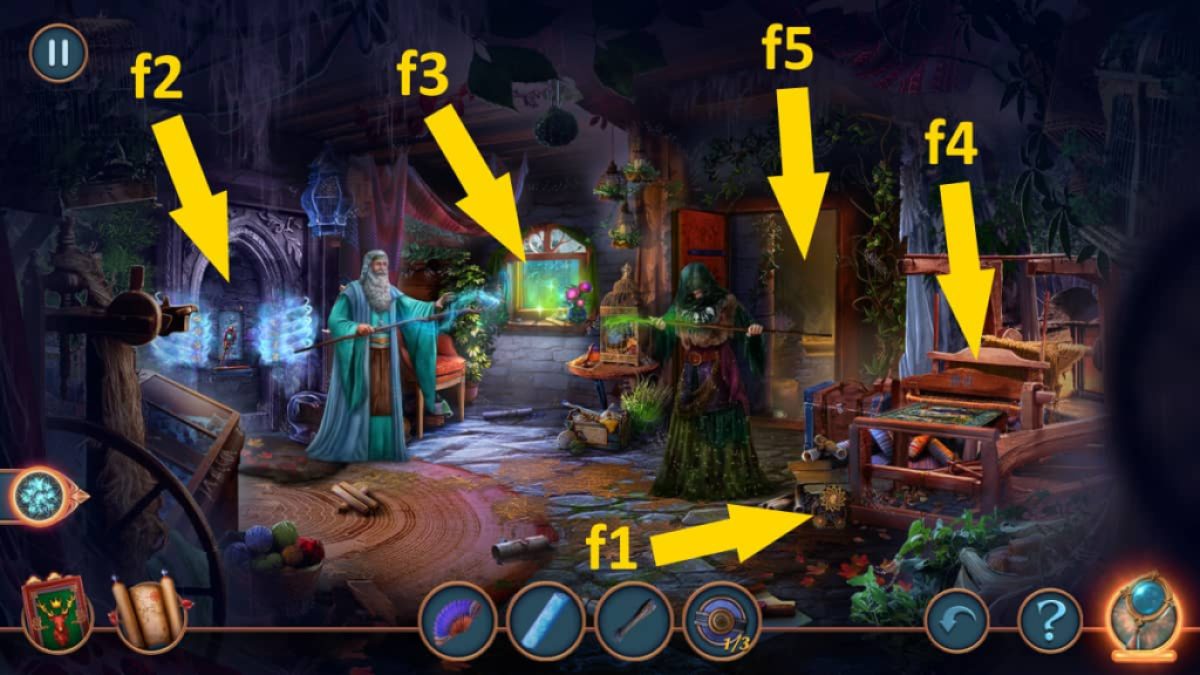
Image by Pro Game Guides
Get to Margeria’s House
Go over to the window ( f3 ) and use the Griffon Figure to prop it open , taking theWrenchfrom the windowsill . Click the bird alfresco for a close - up and give it the Bread . It will fly off , allow you to pile up theTree Amulet . Go back outside and use the Tree Amulet to spread out theGreenhouse(e4 ) . Complete the line up - the - difference mystifier ( or play match - three ) and collect theBerries .
Give the berry to the Wisconsinite by the Tree ( e3 ) , who will move out and allow you to pick up theBroken PliersandCologne . tick on theBarrel(e5 ) and apply the Cologne to get rid of theBees , then pick up theBrush . Pick up theSunflowerhere , too , and put it into the barrel . Place the Empty Oiler under the barrel spout to fill it , then recollect theOiler .
head up down to the Pantry , pick out the Cabinet ( g2 ) , and use the Oiler and Brush to houseclean and then launch the green box , rent theSeashellandWaterfrom in spite of appearance . Select the Henna in your inventory and tally the Bowl , Brush , and Water . You now haveHenna Paint .
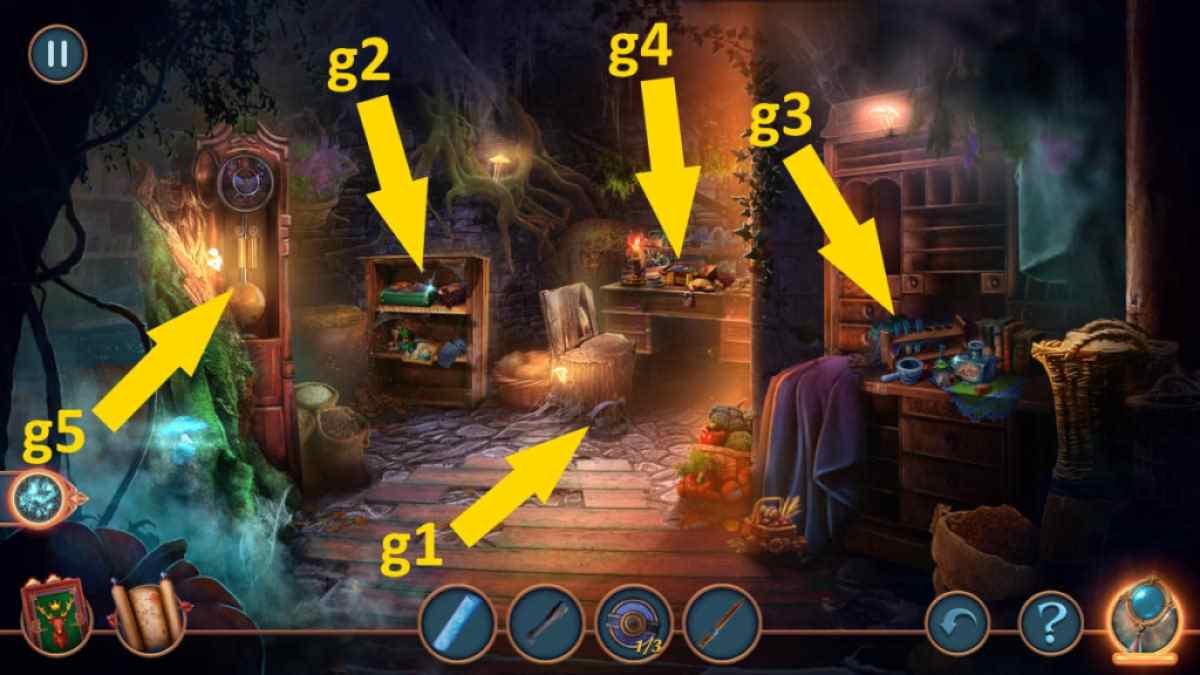
Image by Pro Game Guides
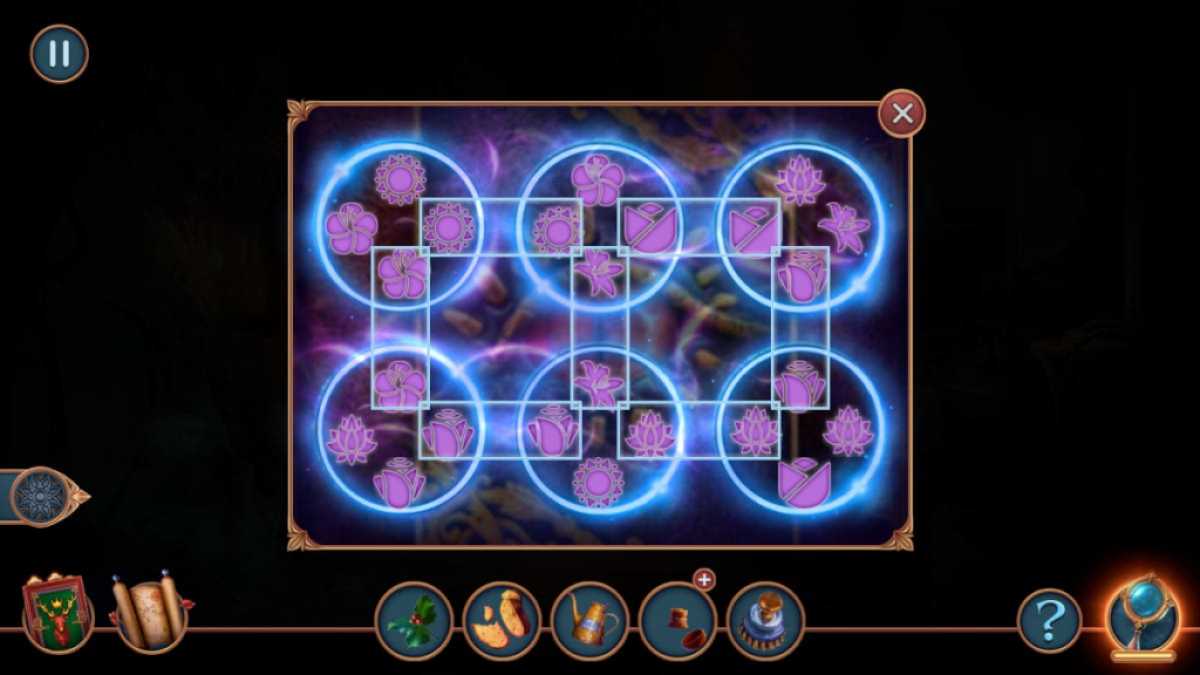
Back up in the Druid ’s House , localise the Portal Instructions and Henna Paint on the Portal ( f2 ) . This starts a symbol - combining miniskirt - game in which you involve to make the hieroglyphic out of the symbols you ’re given ( see above for the correct symbols you need ) . Once terminated , you may move through the portal toMargeria ’s House , and you ’ll have complete Chapter 2 of Royal Legends 1 , Marshes Curse !
If you want to continue with this walkthrough , clickRoyal Legends 1 Walkthrough , Chapter 3to get the next subdivision here at Pro Game Guides !
Screenshot by Pro Game Guides

Screenshot by Pro Game Guides
